
This project was a first for me – hand cutting an Acrylic stem from rod stock. OK, not quite rod stock, as the chunk of acrylic I used was actually an off-cut from a 1″ diameter by 4″ long acrylic stem blank, so the airway drilling was already done when I started work.
A stem, of course, needs a pipe to go with it, and that pipe is a lovely Algerian Briar Bamboo Rhodesian. This pipe was sent to me specifically for an upgrade to an acrylic stem over the factory Vulcanite piece when the pipe’s steward became tired of both the flavour and colour of oxidized Vulcanite. Here is the pipe as it looked when I brought it to the worktable.

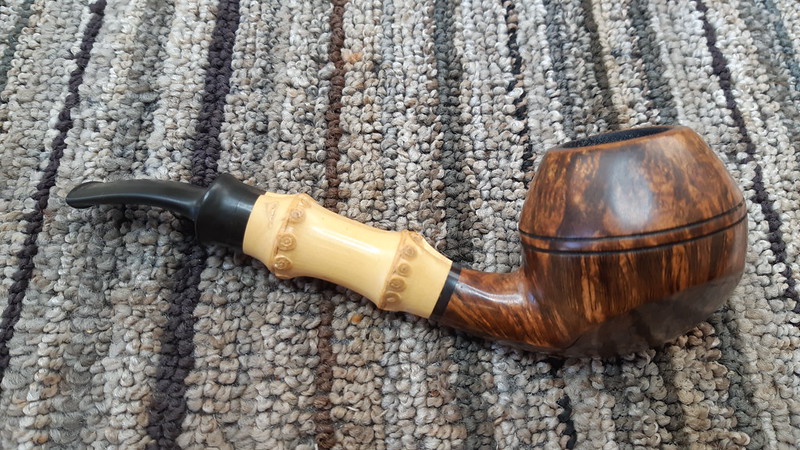


As you can see from the above pics, there is nothing actually wrong with the pipe. In fact, I’d have to place it in my top ten Best Kept Pipes list (I have seen far, far worse come into the shop <shudder>.) Let’s take a closer look at the stem. These close-up shots show you what I was aiming to reproduce in acrylic.
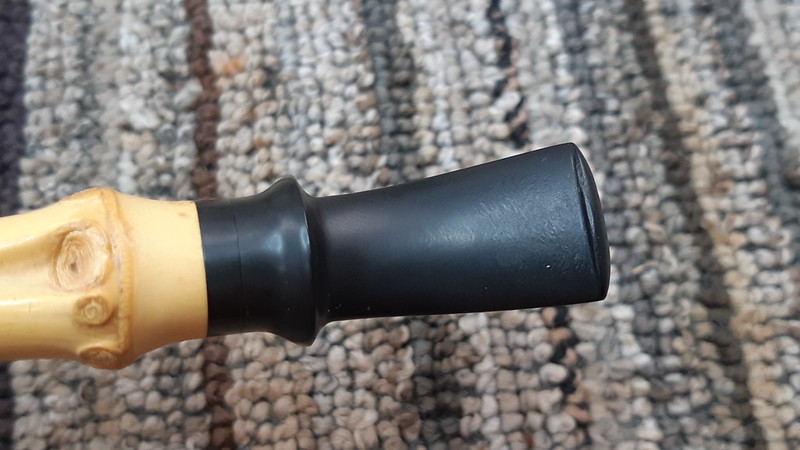
For a first attempt at cutting a stem from rod stock, I certainly chose a doozie – the stem is only about 1-1/2 inches long overall and features a saddle stem that tapers from about one inch wide at the button to around 1/2 inch wide at the shank. In the middle, just to add a bit more fun, is a wide flare. Maybe I should have held out for a nice, boring taper stem??
Oh, and the original stem was to be returned with the pipe as a backup/spare part in case anything happened to the new acrylic stem. This is a smart idea but on my end it meant that I could not alter the stem/shank junction at all if the original stem was to retain its factory fit. Yikes.


Alright! Now that I had my marching orders, I started to get organized. Before I did anything with the acrylic rod stock, however I did my homework. YouTube is a treasure trove of information for just about anything imaginable nowadays, and pipe repair is no exception. If you have not yet discovered his videos, I highly recommend watching George Dibos’ High Grade Pipe Repair & Restoration channel.
I also read up on stem making on Pipedia, and the Pipe Makers Forum and its affiliate Facebook group, gathering tips and techniques that I felt I could reasonably modify to compensate for my lack of a metal lathe, which is what most serious pipe makers use for stem work. I would be tackling this project with basic hand tools only, barring a bit of help with bulk stock removal here and there using a sanding disk mounted in the drill press.
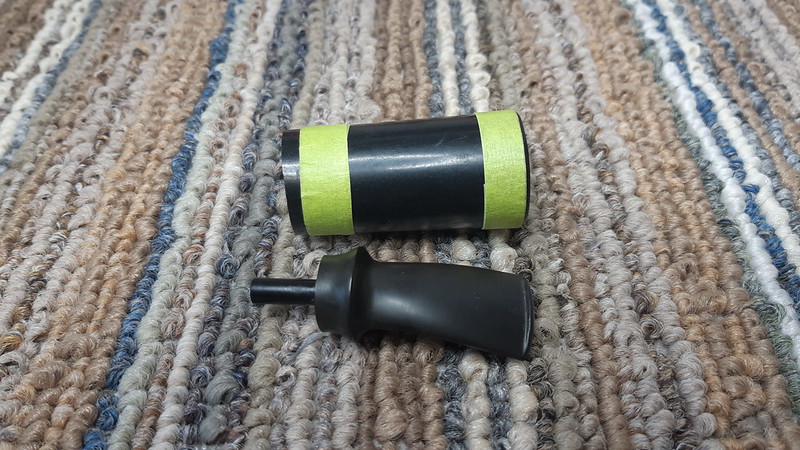
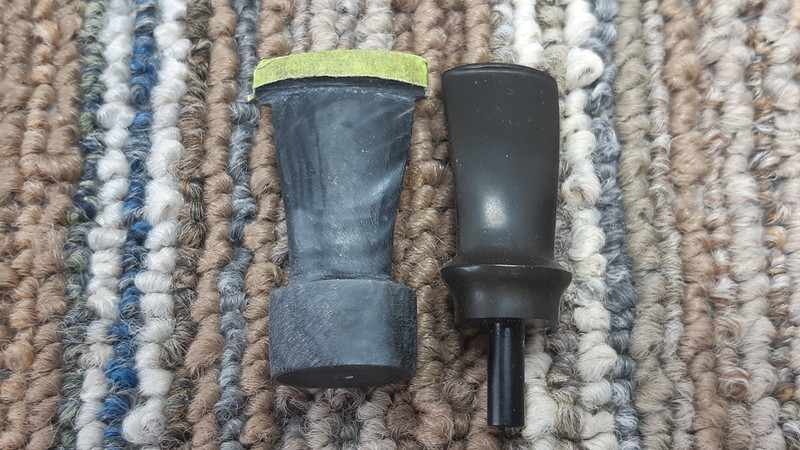
This pic shows the original stem next to the chunk of acrylic stock I would be shaping. The rod stock looks rather excessive next to the delicate little stem, but the wide flare at the shoulder of the saddle stem dictated the starting diameter.

Before I got too involved in laying out the new stem on the rod stock, I took a few minutes to deal with the tenon. While I could have cut an integral tenon from part of the rod stock, I much prefer to use Delrin as a tenon material. It is easier to work than acrylic and a glued-in tenon provides a bit of flexibility when it comes time to fit the stem flat to the shank face.
As you may have already guessed, the tenon on the original stem is definitely on the small side. My digital caliper measured it at 0.200 inches in diameter, so I chucked a 1/4″ Delrin replacement tenon in my hand drill and used files and sandpaper to turn it down to spec. These pics show the new tenon next to the old stem and fitted into the shank.


With the tenon sorted, I set it and the pipe aside and started laying out the new stem on the rod stock by taping off the button and shoulder areas with thin strips of masking tape. I gave myself plenty of extra room here so I could adjust things later – removing excess stock is easy. Replacing it is not.
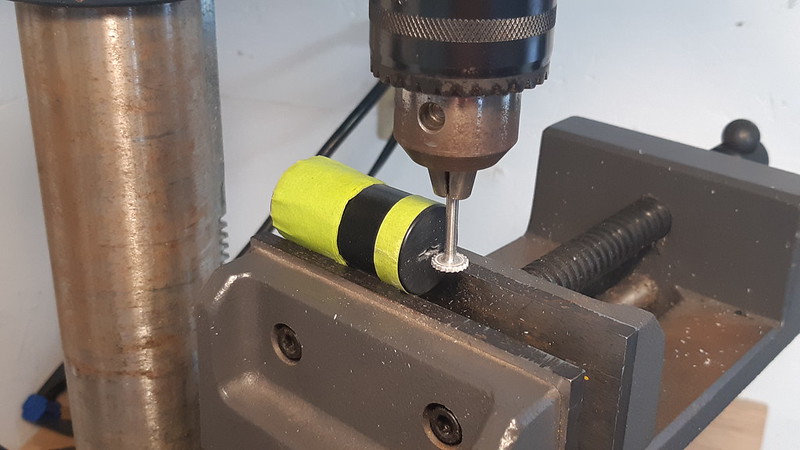
Since the rod was already drilled for the airway, my next step was to cut a rudimentary slot in the button end of the rod. This cut, made using a small round Dremel cutting wheel, provides a reference line for the stem – somewhat like the artificial horizon line in a jet’s cockpit. Note the wider tape bulking up the tenon end of the blank. Because I was using an off-cut form a larger stem blank, the rod had a taper to it. A few windings of painter’s tape around the smaller end allowed the blank to sit level on the cradle created by the vise jaws.
As you can see here, I was a bit off-centre with the cutter side to side but hit the mark pretty nicely on the vertical axis. The slight misalignment left to right made no difference in the end, as I would use a slot saw and needle files to shape the final slot.

I now added two more strips of tape, this time running horizontally down the length of the rod stock and aligned with the rough slot I cut in the previous step at the button end and the airway at the tenon end of the rod. These are rather important reference lines as they help to keep the stem true and keep the carver from accidentally cutting through the airway, ruining the blank.


All of this fiddly but vital work laying out the stem took me about an hour, though I’m sure a more experienced stem maker could do it in a quarter of that time. I spent quite a bit more time and effort on the next stage – bulk material removal. After clamping the rod in a drill press vise which I then clamped to my worktable, I used a series of files to cut out the excess acrylic between my tape lines on both the top and bottom of the stem.
Shown in the first pic are three files – a 1″ wide bastard file, a 1/2″ flat needle file and a 1/4″ flat needle file that I have ground smooth on one edge. The rather diminutive size of the stem made the large bastard file less useful fairly quickly. Most of the work you see here was accomplished with the 1/2″ flat file, while the 1/4″ file, with it’s dead edge, was handy for squaring up corners.


With both top and bottom carved down to the tape lines, the stem looked more like a very small steel beam than a pipe stem, and that’s how I left it for the night. When I came back to the worktable the following day, I used a few round and half-round needle files to rough in the step-down from flared shoulder to saddle stem. The round file also proved an excellent tool to rough in the back side of the shoulder flare.

With those steps done, I carried on and roughed in the tapered profile of the stem from shoulder to button. I set the new stem next to the original and snapped a progress pic. It’s beginning to look like it might turn into a stem eventually!

Many of you will be staring at the above pic, thinking “There’s a LOT of button material there!”. I would eventually have to start cutting the acrylic down at that end of the stem, but for now I left it in place as it gave me something to clamp into the vise and also provided a canvass on which to trace the line of the airway through the rod stock. This line was especially helpful when I started cutting in the radius of the stem and thinning down the edges. Without a reference line, it is very easy to end up with a “twisted” stem.
This pic shows where I again left off for the day. The upper edge of the flare had been roughed in and the radius cut into both the upper and lower saddle portions.

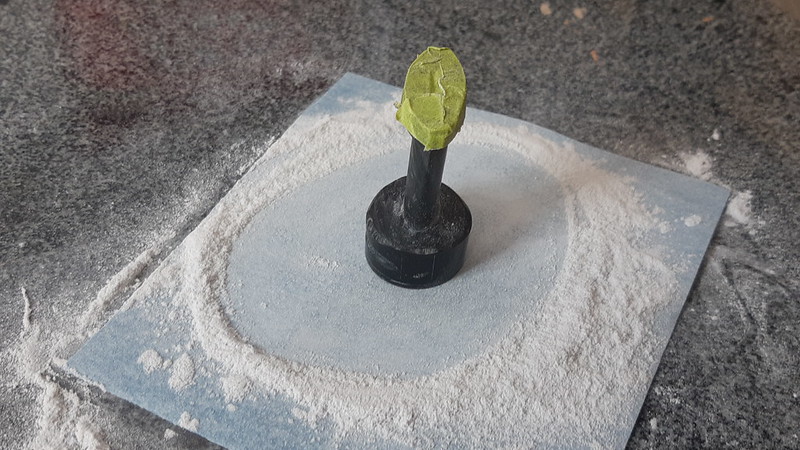
The next day, I moved forward with removing most of the excess acrylic from the button end of the stem. Again using the airway line on the tape as a reference, I chucked a sanding disk in the drill press and fairly quickly cut the button down.


Then it was back to the needle files to continue shaping the stem. This time I narrowed the button and further refined the “blade” of the saddle stem. The new masking tape at the button end kept me from removing too much stock at this point and prevented accidental marring of the acrylic by runaway files.

Now I turned my attention to the shank end of the stem. Again using the sanding disk, I reduced the diameter of the acrylic to slightly larger than the target finished diameter of the shoulder flare. I removed more excess acrylic by sanding down the shank end of the new stem to better match the length of the original stem.

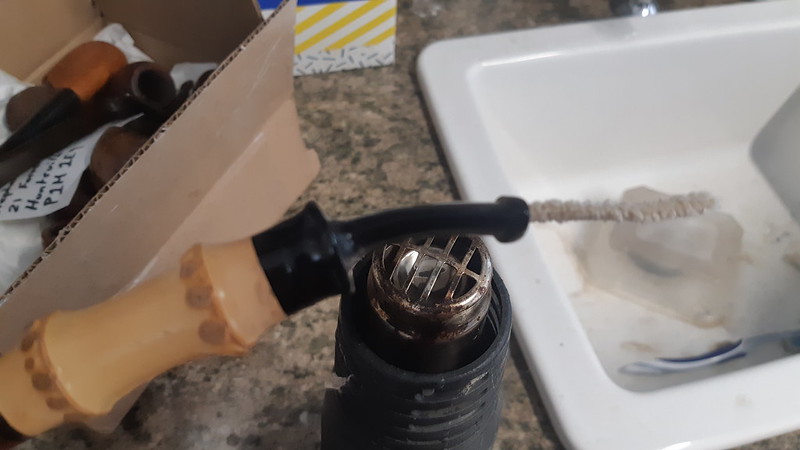
After about 12 total hours of work, it was time to mount the new stem to the pipe shank. I mounted the new Delrin tenon in the shank mortise, then drilled out the stem’s airway to accept the other end of the tenon. I roughed up the stem end of the tenon and used a small carving burr in my rotary tool to cut corresponding pockets into the inside of the stem mortise. These nooks and crannies give the epoxy much more grip on the slippery Delrin than glue alone could provide.
After a test fit showed that everything lined up properly, I wiped a bit of petroleum jelly to the shank face to stop any errant glue from bonding to it, then applied some two-part epoxy to both the tenon and the stem mortise and mounted the stem. I held the pieces in position until I felt the epoxy grab hold, then I clamped the pipe in the padded jaws of the vise to hold everything in place overnight while the epoxy cured completely.


The next day I twisted the stem out of the shank and had a look at the new tenon. Looked good!

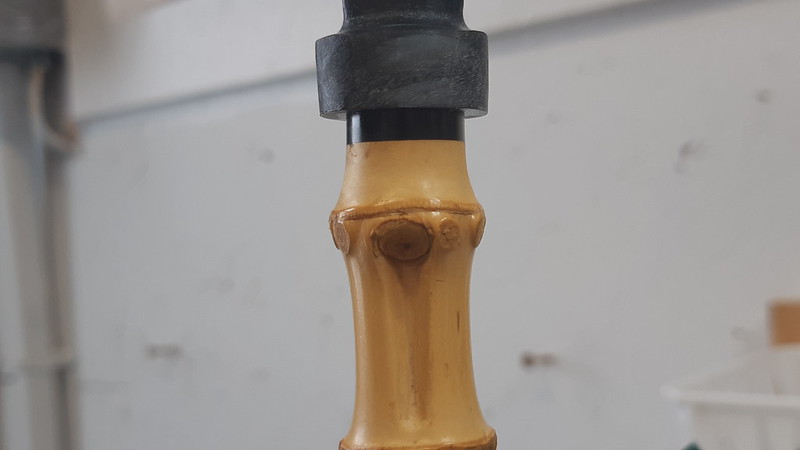
A look at the shank face told me that finishing the stem-to-shank fitting would be a bit trickier than I had thought. The shank is not round, despite its overall appearance. It is, in fact, ovoid in cross-section, with the right and left sides pinched in towards the airway.

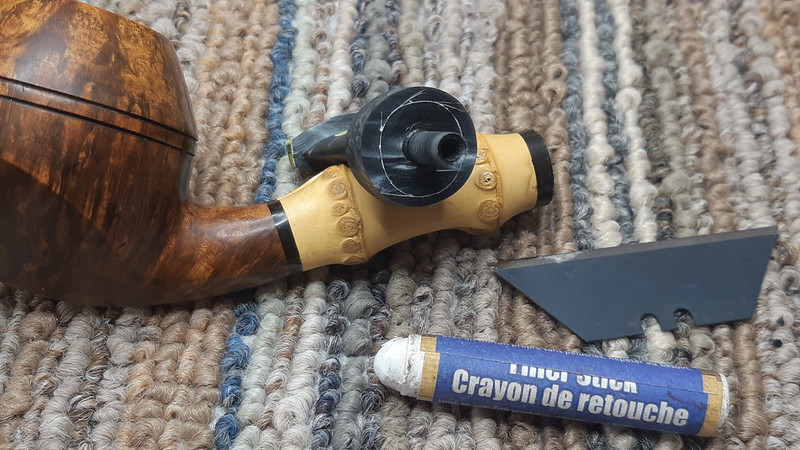
Trying to file the contours of the shank freehand would have been foolhardy to say the least, especially with so much work already sunk into the stem. To provide a line to work to, I borrowed one of George Dibos’ tricks and used a sharp razor blade to scribe the outer shape of the shank onto the oversized stem face. I then filled the scribed line with some white wax filler stick. The white wax showed up nicely against the stem face.
I worked on the stem off the pipe for a bit, roughing in the curve of the flare with round and half-round needle files. When I was close to the scribed shank line, I remounted the stem on the shank and carried on after taping off the areas I didn’t want to mar. Note the scrap of tape on the top of the stem. This was used to indicate “This Side Up” for those of us who are periodically directionally challenged….


Eventually I got the stem slimmed down to the correct dimensions and matching up smoothly with the shank. The button still needed to be brought down to final size, but I wanted a change from wielding needle files so I switched to sandpaper for the final fitting and polishing of the lower parts of the stem before calling it a night. As soon as I started wet sanding the grey swirl stem came to life!
Although you can’t really tell from the last pic below, I continued to refine the shape of the stem, thinning down the bite zone to make the stem comfortable in the teeth. One of the problems with the original stem is the combination of thin bite zone and almost nonexistent button. I deliberately left a bit more meat on the new stem, making the bite zone about 1.5mm thicker than the original and the button noticeably taller and wider.


I came back the next day to finish the stem, with the work consisting mainly of reducing the button to final size and cutting the slot at the end of the stem. Unfortunately I failed to take any pictures of these jobs as I was concentrating on the somewhat delicate tasks at hand. You will, however, see the final product below.
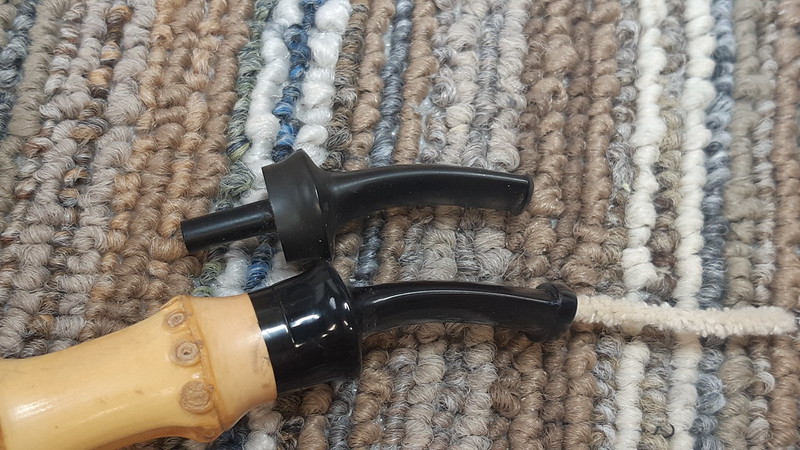
I did remember to snap a few shots while I bent the stem to match the curve of the original. Bending acrylic is much the same process as bending Vulcanite. I slid a pipe cleaner through the airway to keep it open, then warmed the stem over the heat gun until it was just pliable. I held the curve until the stem cooled enough to hold the new shape, then ran it under cool water to finalize things. A quick side-by-side comparison to the old stem showed that I had got the bend right.
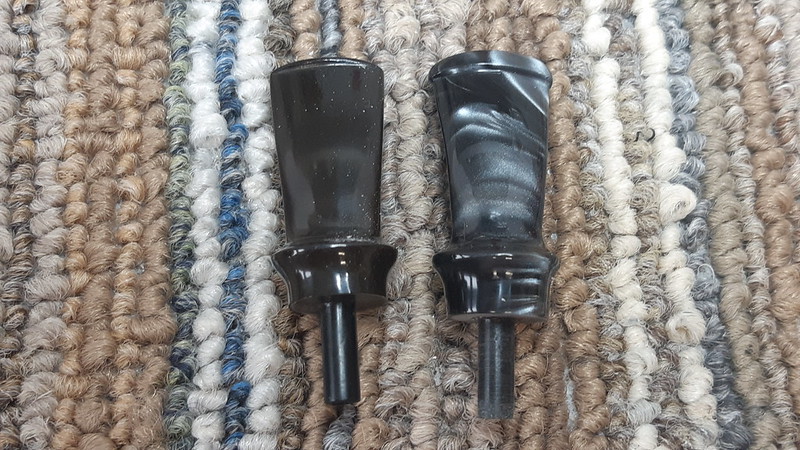
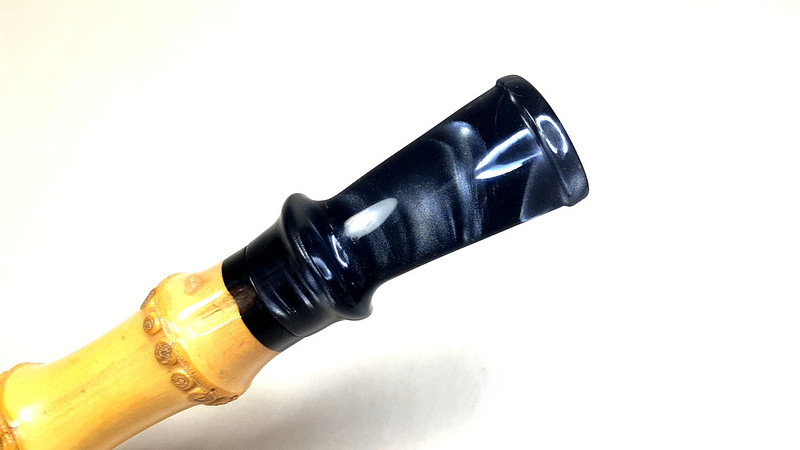
Before final buffing and polishing, I took these shot of both stems side by side. The difference in overall length is due almost entirely to the deeper button.

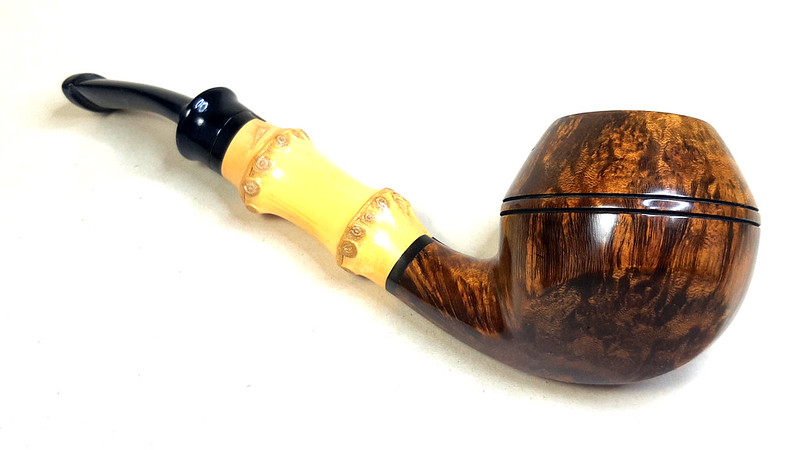
A quick run on the Tripoli and White Diamond wheels (after remounting the stem on the shank) erased the last of the sanding scratches and brought up the shine on the new acrylic stem. Though not strictly necessary, I also applied a light coat of Carnauba wax before taking final pictures.
This was a real marathon project, with a total of 15 hours invested over a period of five days to make my first acrylic stem from (almost) scratch, and I am very happy with the results. While my critical eye can spot a few things that I might have done differently, the stem fits beautifully at the shank, the Delrin tenon is “snug-tight” in the mortise, and the slightly beefier profile of the bite zone and button make the pipe much easier to hold comfortably in the teeth. Better still, the pipe’s steward is very pleased with the new stem, proclaiming it “better than the original” – high praise indeed, especially for a first attempt!
Thanks for joining me on this rather special project. I hope it was as fun for you to read as it was for me to do! I’m not sure how many commissions for custom stems I will take on (at least until I can finally add a good lathe to the shop), but, if nothing else, I have proven to myself that I can do the job with the tools currently at my disposal. And given that this stem was completed during Ontario’s second COVID lockdown, I certainly had the time on my hands, so a win-win all around.
Until next time, Happy Piping! Here’s the finished pipe.


PS: the camera was kind enough to point out the scratches around the edge of the slot in the pic above. A quick bit of work with sandpaper sorted it out before I sent the pipe back to its steward. 🙂 — Charles

Ye Gods, Charles! Your skill set is constantly amazing to me. That stem is so beautiful. Just what that gorgeous pipe was calling for. Thanks for sharing this!
LikeLiked by 1 person
Thanks very much, Mark. This one really stretched the muscles!
LikeLike
Beautiful work, Charles. I couldn’t even imagine taking that on. The stem is very attractive. My father would call a job like that “a fiddle”.
LikeLiked by 1 person
It certainly qualified as “fiddley” at times! 😄 Thanks, David.
LikeLike
Charles, again, what an incredible job fashioning the acrylic in the tight and demanding quarters of the original shape. The initial taping in the set-up was especially helpful to maintain proper orientation during ‘flight’. This write-up is going into my ‘keep’ bucket for the day I work up the courage and have the opportunity! Thanks, also, for the link to the YouTube channel. Very good information. Carry on!
LikeLiked by 1 person
Thanks, Dal. I have learned a lot from watching George Dibos in action on his YT channel. He really is a master of pipe repair.
LikeLiked by 1 person