
Regular readers of this blog will know that I’ve worked on countless Brigham pipes over the years, both those belonging to clients and those in my own rack and rotation. Brigham celebrates its 120th birthday this year – a remarkable achievement for any company, but especially for a Canadian pipe house in 2026.
Unsurprisingly, Brigham has refreshed its product lineup more than once over its history, most recently with the 2007 Series, the first series manufactured entirely in Europe. Before that, arguably the biggest shakeup to the firm’s offerings took place in 1980 when Brigham launched its President series of artisan style Freehand pipes. The 1980 President series was the offspring of the Valhalla (smooth) and Norseman (rusticated) series of pipes, produced between about 1965 to 1979, which featured a half dozen “Scandinavian inspired” pipe shapes in various grades.
This scan from a 1970s Brigham brochure shows the Norseman/Valhalla pipe shapes.

The Norseman pipes were pinned with three horizontal Dots, with the centre Dot larger than the outside pair. Valhalla pipes were pinned with four, five or six Dots to reflect the A, B and C grades seen below.

When the Norseman/Valhalla lines were retired in 1980, the President series became the highest grade of Brigham pipe available. These were truly artisan grade, hand made pipes whose shapes and sizes were limited only by the size of briar block and the carver’s imagination. The President series was pinned with a 3-Dot pattern as shown in this chart. Not shown was a letter grading system; President series pipes were stamped with a letter A, B, C, D or E, with A being the highest grade.

Here is an example of a 1980s President series pipe for reference. As you can see, the shaping is not constrained to rigid specifications as its predecessors were.

More details on the Norseman/Valhalla and President lines is available in my book for those interested in learning more or identifying Brigham pipes in their own collections. I’m retelling all of this info in order to make the stamps on today’s pipe make sense, so bear with me a minute.
The pipe on the bench today arrived in decent estate condition, though it clearly could benefit from a good cleaning. The faux-plateaux rim was packed with carbon deposits, the chamber had a layer of rather hairy looking cake that would have to come out. The stem had oxidized to a dull grey, but the biggest issue, and the reason for the pipe being sent in for work, was the large triangle of Vulcanite missing from the underside of the button and bite zone.


The rather decorative stem is pinned with five brass Dots, with two smaller dots on either side of a larger center Dot. Referring to the Dots chart above, that makes this pipe a Valhalla B-grade pipe, the second highest grade available.

This pic shows the original aluminum Brigham System tenon. While dirty, it is in good condition, without corrosion or other damage.

Looking at the stamps on the shank of the pipe, this is where things get a bit interesting. While the stem is pinned as a 1970s Valhalla series B-grade pipe, the shank is marked with “Brigham” over “Canada” over “A”. This is the newer 1980’s COM stamp and the newer President series A-grade. Not only has the pipe crossed over in terms of the pipe series, but it has received a promotion to a top of the line A grade as well.
I’ve come across a few other Brigham holdovers between the Valhalla and President series pipes. Indeed, I had one in my own collection years ago, so they are out there in the wild. I don’t think these pipes command a higher price because of the stamping anomalies, but it’s an interesting pipe history talking point. This was simply Brigham’s way of using up old stock, a thrifty practice also seen with rusticated Norseman stummels fitted with basic round taper stems and (usually) a 4-Dot pinning pattern.

Now that the pipe’s provenance had been established, it was time to move on to the real work. As always, I began by cleaning the stummel. I removed the old cake from the chamber using my reamer and pen knife, followed by sandpaper wrapped around a dowel to tidy up the remnants.
I’ll note that the knife isn’t usually part of my toolkit here, as the sharp point on the blade could easily sratch up the chamber floor or remove material I don’t want removed. However, the pipe had not been used in many years and some of the oldest cake at the bottom of the bowl was rock hard and needed a bit of extra encouragement to relinquish its hold on the briar.

The shank and airway received a scrubbing with cotton swabs and 99% isopropyl alcohol to remove years of tar deposits.

When the internals were clean, I scrubbed the exterior of the stummel with Murphy’s Oil Soap and a toothbrush. This lifted away the dirt, grease and grime from the briar’s surface and removed the old wax at the same time.

Setting the stummel aside at this point, I turned my attention to crafting the new stem. The best match for a replacement stem was, interestingly, a standard Vulcanite Round taper stem blank. This pic shows the original stem above the selected stem blank. I’d have to do some work on the lathe to get the new stem looking like the original.

Before I got stuck into the aesthetic work, I had to drill the new stem for the Brigham System. First up on this task was to salvage the aluminum tenon from the damaged original stem. This was accomplished rather easily by applying a bit of heat to the stem face area. I warmed the stem over the heat gun until the Vulcanite became pliable, then twisted the aluminum tenon out.

I quickly cleaned the interior of the tenon, then pulled a Brigham Rock Maple filter from my supplies. Unlike modern Brigham pipes with a standard length tenon, vintage Brigham pipes had the tenon sized for the shank of each pipe shape. This means that the filter pocket drilled into the stem was a different depth for each pipe. I’d have to take a couple of measurements from the tenon and filter to get the drilling right on the new stem.

First, I measured the amount of filter extending beyond the shoulder of the tenon. In this case, a filter pocket 46mm deep would need to be drilled into the stem’s airway.

Second, I measured the depth of the tenon where it fits inside the stem face. I’d need to drill an 18mm deep mortise into the stem face to fit the tenon.

I transferred these measurements to the correct drill bits and marked the depth with masking tape before mounting bits and stem in the lathe. I first drilled the 46mm deep filter pocket, then the mortise for the aluminum tenon.


A test fit with a filter in place showed that I had got my measurements correct. everything went together smoothly, without binding.


Then it was time to make the new stem pretty. I remounted the stem blank in the lathe, this time between centres, in order to turn the decorative rings and add a taper to the tenon portion of the stem. Not bad!

While the stem was still roughly shaped, I marked and drilled the 3/32″ and 1/16″ holes for the Valhalla B pinning pattern – one larger Dot flanked by two smaller Dots on each side. A spring-loaded center punch really helps here, making a tiny pilot point for the drill bit to follow. The Dots for Brigham pipes were traditionally drilled freehand, so slight “wobbles” are to be expected.

This pic shows the brass rods cut to length and glued into the holes with a drop of CA glue each.

I let the stem sit long enough for the CA glue to cure to the touch, then mixed up a small amount of JB Weld high-heat epoxy. After applying the epoxy to both the end of the tenon and the inside of the mortise, I slid the parts together then mounted the stem in the shank mortise to make sure everything lined up properly.
I forgot to take a pic this time, but regular readers will be a familiar with my tenon installation technique by now. After sliding the parts together, I clamped the pipe upright in a padded vise to allow gravity to help hold the stem in alignment while the epoxy cured. Original JB Weld takes about 12 hours to cure, so the pipe stayed in the vise overnight.

When I came back to the bench the following morning, I removed the pipe from the vise and chased the tenon with a drill bit to remove the inevitable excess epoxy from the airway. I then spent some time with files and sandpaper refining the shape of the new stem and sanding everything smooth. When I was happy with the overall shape, I wet sanded the stem to 2000-grit in preparation for final buffing and polishing.
Before I took the pipe to the buffer, though, I took the opportunity to add the required bend to the new stem. It’s very important here to bend the stem with a filter in place. Failing to do so risks ending up with a filter that won’t seat completely. Also notice the pipe cleaner slipped through the stem’s airway. This helps keep the airway from collapsing while the Vulcanite is soft.
A bit of time over the heat gun was sufficient to allow me to introduce the slight bend needed. I held the shape of the stem by hand while I ran the arm Vulcanite under cool water to set the new shape permanently.

Then it was off to the buffers for a run on both the red Tripoli and White Diamond wheels to erase the last stray sanding marks and bring up the shine. A few light coats of Carnauba was added more shine and a layer of UV protection for the new stem and refreshed stummel.
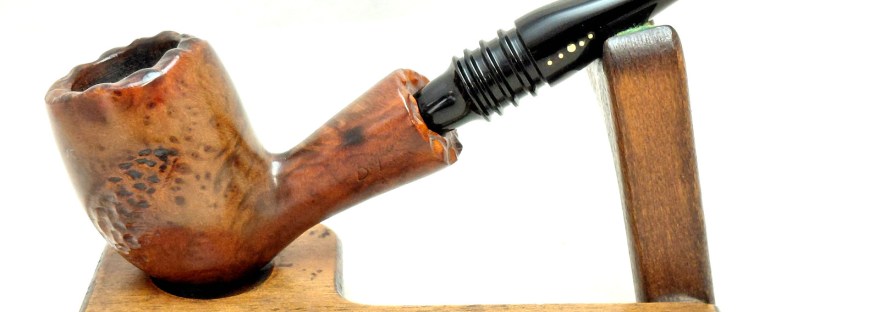
This 1980 Brigham Valhalla/President crossover pipe is once again looking its best and is ready to take its place in its steward’s rack and rotation. With a little care and feeding, it should perform well and continue to look great for at least another 46 years!
I hope you enjoyed watching the process of crafting a replacement stem for this vintage Brigham freehand. As the years march on, parts for these vintage pipes get more difficult to source, requiring the restorer to find creative solutions to the problem. I’m glad I could successfully get this old Brigham back into smoking condition.
Until next time, Happy Piping! Here’s the finished pipe.


Very awesome read, Charles. I enjoyed watching this Bringham come back to prime life under your hand. Your restoration planning and skills are both valuable and admirable. Thanks for the great write-up, again. Cheers!
LikeLiked by 1 person
Thanks, David!
LikeLike
Wow… what a transformation Charles….
LikeLiked by 1 person
Thanks, Rick. I enjoyed working on this one.
LikeLike
What a restoration – the lathe work plus the pinning! Wow!
Thank you sharing this with us readers. 🙂
LikeLiked by 1 person
Thanks very much! Creativity and a certain amount of plain stubbornness is necessary when dealing with vintage pipes. Where stock replacement parts don’t exist, the only option is to learn to make them in-house!
LikeLike