
Ah, the broken tenon – bane to pipe smokers everywhere and a bread-and-butter repair for any pipe shop! For such a small piece, the stem tenon is a crucial part of any pipe. After all, it’s the part that attaches the stem to the shank. Without a sound tenon, a pipe is reduced to an un-smokable stummel and an orphaned stem.
While care must be taken to cut each part of a pipe accurately, this is especially true of the stem tenon. A slight variation of as little as 0.01 millimetres in diameter can mean the difference between a snug fitting stem and a loose one. A tenon that stops short of the bottom of the shank mortise creates an air gap inside the shank that quickly gathers tars and detritus; too long, and the stem will not fit flat against the shank face.
When a tenon breaks it is important to not only replace the tenon with a new one but also inspect the shank carefully for any signs of damage. Often, the same accident that snapped the tenon will crack the shank. A hairline crack may not be noticed until the pipe is on the bench for repair.
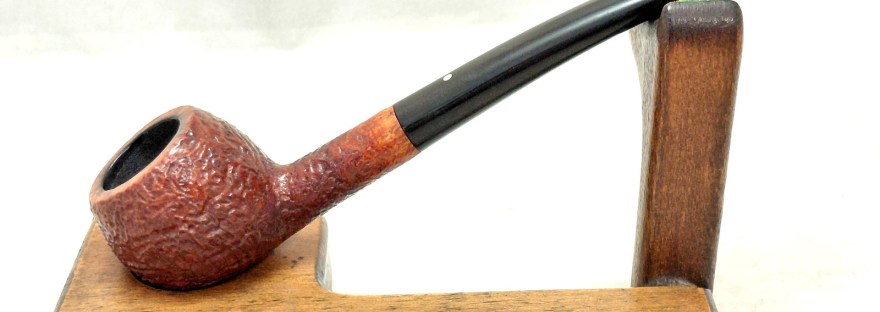
The tenon replacement today is for a 1966 Dunhill Tanshell Prince. As this initial series of images shows, the remains of the tenon were still lodged in the shank of the pipe, another common problem. The stub of tenon will need to be extracted, ideally without damaging the shank, before a new tenon can be installed in the stem.
The pipe as in quite good estate condition, with only a bit of tar buildup on the rim and some oxidation to the Vulcanite stem.


This shot down the shank mortise shows the nub of broken tenon lodged there.

Likewise, the face of the stem was uneven where the tenon had broken off.

The underside of the pipe is stamped “259 F/T” then “Dunhill Tanshell” over “Made in England6” followed by a 1 in a circle and the letter T. I was unable to match the shape number, 259, with any Dunhill shape chart online, but the pipe is clearly a Prince shape. If I’ve decoded the rest of the stamps correctly, they tell us that the pipe is from the Tanshell line, in a Group 1 size. The date code corresponds to 1966.

With the assessment of the pipe finished, I could move on to the repair. The first step was to remove the broken tenon from the shank. To do this, I twisted a screw into the airway of the tenon and, holding the stummel firmly, pulled the screw straight back, keeping it in line with the shank lest I accidentally cause more damage.
Sometimes the tenon will come out easily, and other times it needs some encouragement. When this happens, I dribble a little 99% isopropyl alcohol around the outside of the tenon to dissolve any tars that might be holding the tenon in place. Repeated applications of alcohol followed by a bit of sitting time and an extraction attempt may be required before the job is done.
In this pic you can see the remains of the tenon attached to the end of the wood screw. I gave the shank a good inspection but found no cracks that would need repair.

Now that the shank was unblocked, I used a few cotton swabs and pipe cleaners dipped in alcohol to clean the mortise and airway. The pipe was rather clean, so it didn’t take long to tidy up the stummel. Not shown is the single pipe cleaner I ran through the stem to ensure it too was free from tars and debris.

The chamber had no cake buildup to speak of, so I just tidied it up quickly with some sandpaper wrapped around a dowel.

Setting the stummel aside briefly, I moved to prepare the stem for the new tenon. I started by facing the stem on some 220-grit sandpaper on the topping board to remove the jagged stump of tenon and smooth out the stem face.
Care is needed here as it is very easy to accidentally sand an angle into the stem face. This would cause the stem to point off in an odd direction, which would not be helpful. Likewise, it’s important not to remove more material than absolutely necessary from the stem’s length. Shortening the stem would leave a smaller diameter at the stem face, whch would cause fit issues when the new tenon was installed.


In this pic, I have enlarged the airway at the stem face to create a short mortise into which the new Delrin tenon would be glued. I like to keep this mortise as small as possible to lessen the risk of cracking the stem while drilling.

With the stem prepped, I cut a short section of Delrin rod and mounted it in the lathe. After facing the end and drilling a 1/8″ airway through the rod, I turned the end down to fit snugly but easily in the shank mortise.
I use Delrin for tenons for a couple of reasons. Delrin has a much higher sheer strength than either Ebonite or Acrylic, meaning it is much less likely to snap. To be honest, if that much force is applied to a Delrin tenon, it is very likely that the shank breaks before the tenon does. Secondly, Delrin is both slightly spongy and a bit slippery. This means that a Delrin tenon will compact slightly when mounted in the shank mortise, providing a lot of grip to hold the stem in place. The slippery nature of Delrin means that it will slide in and out of the mortise easily.

Here you can see the stummel test fit to the new tenon. The stem end of the new tenon was then turned to fit inside the mortise drilled in the stem face.

And here are all of the component parts, ready for glue-up. I made repeated test fittings to make sure that the tenon fit properly in the shank and the stem face sat tightly against the end of the shank.


A swipe of petroleum jelly on the shank face helps prevent the epoxy from sticking to the briar. It’s a small step but an important one if you want to avoid gluing the stem to the end of the shank permanently.

I mixed up a small amount of standard 5-minute two-part epoxy and applied it to both the tenon and the mortise, then slid the parts together. After adjusting the fit to make sure the stem lined up perfectly with the shank, I clamped the stummel upright in a padded vise to let the epoxy cure. This allows gravity to assist in keeping the stem face flat against the shank. A bit of masking tape makes sure nothing moves while the epoxy cures.

I left the pipe in the vise overnight to make sure the epoxy had completely cured before twisting the stem out fo the shank and chasing the airway with a drill bit to remove the inevitable excess glue. When I was happy with the airway, I reassembled the pipe and took it to the buffer for a bit of polishing and a few layers of Carnauba wax to shine and protect the repaired pipe.
This 1960s Dunhill Tanshell Prince is once again ready to assume regular duty in its steward’s rack and rotation. With a little care, the pipe should provide many more years of service.
I hope you enjoyed watching this repair. Perhaps you even picked up a few pointers about tenon replacement along the way. Even if you never plan to DIY a tenon replacement, understanding the process and materials used will stand any pipe lover in good stead.
Until next time, Happy Piping! Here’s the finished pipe.


