
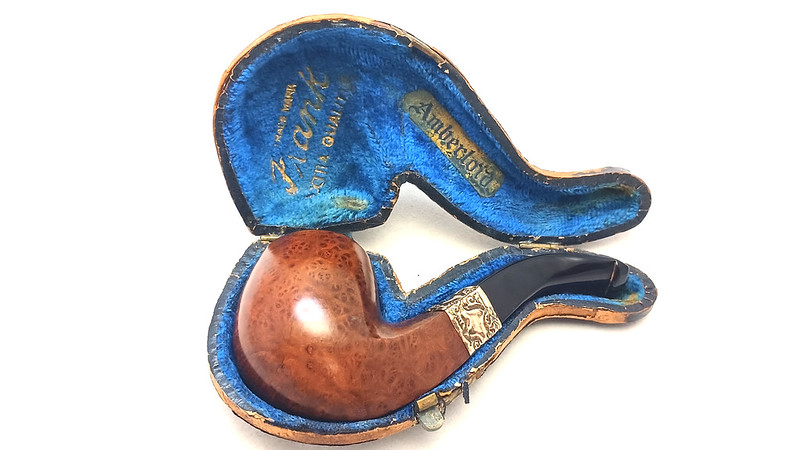
One of the fun parts about pipe restoration is not knowing exactly what will show up in the shop. Will the next pipe be a Dunhill ODA, a huge artisan grade “War Club” or something more delicate, like the diminutive Frank Amberloid Bulldog that is the subject of today’s post? Here is the pipe as it looked on arrival.

It is a fact that pipes have gotten larger over the last 50 or so years. If one considers size as the inverse of age, then this little pipe, which measures a scant 4 inches overall, is definitely getting up there in years. S.M. Frank Sr started his pipe company, which would go on to include not just the Frank brand but also Kaywoodie, Medico, Demuth and more, in 1900, and this little Bulldog certainly looks like a design hold-over from the late 1800s. There are a few clues, however, that help establish a slightly later production period.
First up, the interwebs tell me that “Amberloid” is another name for Redmanol, an early plastic developed in 1913, so that becomes our earliest year of production. I’m going to put a cap on the other end of the scale at about 1928, purely based on the button design. This pipe has an orific bit (a simple, round airway exit at the button), a style that went out of general use in the mid to late 1920s. Earlier stems of this type were essentially round through the bite zone, but this one has a more modern looking football-shaped cross section. I’m fairly comfortable labelling this stem profile as a transitional design from the mid to late 1920s, which makes this Frank Amberloid Bulldog a “Between the Wars” pipe.
The case, well worn and a little fragile, has two labels inside, which read “Amberloid” and “Trade mark” over “Frank” over “Extra Quality”.


The pipe is also marked “Frank” over “Amberloid” on the top left shank face. The font and size made it a bit tricky to photograph, so this pic is actually from my roll of “After” pics.

The pipe was in fair condition, especially for its age. The whole thing was dirty and slightly greasy feeling, and the rim showed signs of careless dottle-knocking, but the Amberloid/Redmanol stem was almost miraculously intact. At first glance, the pipe looked like a pretty basic restoration job.


And here’s where a second, closer examination put the kybosh on my “easy restoration” theory. The stem, slightly out of register with the diamond shank, showed the telltale sign of a past repair attempt – glue in the shank. The pipe’s steward had requested a full restoration of this vintage pipe as he hoped to put it into his regular rotation. That goal was in jeopardy unless I could separate stem from stummel without damaging the pipe further.

The work was not without risk. A pipe this old is inherently fragile, and I had no way of knowing why the stem had been glued on in the first place. Things could very easily go sideways, resulting in a cracked or broken stem, damaged shank or worse. After discussing the risks with the pipe’s steward, I was given the green light to proceed.
To that end, I did my best to inject some 99% isopropyl alcohol into the seam between the shank and stem face. Alcohol will dissolve or soften several types of glue just as it does tobacco tars, but it needs time to do its work. After repeated applications of alcohol followed by rest periods to allow the alcohol to attack the glue joint, I began to twist the stem very gently back and forth to test the bond. After a few tense moments, the glue holding the bone tenon in the stem let go and I could unscrew the stem completely from the pipe.

While I was excited at the prospect of being able to refit the original Amberloid stem, I was equally unimpressed with the state of the shank. There was a LOT of glue, or perhaps wood filler of some kind, packed into the shank, completely encasing the old bone screw tenon. What a mess!

I hoped to encourage the glue, or whatever it was, to come out easily with the help of more alcohol, but even after standing the stummel in a small dish of isopropyl, I ended up doing the work old school style, removing it mechanically with needle files and dental picks.

Eventually I got enough of the filler material out to loosen the bone screw tenon. Unlike the stem, however, the tenon did not come out unscathed but rather in several small pieces.

With the tenon out of the shank, I was able to clean up most of the glue/filler material. This shot of the shank face shows some smaller patches stuck in dents and depressions in the briar, but the mortise is clear and the shank face flat.

The alcohol had also dissolved the glue holding the brass shank band in place. I removed it to clean the old glue residue off the briar, giving the stummel a quick scrub with 0000 steel wool while I was at it. The cleaning revealed a number of old fills that would need a bit of attention before the work was done.


After another good look at the mortise, I realized that the threads were worn almost flat – another possible reason for the excess amount of filler? After discussing it with the pipe’s steward, it was decided that the least invasive way to rehabilitate the mortise and tenon joint was to drill the mortise smooth and convert the pipe to a push tenon. This was a bit of a departure from the original design of the pipe, but would make the pipe much more user-friendly going forward.
As the threads in the shank were already so worn, it didn’t take much to finish the job. I selected a suitable drill bit and turned it by hand to smooth out the mortise. Notice that I slipped the shank band back into place to reinforce the briar while I drilled.

With the shank prepped, I could move on to making a new tenon for the pipe from a bit of Delrin rod. After turning the rod to diameter on the lathe and testing the fit – snug but not too snug – I reduced the stem end of the tenon and cut threads to match the originals cut into the stem face.

Here is a close shot of the new tenon. It was a bit tricky to work on something this small – perhaps 3/4 of an inch in overall length, but it screwed neatly and squarely into the stem face. Nice!


Of course I needed the obligatory “Looks like a pipe again” shot.

Now that the delicate work on the shank and stem was complete, I could move on to address the cosmetic repairs. I cleaned the carbon crust from the rim of the bowl before topping it very lightly to smooth out the dottle-knocking scars without removing excess briar, then cleaned the exterior of the stummel with Murphy’s Oil Soap. A preliminary run on the Tripoli polishing wheel yielded a nice surprise – the fills that were shining white against the briar buffed out very nicely, negating the need for more invasive repairs.


There were a few things left on my to-do list for this pipe before final polishing. One was to reinstall the brass shank band permanently, which I did using a touch of wood glue to bind it in place. I like to use this glue when possible as it is reversable with alcohol if the band ever needs to come off in the future.

I could now turn my attention to the Amberloid/Redmanol stem, which was slightly over-bent. With a pipe cleaner inserted through the airway to hold it open, I warmed the vintage stem carefully just until pliable. Bent stems tend to “remember” their original straight shape when heated, so I allowed the Amberloid to correct itself, relieving the bend enough to allow the pipe to sit more comfortably in the teeth while still fitting neatly into its case. When I was happy with the new bend, I ran the stem under cold water briefly to set the revised shape.

Coming to the end of this restoration project, I drop-filled a pinhead dent near the underside button with clear CA glue. After letting the glue cure, I sanded the patch flush with the surrounding material and wet sanded the entire stem with 800 and 2000 grit sandpapers to smooth out some light scratches.

Then it was finally time to take the complete pipe to the buffer where it was given a run on both the Red Tripoli and White Diamond wheels followed by a few light coats of Carnauba wax to add shine and a layer of protection for the freshly restored pipe.
I’m very happy with the end product here. What started out as a somewhat derelict shelf-sitter has been transformed into a beautiful and functional vintage smoking instrument ready and able to provide decades of companionship to its new steward. Not bad for a pipe coming up on its 100th birthday!
Thanks for following along on this vintage estate pipe project. Working on these very old pieces comes with a unique set of challenges, but patience and a bit of ingenuity can carry the day and keep these Elder Statesmen of the pipe smoking world in action for the next generation.
Until next time, Happy Piping! Here’s the finished pipe.


A very impressive job!
LikeLiked by 1 person
Redmanol/Amberloid is one of my favorite materials to clean up and restore. Very stunning color and shine in the light. Nice job, Charles!
LikeLiked by 1 person
Thanks, Mark. I was very impressed by the way the Redmanol took a polish.
LikeLike
Great job Charles! Such an extraordinary pipe. Is that the natural color of the bowl’s interior after you cleaned/reamed it or did you coat it with something?
LikeLiked by 1 person
Thanks Dennis. No bowl coating for this one.
LikeLike
Wow, quite an extensive job on that one, Charles. And impressive as usual. I love the shape of that pipe. It’s similar to my favourite; a Julius Vesz hand-cut estate I picked-up in a small Columbus, Ohio pipe store a few years back.
LikeLiked by 1 person
Thanks David. It was an interesting pipe to work on. Still don’t really know what was packed into the shank or what they hoped to accomplish by doing so, but the pipe itself came out rather well. 😁
LikeLike
What a lovely treasure for the owner. That was a fun read. I was a bit anxious myself just reading the removal of the stem!
LikeLiked by 1 person
Indeed! I manipulated the stem very very gently when breaking it free of the glue/filler in the shank. One of those restorations where x-ray vision would have come in handy! 😁
LikeLike