
Ask any pipe smoker or collector and they will tell you that pipes can be a lot more than simple smoking instruments. They can become conduits through which the pipe steward is connected to a person, place or philosophy that holds deeper meaning for them. Many of us have at least one pipe, stand or accessory that connects us directly with the past – a pipe once owned by a parent or grandparent who has since passed, or perhaps a commemorative piece received as a gift to mark a graduation, birth, or retirement.
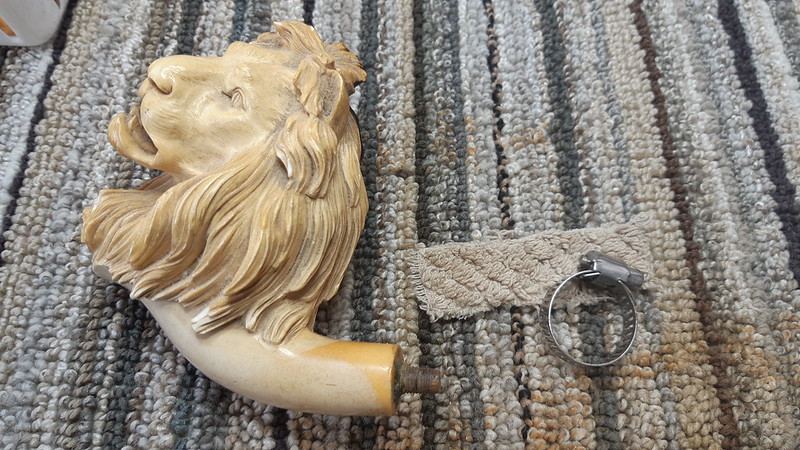
The figural meerschaum on the bench today is just such a piece, a tangible link to the current steward’s father. According to family legend, this large Lion’s Head pipe was purchased in Holland during the Second World War and brought home to Canada after demobilization. Unfortunately at some point it suffered a fall and the Bakelite (or possibly Amberite) stem shattered into five or six pieces. An attempt was made to stick Humpty Dumpty back together again, but was unsuccessful, and so the pipe languished in a drawer for many years before the decision was made to have it restored properly.
As you will see in this initial series of pictures, the pipe was in a sorry state when it arrived here at the shop. The case that usually protects meerschaum pipes from incidental damage was long gone, so it was no surprise that the carving sported a few nicks and dings. The rim carried a thin crust of carbon that spread outwards from the chamber and caught in the intricate grooves of the carving, but the primary concern with the fist-sized meerschaum stummel was the shank and tenon. Apparently epoxy was used during the abortive repair attempt, and the original bone screw tenon and the entire end of the meerschaum shank were covered with it. The epoxy had also found its way inside the tenon’s airway, completely blocking all airflow though the shank.
The rest of the stummel was in reasonable estate condition. It would need a good cleaning and waxing but it was clear to me that the success of this restoration would rely heavily on rehabilitating the shank. The stem arrived in three pieces inside a plastic bag. I quickly write it off as unsalvageable, but could at least use it as a template for a replacement stem.


The pipe’s steward wished to restore the pipe to as close to original condition as possible. To that end, I ordered a couple of Bakelite stems and added a few acrylic stem options to the bag as well, just in case. Foreshadowing, anyone?
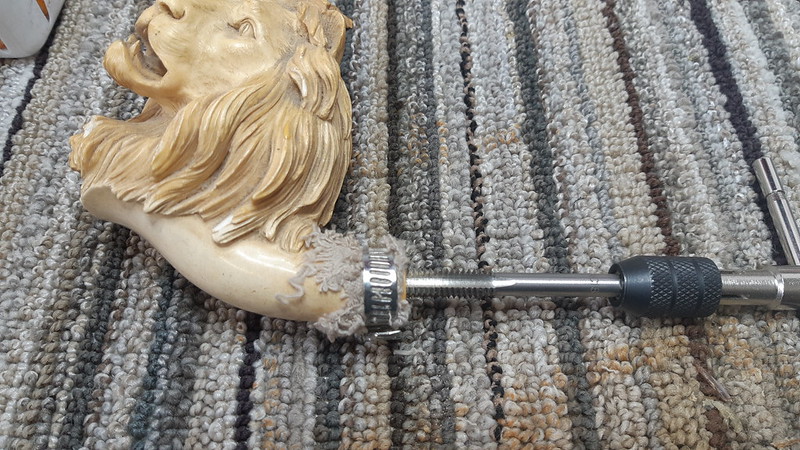
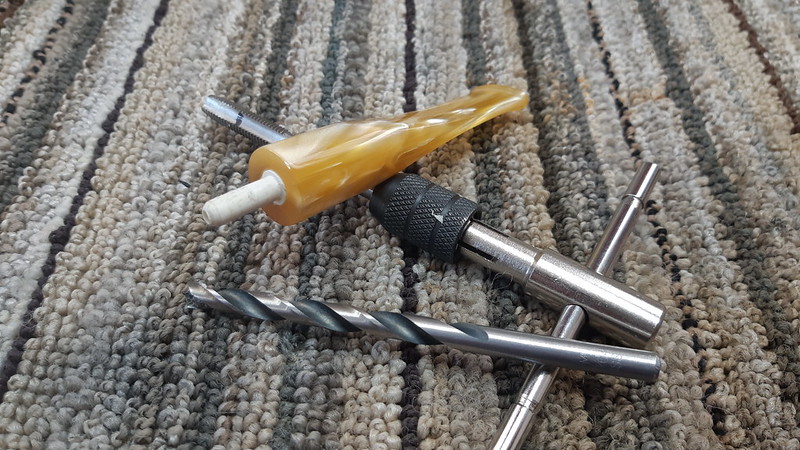
As I waited for the stems to come in, I devised a plan of attack for dealing with the mess of a shank. After all, a replacement stem is only useful if it can be mounted to the shank. The task seemed simple enough on paper – cut off the stub of the old bone tenon, then drill and tap the shank for a new push-pull fitting. The catch? Meerschaum, especially vintage meer like this Lion’s Head, is very fragile. An attempt to drill out the old tenon without reinforcing the shank somehow would almost certainly have resulted in a shattered shank.
To give the shank the required support to survive the upcoming operation, I dug around in my bin of hardware and came up with a 1″ worm gear pipe clamp. I cut a piece of old terry towel to pad out the clamp, and fit the assembly over the end of the shank.

With the shank suitably braced, I cut off the old tenon with a hacksaw, then worked my way up through increasingly larger drill bits until I hit the required tap drill size for the push-pull insert.


I mounted the correct tap in a holder and tapped threads into the mortise.

A quick test fit of the female half of the push-pull set confirmed that the threads were good and the mortise drilled deep enough. To set the face of the insert flush with the shank face, I countersunk the mortise slightly larger than the diameter of the insert.


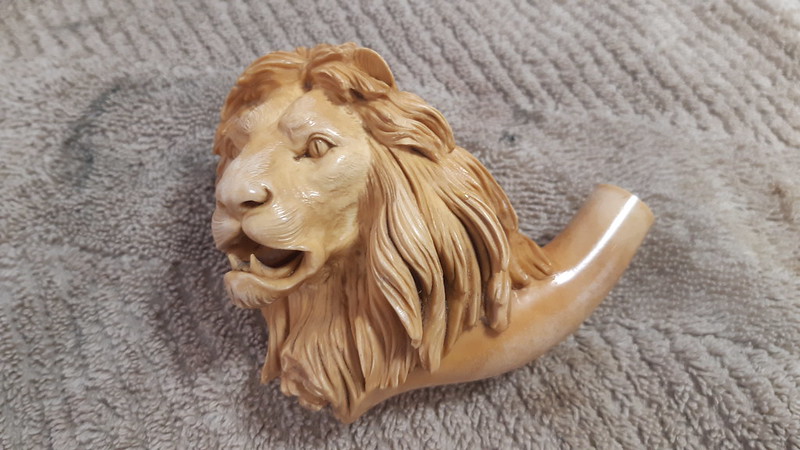
With a sigh of relief, the delicate part of this pipe rescue was complete and I could move from structural repairs to cosmetic work, starting with a good cleaning of the meerschaum. I forgot to take pictures of the internal cleaning, but it was uneventful. I reamed the chamber gently to remove the old and unnecessary cake there, then ran a few pipe cleaners dipped (lightly) in 99% isopropyl alcohol through the airway to make sure the draw was unobstructed.
I then moved to exterior cleaning. I have found that the best tool for removing dust, dirt and general debris from figural pipes is a toothbrush dampened with clean water. Over-wetting the meerschaum can soften it, risking damage to the carving, so a damp brush is all you want here. Here are a few pics of the meer after cleaning. Already much improved!


When the stummel was clean, I turned on the wax pot and melted some pure beeswax. After corking the chamber and shank openings, the stummel barely fit inside this little crock, so I ended up using a “brush and dip” technique to get the fresh wax over the entire stummel. The hot wax is readily absorbed by the meerschaum, where capillary action draws the wax into the pores of the material and draws the colouration to the surface.

Here is a shot of the stummel immediately after removing it from the wax pot. Notice how the colour has changed from a pale ivory to a rich honey brown. Nice!

When the stummel had cooled enough to handle, I hand buffed it in a clean towel, removing the excess beeswax and bringing up the shine. Now ready to go, I set the stummel aside to rest while I worked on fitting the new stem which had arrived by this time.

This pic shows the original stem above the new Bakeltie stem. Apart from a slight variation in colour, the new stem wqs a good match to the old.

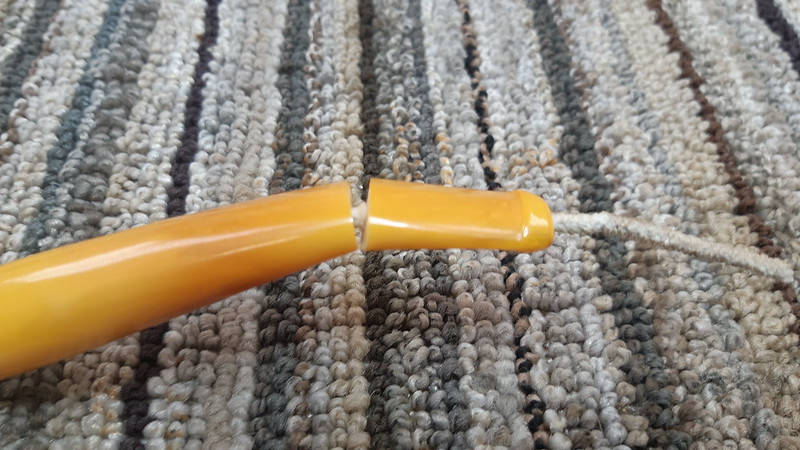
An important note about Bakelite – while the finished stem is safe to use, the sanding dust from working Bakelite is toxic. A proper respirator is an absolute must here! Also, as you are about to find out, Bakelite can be heated and bent, but only to a certain point after which it is very likely to break.
I faced the stem on the topping board to get a good fit at the shank, then drilled and tapped for the male portion of the push-pull fitting. This went very smoothly, until it didn’t…..


As you can see form the last pic above, I was in the home stretch on this restoration. The shank had been salvaged and the fittings installed in both shank and stem. All that remained was to add the necessary bend to the new stem.
And that’s where it all went sideways. My first attempt achieved a 1/8th bend in the Bakelite before tragedy struck. Ouch!
Thinking I may not have applied enough heat to the Bakelite, I faced, drilled and tapped a second stem – and this one broke at almost the exact same place. Doh!

Remember I mentioned I had added a few acrylic stem blanks to the order, “just in case”? Unwilling to put the time and budget into another attempt at Bakelite, I instead moved to fit a rather handsome gold swirl acrylic stem instead.

I again went through the process of facing, drilling and tapping the stem blank, then needed to spend a bit of time sizing it to match the diameter of the shank. A few wrappings of clear hockey tape protected the shank from any errant file strokes.


It’s not visible in the above pics, but when held up to the light there were a few small gaps between the stem face and the end of the shank due to irregularities in the worn meerschaum. A shank band re-squared the end of the shank, with the added bonus of reinforcing the delicate old meerschaum. A bit of bling never hurt either.
You can also see in this shot that the acrylic stem took on the fairly significant bend of the original without any problems.

After giving the new acrylic stem a final buff and polish, I declared this marathon restoration complete! While not 100% historically accurate, this family heirloom is once again clean, whole and ready to enjoy by its current pipe steward. The acrylic stem retains the look of the original Bakelite while avoiding the pitfalls of the vintage material.
The restored pipe has already been returned to its steward, where it generated quite a buzz and brought back many memories of his father. I’m very pleased to have been able to play a role in its rebirth and hope the pipe remains in the family for generations to come.
Thanks for following along with me on this project. I hope you enjoyed watching it unfold as much as I enjoyed doing the work (though I may pass on future requests for Bakelite stems on bent pipes!).
Until next time, Happy Piping! Here’s the finished pipe.


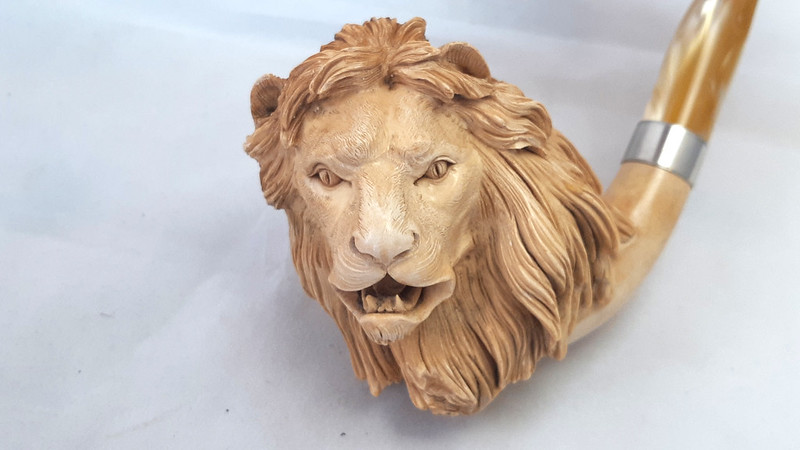


the head is very well carved. That kind of detail even in a Meer is rare
LikeLiked by 1 person
Very nice work. I have had luck bending bakelite and having it stay bent by boiling it and holding the bend while boiling. I can send you a couple after pics if you’d like.
LikeLiked by 1 person
Thabks Mark. Great tip!
LikeLike