
Leonard Payne was a British pipe maker who immigrated to Canada and set up shop in British Columbia. His pipes can be found on the Canadian estate market, though I’m not sure how many pipes were produced over the years. The entry on Pipedia.org is brief and to the point:
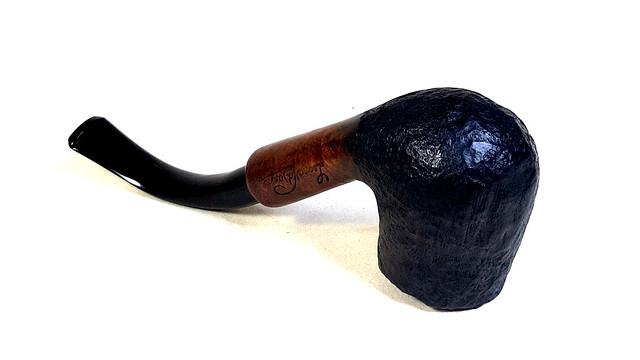
Mike Glukler of Briar Blues, states, “Leonard Payne was based in B.C. for many years. He came to Canada from England. He had shops in Surrey, B.C. and Kelowna, B.C. Interesting fellow. Gruff as the day is long. When you bought a pipe it was handed to you in a paper bag. No sock, no box. Most of his pipes carried a “carburetor” system at the shank / stem junction. Another Payne idea was his shanks. Almost all his pipes were two pieces. He’d turn the bowl and shank, then cut off the shank and reattach with glue (not always with the same piece of briar, so many did not match grains). His thinking was that the shank being the weakest link, if cut and glued would never break and thus “correcting” the weakest link. You may find his pipes on E-Bay on occasion listed as a Len Cayne. The P in his stamping looks more like a fancy upper case C.”
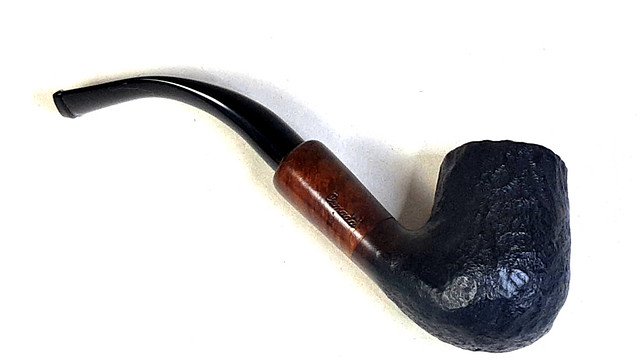
The Payne pipe on the worktable today was in fairly good tick overall, though it looked tired and unloved. The vulcanite stem had oxidized to a rather unpleasant shade of yellow/brown and was a bit stuck in the shank. The stummel was dirty and greasy in the hand, and carried a respectable amount of cake in the chamber.
The exterior of the stummel was oddly finished, to my eye at any rate. At first glance it appeared sandblasted, but there were some odd irregularities that made me look closer. Under good lighting and magnification, I was able to make out tool marks, which means that this pipe was rusticated to look like a sandblasted finish.


The pipe is stamped “Leonard Payne” on the left shank, “Canada” on the right and “Select” on top of the shank. There is no shape number.


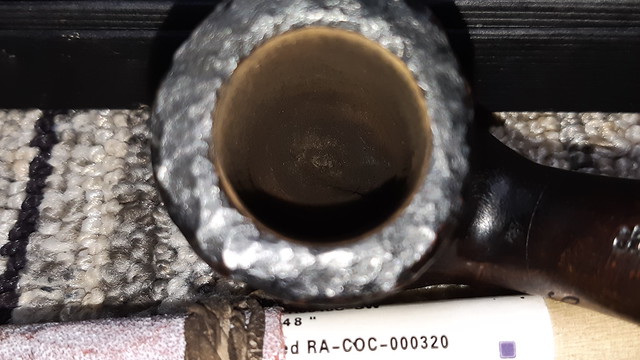
The last two images above show the cut and glued shank mentioned in the Pipedia entry. The next two pics show the carburetor system built into the shank. It is comprised of a condensing chamber in both shank and stem with short airways in the centre of each. These tubes do not meet when the stem is mounted, forcing the smoke to swirl around the chamber. Moisture condenses on the cooler metal walls, so the airway in the stem stays dry.


I dropped the stem into an Oxyclean bath to soften the oxidation, and worked on the stummel while it soaked. I removed the old cake using a combination of reamer and sandpaper wrapped around a dowel. The chamber walls and floor were in good shape underneath.

I used a small pile of pipe cleaners and cotton swabs dipped in alcohol to clear the grime and gunk from the pipe’s shank and airway. I also cleaned the accumulated tars from the shank portion of the carburetor.


Working on the stummel up close let me spot an old fill near the left rim that needed some attention. After wiping the stummel down with alcohol on a cotton pad to remove the dirty and old wax, I drop-filled the area with a mixture of thick CA glue and activated charcoal powder. In other circumstances I would have used briar dust in the filler material, but as this pipe was stained black, the charcoal will allow the patch to blend in more easily.


When the patch had fully cured, I used my rotary tool and a small carving burr to remove the excess material and blend the fill into the rustication. Sadly I forgot to photograph this step but you’ll see the results below.
A coat of Fiebing’s Black leather dye refreshed the pipe’s original finish, followed by a wipe of mineral oil to add some moisture and give the finish depth.


I set the stummel aside at this point and retrieved the stem from its Oxy bath. The now soft oxidation gave way before 0000 steel wool and Magic Eraser, leaving the stem black again. A few pipe cleaners dipped in alcohol made sure the airway was clean and open.

Then it was time to take the completed pipe to the buffer. The stem got a run on both the Tripoli and White Diamond wheels while the stummel was buffed with White Diamond only. Then the entire pipe received several light coats of Carnauba wax to shine and protect the refreshed finish.
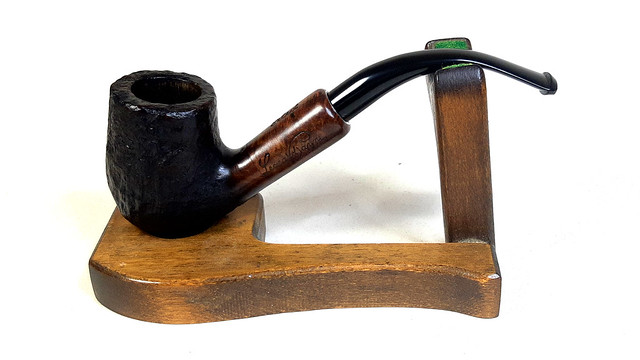
And with that, this Leonard Payne Bent Billiard was ready to find its next pipe steward. I have to admit that this pipe has grown on me during its time on the bench. Although the “blastication” isn’t really in my wheelhouse, the pipe is well made, nicely drilled and is a great piece of Canadian pipe history.
This pipe has found a new home with a new pipe steward, where I am sure it will serve faithfully for many years.
Thanks for following along with this etate pipe refurbishment. I hope you enjoyed the ride!
Until next time, Happy Piping! Here’s the finished pipe.


That’s a very unique philosophy on the stummel. I’m no pipe maker, but looking at the world of pipes, I’ve never seen anything like it. I wonder if you think as I do, that although creative and innovative, it sought to fix a problem that doesn’t really exist?
LikeLiked by 2 people
I understand what you’re getting at. I don’t personally see the shank to bowl junction as a looming weak spot in a pipe. The shank/stem junction breaks much more frequently based on the number of tenon replacements I’ve done versus shank reattachments.
LikeLiked by 1 person
Yes, I have a pipe with that same malady right now where the tenon snapped. I would think it would take something unusually catastrophic to snap the shank from the bowl. Still, interesting pipe and great restoration, as usual.
LikeLiked by 2 people