
I was asked recently about my pipe repair and restoration setup, so I thought I’d do a little write-up here. Though there have been a few changes over the years, the core tooling and supplies have remained basically the same.
DadsPipes utilizes four areas of our home here in Kitchener, including the garage where I keep the buffer and drill press, the den where I write up these posts on my laptop, and the bar sink in the basement that gets pressed into service for scrubbing pipes and de-oxidizing stems. The vast majority of the pipe work, however, happens at a small harvest table I bought very second-hand a few years ago and parked in the corner of my basement Man Cave. This room is where I get to put all those things my wife doesn’t want anywhere else in the house, notably my pipe collection, my guitars and other assorted memorabilia.
This picture was taken a few weeks ago when we listed our house for sale – it’s probably the cleanest the room has ever been! You can see my worktable in the front right corner, along with the rather tatty old office chair I hold onto because it’s comfortable. There is an equally tatty leather club chair in the back left corner of the room where I sometimes just sit and look at my accumulated stuff. My kids think I’m stroking out when I do this, but everything in this room represents a story from sometime in my life, and I like remembering.

Here is a picture of the worktable taken this morning. The centre of the table is taken up by a large hobby mat that is cut-proof and acts as a blotter of sorts. At the rear of the table is a small three-drawer unit that holds most of the tools and supplies I use most often during a restoration.

You’ll notice that I have two lamps at the table. The tall brass lamp provides general lighting in my little corner, while the articulated lamp gives some very bright task lighting along with a large magnifier built into the head. Of the two fixtures, I consider the task lighting and magnification to be the more essential of the two. With this lamp, I can get up close and personal to the finer details on a pipe, read faded markings, and trace the paths of hairline cracks with relative ease.
Also on top of the worktable is a tray of pipe cleaners, a sleeve of cotton pads and a box of cotton swabs. The wicker basket keeps things like CA glue, accelerator, mineral oil and various polishes from taking over the main work area. The red thing is a plastic IKEA shot glass I use to hold a small amount of alcohol while I’m cleaning a pipe. A bottle of isopropyl alcohol sits between the brass lamp and the drawer unit, behind a quarter sheet of sandpaper I leave out for topping bowls.
Getting into the nitty-gritties, the top drawer of my little storage unit is where I keep the various grades of sandpaper I use regularly – 220, 320, 800 and 2000 grits. As you can see, it’s also where I keep a few pairs of pliers that come in handy from time to time.

The bottom drawer of the unit is rather difficult to open, as it sits flush with the table top, so it holds a few random things I might find useful at some point, but the tools and supplies I use nearly every time I sit down to work on a pipe live in the centre drawer.
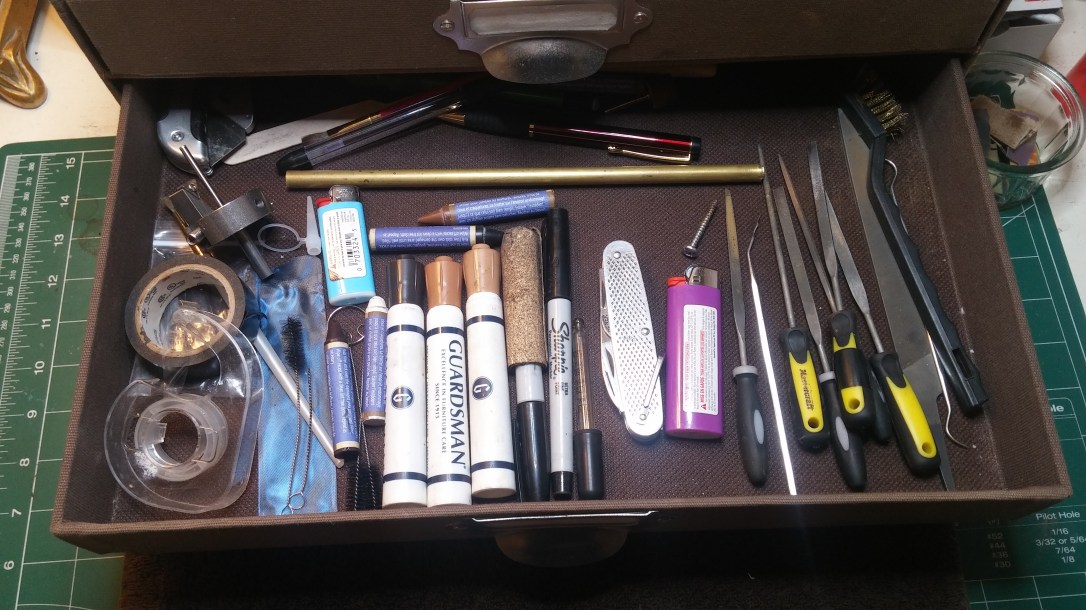
Moving left to right in the pic above, you can see rolls of both regular scotch tape and electrical tape, some spare shank brushes, wax filler crayons for refreshing stem logos, and a few Sharpie markers, the larger of which still has the sandpaper around it for tidying up chamber walls after reaming. Then I’ve got an eye dropper for applying alcohol to seized stems or salt-filled bowls, my trusty old army-issue pen knife, a cheap Bic lighter and then my collection of needle files and dental picks and a brass brush for cleaning rusticated pipes.
Also loitering around in the back of this drawer is my tenon-turning tool, a few pens for taking notes during a repair, and a length of 3/8″ brass tubing I’ve used several times for repairing cracked shanks.
The worktable itself has a large drawer where I keep a few other items helpful to the restorer – drill bits, both regular and micro, my Castleford reamer set, digital calipers for measuring tenon diameters, and a soldering iron I use to steam dents from briar. In the drawer organizer live my bottles of leather dye, pre-mixed dyes and washes, my retort, a few baggies of ready-made replacement Delrin tenons, and tubes of JB-Weld (both quick-set and original formulas). The mess at the front of the drawer is composed of more brass and aluminum tubing in various sizes, a pair of scissors and, I admit, assorted junk.

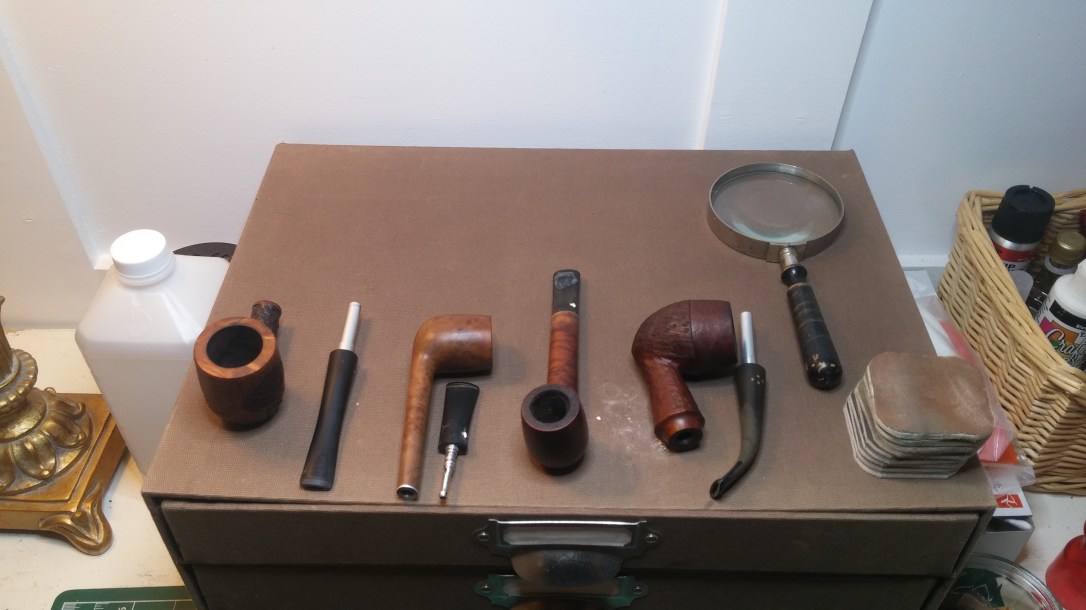
The drawer unit on the desk serves one last purpose for me as a place to put the pipes currently under refurbishment. I’ve got four pipes on the go at the moment in various states of repair. I lay the parts out carefully so as not to confuse which stem belongs to which pipe. If I have more than a few pipes in the works, I’ll use the bottom half of an egg carton to organize bowls and stems. This pic also shows my stack of micromesh sanding pads and a vintage but still useful magnifying glass I inherited from my great-grandmother.
Just before this little tour ends, I’ll take a moment to explain my towel system. In the pic below you can see two towels – or more accurately, two pieces of towel. A while ago my wife was throwing out a bunch of old towels, which I salvaged and cut into pieces roughly the size of a hand towel. I work with two such pieces when I’m repairing or restoring a pipe.

The first piece is laid out on the work surface to catch dust, debris, tars and other goodies while I work, and the other is kept close at hand for wiping bowl or stem, rough polishing after staining, and other such duties. When the towel on the table gets soiled beyond use, I replace it with the “buffing towel”, and grab a clean one out of the stack in the closet. The dirty towels get washed when the laundry pile hits critical mass and the cycle repeats.
Your pipe restoration work station may be similar or very different from mine, as these areas tend to be rather personalized by the user, but I will suggest that the key element of an effective worktable is organization. It doesn’t matter if you prefer to keep your pipe cleaners on the left or the right. Store your stains and dyes on a shelf or in a drawer, or in a stack on the table top if you like, whatever works for you. The important thing is to have a place for everything, and to make sure they go back in that place when you’re done.
As an aside, I also recommend auditing your tools and supplies every now and again. About once a year I take specific note of the tools and supplies I use during a few restorations. This helps me cull the herd a bit, relegating seldom-used items to secondary storage and cleaning up the work space in the process.
I hope you’ve found this worktable tour helpful, whether you’re a new refurbisher or a veteran restorer. This setup works for me, in this space, at this time. A year from now it may look the same or it may be substantially different. If it is different, I am sure it will have changed to better suit my needs at that time.
I hope you have picked up a tip or two to make your pipe restorations easier or your process more efficient. If you have tips and tricks you’d like to share with the community, please add them in the comments section – we’d love to read them!
Until next time, Happy Piping!

Charles, always a pleasure reading your posts. Great setup, and well organized.
LikeLiked by 1 person
Thanks Marc. I hope this post at least shows that you don’t need a huge amount of space to set up a useful Restoration Station.
LikeLike
That’s a really gorgeous man cave you have there! Must say I’m a tad jealous 😉
Thanks for sharing!
LikeLiked by 1 person
Cheers, Bruno. I spent quite a bit of time planning and building that room. I’m happy to say it came out exactly as I had hoped. 😀
LikeLike
Very cool. It’s a far cry from my propane heated garage and cluttered workbench. I think the 335 hanging on the wall would be too much of a distraction for me though. If you have that problem, Charles, I’ll keep the 335 out of site for you. 😀
LikeLiked by 1 person
A very generous offer, David! 😁 It’s actually an Epiphone ES-339. Same shape as the 335 but a much more comfortable 15″ lower bout. I love it, though I don’t play it nearly as much as I’d like too.
LikeLike
Charles, loved the tour and the Man Cave rocks! My Man Cave is a balcony – I have some memorabilia hung like all the license plates I’ve ever had, but when the wind gets up….well. The workspace tour was good too – you described your ‘Shank Brushes’ which I have a set but never knew what the long things were called. Now I know. Also, you described your ‘tenon-turning tool’ – I think I was able to identify the tool in the upper left. Did you buy it or fabricate it? My guess at how it works is that the tenon is mounted so that it does rotate freely and the tool is mounted in a power drill for high speed rotation? You then apply pressure with some sand paper to bring the tenon down? Is that how it works? If I got it right, a very helpful partner when in time of need. Thanks!
LikeLiked by 1 person
Hi Dal. I bought the PIMO tenon turning tool from Vermont Freehand. It mounts in a power drill and the cutter is adjusted to shave down the diameter of the tenon when the guide pin is inserted into the airway of the stem. It can be a bit tricky to adjust but saves a lot of hand sanding.
LikeLike
Thanks, Charles. I appreciate the information. Do you use it in cannibalizing tenons from other stems or utilizing old stems? I haven’t gotten into stem replacement yet and have been reading up on it and looking at the use Delrin stems. Thanks!
LikeLike
It’s handy for both applications. 😀
LikeLiked by 1 person
Here’s a link to the Vermont Freehand page for the tool.
http://vermontfreehand.com/product/adjustable-tenon-turning-tool/
LikeLike
Thanks, Charles! One tenon turning tool on its way to Bulgaria, eventually 😊.
LikeLiked by 1 person
Charles, can I bother you one more time?! I’ve mentioned that I’m looking to add some Delrin plastic tenons to my arsenal here to have them in supply when needed. JH Lowe offers straight threaded tenons and step-threaded tenons. First, I’m not sure I know the difference in these two styles. Is there a quick answer to that? And one more – there are several sizes available sold in 12s and a bit pricey for my pocketbook. Is it possible to purchase only the larger sizes and downsizing an individual tenon to the smaller sizes using the tenon turning tool that I just ordered? This sure would be more economical than having available each possible size. thanks!
LikeLike
Straight threaded means that the diameters of smooth and threaded parts of the tenon are the same
Step threaded tenons have differing diameters.
And yes, the tenon tool will allow you to slim down a larger tenon to fit your application. If you want to only buy one size of tenon, buy the largest one and adjust as needed with the tool. 😀👍
LikeLike
Fantastic! That works for me and my pocket :-). Thanks, Charles. Have a great day.
LikeLiked by 1 person