
Buying an estate pipe is a lot like buying a box of Cracker Jacks – you never know what surprises you’ll find until you open it up! Sometimes you win, finding a rare or special pipe under all the grime; sometimes, though, Fate decrees otherwise and drops a seriously damaged pipe in your lap. That was the case with this squat Rhodesian. It’s a no-name pipe, stamped only “Imported Briar” over “Made in Italy” on the underside of the shank.
The eBay listing, to be fair, had identified a few flaws – a mark on the rim and a white spot on the face of the bowl – so I was expecting these and a few other typical estate pipe issues. The stem had a fair bit of chatter and the button was a bit run down. The stem also fit somewhat loosely in the mortise – it stayed in place, but would rattle back and forth a few millimetres when shaken. The bowl was heavily caked, especially towards the back of the bowl, where the draught hole seemed slightly off-centre, though it was hard to tell with all the cake in the way. There was also some tar on the rim, but not enough to hide the flaw mentioned in the listing. Here’s the pipe as it was when I received it.


Just like home renovations, I’ve come to anticipate finding at least one or two unforeseen problems when I tackle a new-to-me estate pipe (wait – there’s plumbing in this wall??), but I wasn’t quite prepared for what I found when I reamed the bowl back to briar. Not only was the draft hole drilled off-line, but it was completely burned out! Removing the copious old cake exposed a hole almost 3/8” wide and perhaps 1/4” deep burned out of the back wall of the tobacco chamber and extending into the shank. As you can also clearly see in the next pics, the bowl had been over-reamed and now sported a circular depression in the centre of the bowl. To add insult to injury, the tobacco chamber is drilled off-centre, and with a backwards slant. In fact, my overall impression after close examination is that this pipe was likely (hopefully?) produced by an apprentice carver, and as a practice piece at that. To call it a second would be flattery – I’d like to think that this pipe never made it to the sales counter, instead being used by its hapless maker until it burned through.


Wanting to get a better idea of the extent of the damage to the bowl and shank, I started picking away at the edges of the burnout with a dental pick. I cleared out the hole until I saw solid wood on all sides. It was during this clean-out that the “mark” on the rim identified in the auction listing proved to be the end of a long crack about 2mm deep that ran from the burnout around the draft hole right up the back wall of the chamber. I used the dental pick to clean out the crack and took the following picture.
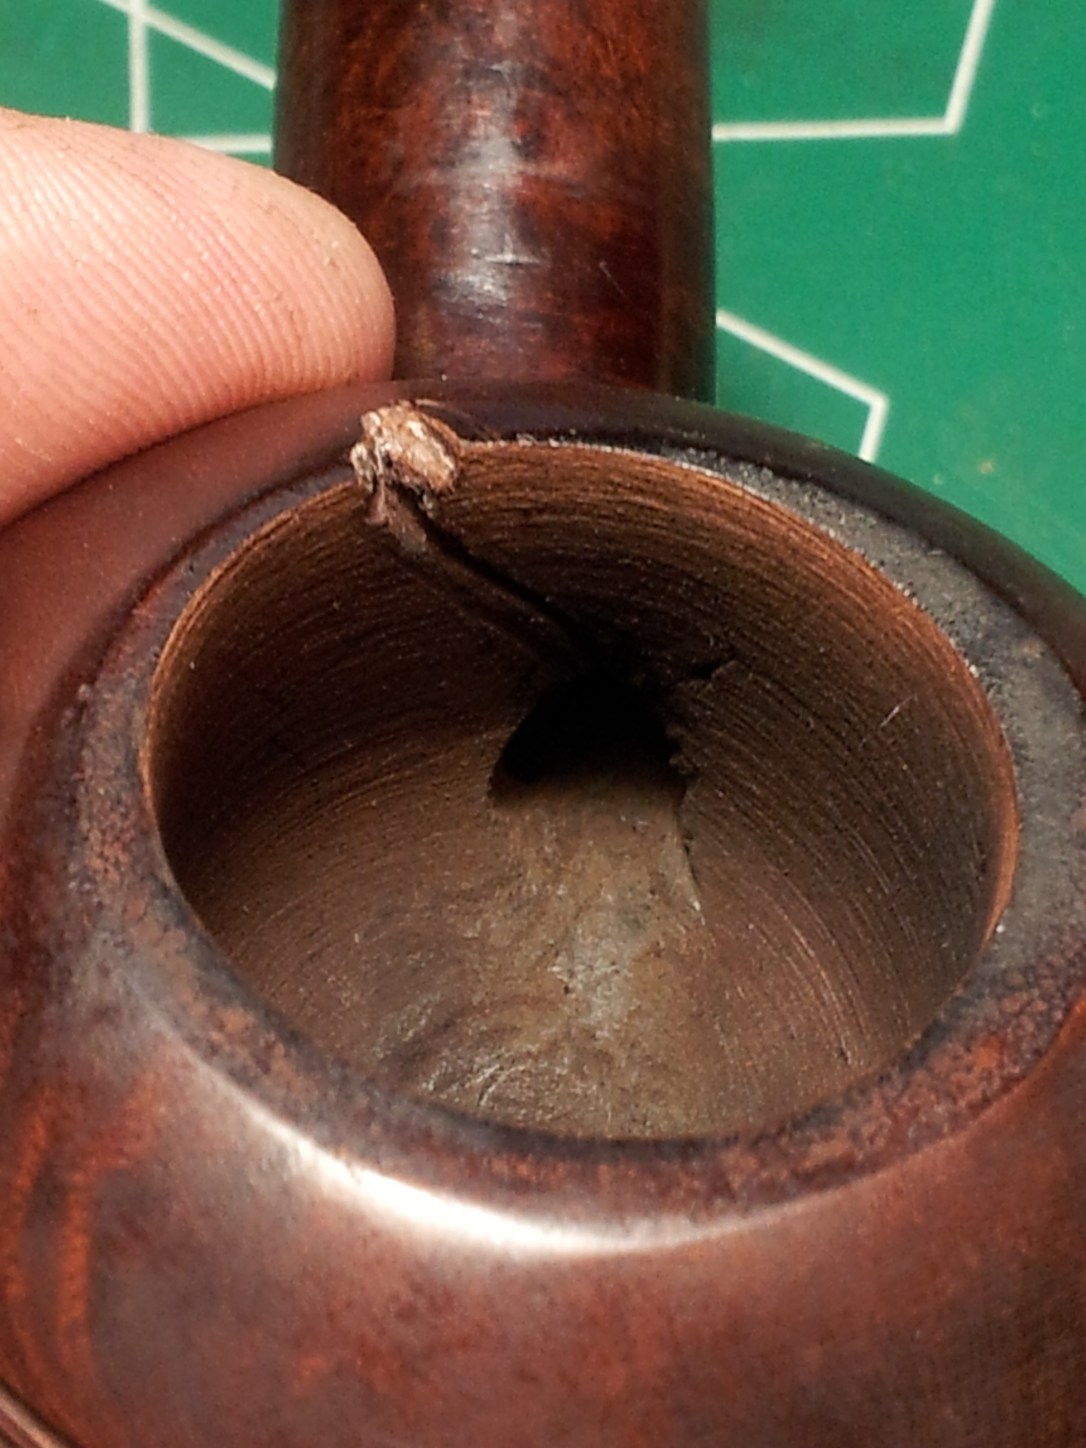
This is where things got interesting. I noticed in the pic above that there appeared to be a deeper hole or channel inside and to the left of the burnout. More intriguing, however, was the discovery that this “lower channel” lined up exactly with the middle of the shank’s airway. The pics below show the different tracks – the first pic is the draft hole/burnout. The second shows a 5/32” drill bit seated in the lower channel.


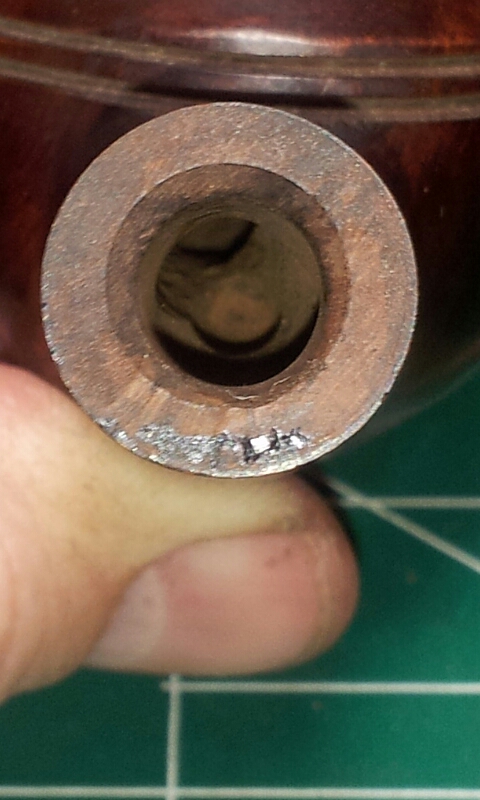
Technology is a wonderful thing – I have a magnifier app on my smartphone that I use frequently when trying to read the microscopic text on a product label, the stampings on a pipe or, in this case, get a clear view of what lies inside a pipe shank/mortise. A recent update to the app added photo capabilities, so I was able to snap the following shot down the airway of this pipe’s shank. It clearly shows a double-drilling: the original (and presumably intended) drilling of the mortise and airway, which comes to an abrupt end before penetrating the tobacco chamber, and a second drilling in the upper left of the airway, which is the path of the burnout. It looks like our apprentice pipemaker let the drill slip while drilling this stummel.
After thinking about the situation for a while, I decided to attempt a fix that both repaired the burnout and restored the airway to its intended course, which seemed to line up pretty well with the bottom of the tobacco chamber. My go-to product for tobacco chamber repairs is JB-Weld, as it’s easily acquired, easy to work with and, once cured, heat-resistant, safe and inert. I have had success with JB-Weld repairs to chamber wall cracks and small burnouts, but considered this repair experimental due to both the size and location of the damaged area.
I prepared for the chamber repair by cleaning up the stummel, starting with an alcohol soak to soften the old tars and remove the old finish. The soak, followed by a quick sanding, cleaned up the exterior of the stummel and smoothed out the small dings and dents. I also picked out a few small fills that would need attention. The airway was also scrubbed out with pipe cleaners and alcohol.
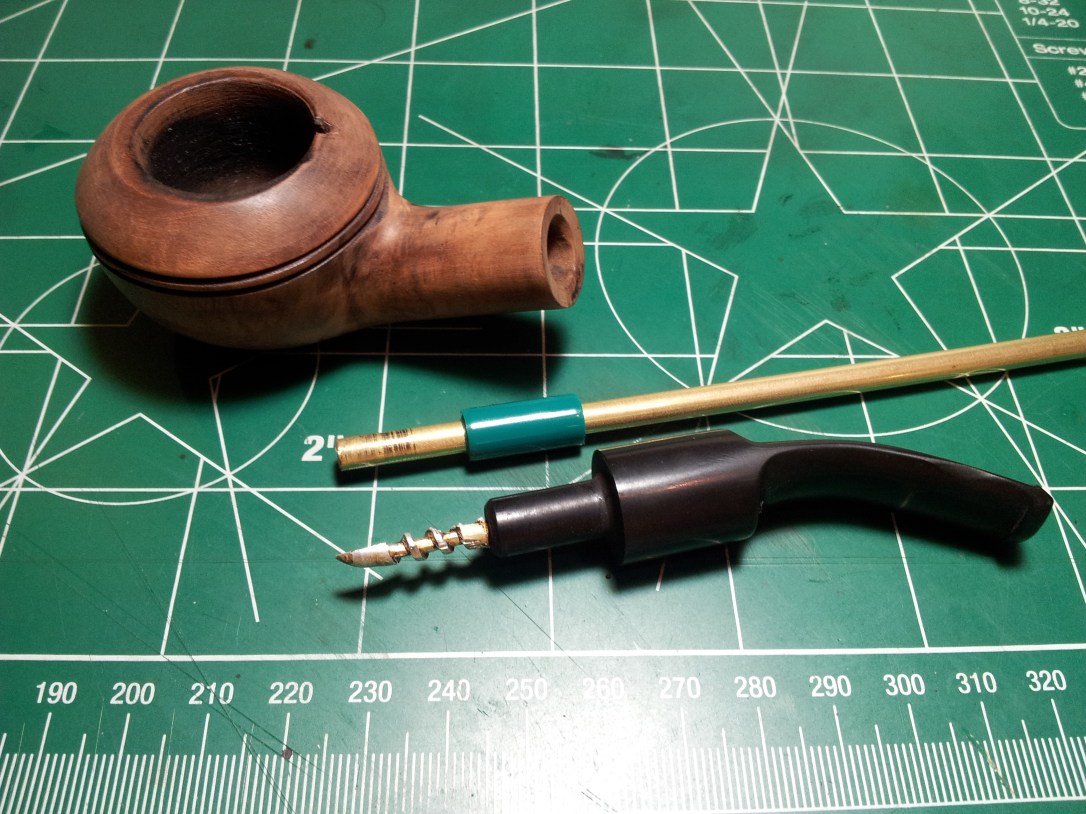
I also cleaned up the stem with an Oxyclean soak and a scrub with 600-2000 grit sandpaper. It was actually in good shape and cleaned up quickly. The aluminium stinger was not in great shape – it had been bent repeatedly by being pushed into the under-drilled mortise, and had been further damaged when someone used pliers to pull the stinger out of the stem, presumably for cleaning.
With the pipe clean, it was ready for my repair attempt. I decided to concoct an ad hoc form to use inside the mortise to keep the JB-Weld in the damaged area. I hoped this would minimize the amount of cleanup required after the epoxy cured. I used a length of suitably-sized brass tubing for this, adding a mortise-sized plug of electrical tape at the right distance from the end of the tube to recreate the correct interior dimensions.
I spread a little Vaseline onto the tube form and then inserted it into the shank, seating it as firmly as I could in the mortise. Then I mixed up a small amount of JB-Kwik, which sets in 4-6 minutes. I used the end of a bamboo skewer to drop blobs of JB into the burnout, pushing the epoxy deep into the damaged area against the tube form. After a few minutes, when the JB started to set, I pulled out the tubing form to ensure I didn’t glue it into the shank. Thankfully, the vaseline had done its job, and the JB did not stick to the form. Then it was a simple matter to add successive layers of JB to build up the repair until it filled the entire burned out area. I applied 4 layers of JB in total, letting each layer cure before rough-sanding the surface with 80-grit paper to give the next layer a good grip. This series of pics shows the repair after each layer. You can also see that I dropped a bit of JB into the over-reamed area on the floor of the bowl and also filled the crack at the back of the bowl. I left the very top of the crack open at the bowl rim so I could fill that later with CA glue and briar dust.
THe final shots below show my attempt to improve the off-centre look of the rim by topping the bowl, though this necessitated sanding an angle into the top. I aimed for a happy medium of a “more or less even” rim width with a “more or less flat” top, though anything more than a casual glance at the pipe’s profile will show how off-kilter the bowl drilling really is. There is more briar between the dual rings and the rim at the front of the bowl than there is at the back, so just pretend you don;t see that…..


After the last layer of JB had fully cured, I got to work sanding and shaping the repairs. I used 80-grit paper wrapped around a dowel to remove the excess JB, bringing the repair flush with the briar. I also re-drilled the airway to remove the excess JB from the mortise. I hand-turned the bits to avoid over-drilling, then used an electric drill and a 5/32” bit to drill the new draft hole in line with the original airway. This series of internal pics shows the progress at each step. As anticipated, the original course of the airway lined up nearly perfectly with the centre of the bowl.


The last steps in this rebuild/restoration were filling the larger dents and adjusting the fit of the stem. Given the rather rough condition of the stinger, I decided to remove it and refit the stem on its own by expanding the tenon. This was accomplished by heating the tenon over a lighter flame and inserting the smooth end of a drill bit sized slightly larger than the airway. This fattened up the tenon sufficiently to provide a nice snug fit in the mortise without the rattle it had come with.

The missing fills on the side and rim of the pipe were repaired with CA glue and briar dust. When the glue was cured, the fills were sanded smooth and the entire stummel was sanded with medium and fine sanding sponges and 0000 steel wool. This smoothed the surface and brought a bit of shine to the briar. The stem was polished using the same sanding sponges and steel wool. I didn’t put a great deal of effort into the cosmetics of this pipe, being more concerned with the structural integrity, but it came out looking pretty good anyway.
Then it was time to stain and refinish the pipe. I first applied a coat of black leather dye to highlight the grain. Most of the black was scrubbed off with 0000 steel wool before I stained again with a medium brown dye with a bit of tan added for good measure. Then the pipe was buffed with White Diamond compound and given several coats of Carnauba wax. The pipe looks almost new again, and experience has taught me that the grey JB Weld in the bowl will turn dark and fade into the chamber after a few smokes. I’ll be watching this repair carefully for a while to see how the JB holds up but I’m reasonable optimistic that this pipe will be serviceable for a long time to come. I will update after I’ve had a chance to break it in.
Here’s the finished pipe:


Thanks for looking and happy piping!

That is a very creative fix and a great looking pipe, nice work!
LikeLiked by 1 person
Thanks, Al. I figured I had nothing to lose in the attempt, and if nothing else I’ve gained another shop pipe.
I fired it up yesterday and it smoked really well. Wide open draw and very lightweight. My JB patch shows no ill effects either. I did rebend the stem afterwards though – the bowl was tilted too far down and I kept dropping ashes. Whoops!
LikeLike
Very impressive surgery….A bit of “plastic surgery” so to speak!
LikeLiked by 1 person
Ha! I see what you did there…. 🙂
LikeLike