
One of the things I enjoy most about operating a web-based business is that I never know where my next job will come from. Nearly a decade after first hanging my shingle out, about half of the repair and restoration projects that arrive on the bench are from domestic clients across Canada; the other half are sent in by pipe smokers and collectors around the world. Today’s patient, a 1980 Dunhill Cumberland Dublin, was received from a gentleman in New Mexico, USA.
The initial email from the pipe’s steward reported a blockage in the stem, the result of a piece of pipe cleaner jamming up in the narrow section of airway behind the flat V-shaped slot. Otherwise, the pipe appeared to be in good shape, in need of only a good cleaning and polishing. I took this initial series of pictures when the pipe arrived in the shop. As you’ll see, the rim of the bowl was obscured by a crust of carbon “lava”, and the chamber sported a light layer of cake. The Cumberland stem was lightly oxidized but otherwise free of the usual tooth chatter.
Note the band of darker briar around the middle of the bowl. Sometimes such discolouration is simply an accumulation of dirt on the exterior of the bowl, but it can also be a sign that the briar was subjected to high heat. Foreshadowing, anyone?


The pipe is stamped on the underside with “21143” over ” Dunhill Cumberland” over “Made in England20“. Deciphering the shape number, we learn that the pipe is a Group 2 size (2), Taper Stem (1), Shape 14 Dublin. The superscript, underlines “20” indicates the year of manufacture: 1960 + 20 = 1980.

As the stem blockage was the primary complaint with the pipe, I decided to start my work there. As suspected, the blockage was located at the narrowest part of the stem’s airway, approximately 1cm from the button end. This is a common spot for a blockage, especially on a curved stem, and removing the offending material can be a task.
To make things a little easier, I decided to straighten the stem. This not only allows the use of a straight drill bit to clear the blockage but also opens up the airway at the pinch point. To ensure that I reset the bend precisely afterwards, I first traced the contour of the stem on a piece of scrap paper to make a template.

I warmed the Cumberland Ebonite over the heat gun until it became pliable. In the pic below, you can see how the stem straightened itself out, “remembering” its original shape.

With the stem straight, it was a fairly simple task to drill out the blockage using a long 1/16-inch drill bit followed by a finishing pass with a 9/64-inch taper-point bit.

With the airway cleared, I used the template made earlier to restore the stem’s bend to factory spec.

The stem would need polishing to remove the light oxidation and bring up the shine, but for now I put it aside to work on the stummel. I used my reamer and some sandpaper wrapped around a dowel to remove the old carbon cake form the chamber.

With the cake out of the way, the true state of the chamber was revealed. As you can see below, the bowl was heavily heat damaged, with a band of scorched briar wrapping he full circumference of the chamber.


Looking straight down the chamber from above, I could see that the chamber had, at some point in the past, been reamed slightly off-center, leaving a crescent of cake on the righthand side of the bowl. I was working to remove this last bit of carbon when disaster struck and the whole left side of the bowl came away in my hand. Yikes!


You can see in the close-up pic below just how deeply the heat had penetrated the briar. The cross-section of chamber wall was almost all black, with just a sliver of undamaged briar around the outside. This is a prime example of the worst-case “hidden damage” scenario. There is really no definitive way to identify the problem before actually working on the pipe, but once discovered, it cannot be ignored.

After relaying the state of the union to the pipe’s steward, the decision was taken to attempt a repair to restore the pipe to active service. To that end, I took a minute to clean the shank and airway using a few pipe cleaners dipped in 99% isopropyl alcohol.

Although a shattered bowl is certainly not a good thing, I did get lucky in that the break was clean and there were no missing bits of briar. This would make the reassembly much easier. To get the ball rolling on the repair, I mixed up a small amount of JB-Weld high-heat epoxy and applied it carefully to the edges of the break.
I slid the loose piece of briar into position and held it firmly in place until the epoxy took hold. After cleaning the squeeze-out from the exterior of the bowl, I clamped the repair in place with a wrap of hockey tape and left the stummel to rest overnight while the epoxy cured.

The next day, I removed the tape and took these pics. The crack was barely visible on the exterior, while the chamber needed a bit of cleanup to remove the excess epoxy that squeezed out.


Glue alone would not be sufficient for a lasting repair. While the epoxy makes a strong bond, the briar needs to be stabilized to survive the expansion and contraction experienced during use. For those looking for more detailed info on crack pinning, I recommend reading through this tutorial post I wrote several years ago.
In a nutshell, the cracked bowl is reinforced by drilling pin shafts across the crack in several locations, then gluing sections of metal rod into the shafts before making cosmetic repairs. This illustration, taken from the linked tutorial, shows how the shafts are drilled across the crack and completely within the briar chamber walls. The opening of the shaft is then filled after the pin is glued into place for a, hopefully, invisible repair.
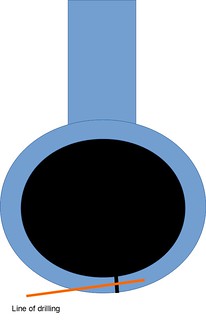
I installed a total of three brass pins across the crack using a 1.5mm drill bit and brass rod measuring 1.43mm in diameter. As you can imagine, getting the drilling angle correct is essential here. You do not want to drill through into the chamber.

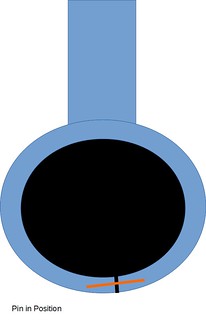
Here is a close shot of one of the pin shafts after drilling. Note the angle of the shaft, indicated by the silver marker. By drilling the shafts at opposing angles across the crack, the pins stitch the bowl together and are unlikely to pull out with the expansion and contraction of the briar.

The pins are cut to length so that they seat within the wall of the bowl. A drop of CA glue is added to each shaft before the pin is inserted. A filler made of CA glue and briar dust then caps the open end of the pin shafts, sealing the pin within the briar.

I let the fills cure overnight, then used a series of needle files to remove the excess filler and texture the repairs to blend into the factory sandblast finish.

The final cosmetic touch to the exterior of the stummel was to apply a new red-over-black stain finish to replicate the original. First, a coat of black leather dye was wiped on and allowed to dry. Then the black dye was removed, leaving it only in the deeper areas.

A top coat of Black Cherry leather dye was then applied, allowed to dry, then hand buffed to remove the excess. A light wipe with mineral oil (not pictured) helped to set the new stain and inject some moisture into the briar.

With the exterior of the stummel in good shape now, I turned to the interior. The large crack had mostly filled when I glued the side of the chamber back on, but the scorched briar around the rest of the chamber needed some help. To fill and protect the damaged areas, I applied a layer of pipe mud to the entire chamber, pushing it into the blemishes for optimum coverage.
The mud mixture I have been using is shown below. This Aristocob Miracle Mud is an easy to use commercial preparation that goes a long way. Unfortunately, I used the last of my supply with this project and it seems that Miracle Mud is now out of production.
To darken the finished look, I mixed in a small amount of activated charcoal powder.

This shot looking down the chamber shows the mud applied to the entire interior surface.

I again set the pipe aside overnight to allow the pipe mud to dry before gently sanding out the inevitable imperfections. When the chamber walls were nice and smooth, I added the final touch – a bowl coating made from maple syrup and activated charcoal. To give the coating maximum thickness, I wiped a small amount of syrup around the interior surfaces then filled the bowl with charcoal powder. A pipe cleaner keeps the bowl coating from blocking the draft hole.

I let the charcoal powder sit in the bowl for a few hours, during which time the syrup absorbs as much charcoal as it can. After dumping out the excess charcoal, I let the bowl sit again to give the fresh bowl coating time to dry. Ideally, the coating is left to cure over a few days, after which it becomes a hard, durable but breathable surface on which a new cake layer can be built.
Finally, with the bowl repairs complete, I took the finished pipe to the buffer where I gave the bowl a bit of a shine and polished up the Cumberland stem. A few light coats of Carnauba wax added more gloss and a layer of UV protection fore the restored pipe.
I’m rather pleased with the results of this repair. The finished pipe looks great, and the repairs are virtually invisible to all but the most dedicated inspection. The Cumberland stem and shank extension have been cleared of the haze of oxidation that had dulled them, and better yet, the pipe is once again structurally sound. Treated with a modicum of care, this rebuilt and revitalized Dunhill Cumberland Dublin should provide many more years of smoking companionship to its steward.
Thanks for following along on this unexpectedly involved estate pipe restoration. I hope you enjoyed watching the process unfold. If nothing else, this project shows that every pipe is restorable if the will to do so exists. I’m happy I had the chance to return this lovely little Dunhill to active service.
Until next time, Happy Piping! Here’s the finished pipe.


Charles, unbelievable save! This project pulled more rabbits from the hat than I’ve seen. Maple syrup… haven’t seen that one. It sounded like your pipe mud had a little bit more stability than the recipe I use of cigar ash and water. Thanks for this write up.
LikeLiked by 1 person
Thanks, Dal. This was an unexpectedly complicated repair – from a simple blockage to a complete rebuild!
LikeLiked by 1 person
There is no doubt that most would look at a charred obliterated bowl like that, and sigh while tossing it in the waste!
LikeLiked by 1 person
Yes, the pipe’s steward had had it since new so was rather attached to it. Well worth the effort to restore the pipe to useful condition.
LikeLiked by 1 person
Awesome save Charles. Great work as always. The pinning is terrific.
LikeLiked by 1 person
And I thought my Dad’s pipes were heavily smoked. At least they didn’t fall apart on reaming! That is one amazing repair Charles!
LikeLiked by 1 person
Thank, Marlowe!
LikeLike
Wow! Nice save.
David
Sent from Outlookhttp://aka.ms/weboutlook
LikeLiked by 1 person