
Pipe forums and other discussion groups are full of posts asking about crack repairs, especially to pipe bowls. Bowl cracks are generally the result of either accident, abuse or neglect – accidental drops or impacts can crack the wood, as can outright abuse like whacking the pipe against a hard surface to knock dottle out of the bowl. Cracks caused by neglect are usually due to a failure to maintain the level of cake (carbon buildup) inside the tobacco chamber.
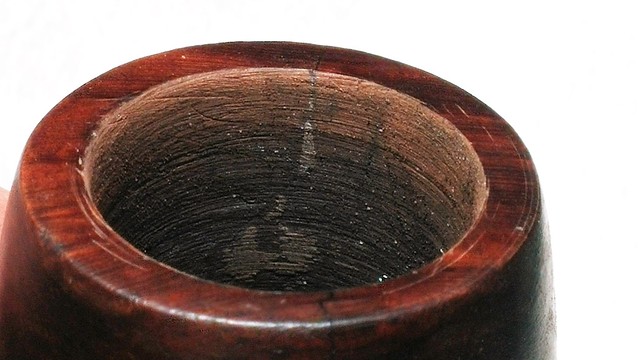
Cake forms on the walls of the chamber when the pipe is smoked. Tars, ash  and carbon combine to form a dense, heat resistant layer that is actually beneficial to the briar pipe up to a point. The ideal cake thickness is about the thickness of a dime, at which point it adds a layer of insulation to the tobacco chamber that helps protect the briar walls from burnouts. Too much cake impinges on the smoking ability of the pipe and can pose a serious threat to its structural integrity. This is because cake expands and contracts at a different rate than the briar of the chamber walls, and, if allowed to build up past the recommended point, can apply enough outward pressure on the tobacco chamber to crack the briar clean through.
If the crack does not penetrate the chamber wall and/or is tightly clamped together, it is often possible to effect a long-lasting repair by sealing the crack with CA glue on the exterior of the bowl or JB Weld or basic pipe mud (cigar ash and water) on the interior of the tobacco chamber. If however, the crack goes all the way through the chamber wall and is mobile (ie the crack can be flexed open and closed), it may be necessary to add physical support to the repair to ensure a solid and permanent repair. Pipers are used to seeing shank bands of nickel, silver or even gold used to reinforce a crack in a pipe’s shank, but most folks don’t want to wrap a metal band around a pipe bowl. Here is where crack pinning comes into the pipe repair repertoire.
Pinning is a method of crack repair shrouded in mystery and really only mentioned online in lists of repairs available at a few shops by skilled craftsmen. It does require a few specialized tools and a steady hand, but pinning should not, in my opinion, be regarded as outside the scope of a home repair or restoration. If you’re relatively handy and have a few dozen pipe restorations under your belt, I encourage you to push the boundaries a bit. If, on the other hand, you’re still nervous about performing a ream & clean, you’re probably not ready to tackle pinning. And as with all new repair skills, I think it wise to practice on a few junker pipes before aiming your drill at that vintage Peterson or Dunhill.
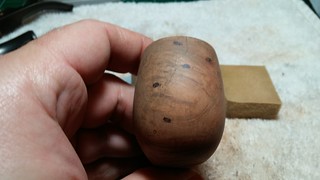
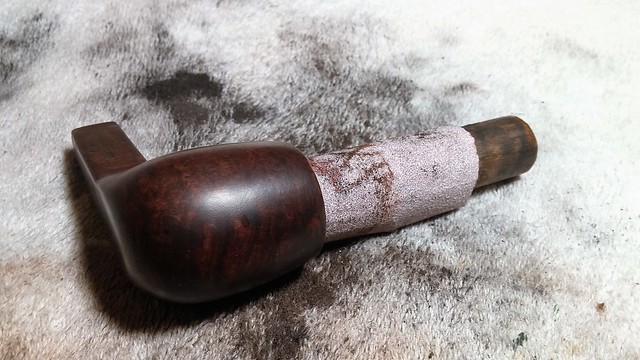
The patient for this pinning tutorial is a stummel made by GBD for Poor Richard’s, a tobacco shop in Bozeman, Montana. The original owner had neglected the cake buildup in his pipe to the point where the cake had literally split the bowl nearly in half, with cracks at the front and rear of the bowl. I could see the cracks opening and closing just by squeezing the bowl in my hand. Not good!


I gathered up a few tools and supplies:
-
a 1.2mm micro drill bit
-
a variable speed electric hand drill
- a length of 1.2mm brass rod
- wire cutters
- 220-grit sandpaper
- CA glue
- a marker
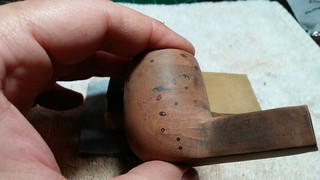
To stop the cracks from spreading further, I first drilled “end cap” holes at the terminal ends of each crack, careful not to punch through the chamber walls. The front crack was simple enough, but the rear crack had “spidered”, spreading thin, running cracks in all directions across the briar. I tracked each spider crack and drilled an end cap hole for each one.
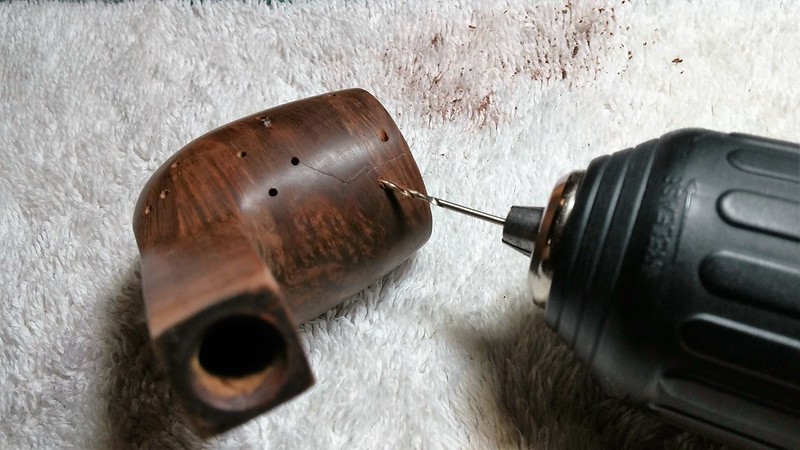
To pin the cracks, it is necessary to drill pin shafts across the crack, through the curved walls of the bowl, without drilling into the chamber. This graphic shows the line of drilling. To minimize the number of holes I’d need to fill afterwards, I opted for “blind pinning”, in which I stopped the pin shaft before it broke through the briar surface again.
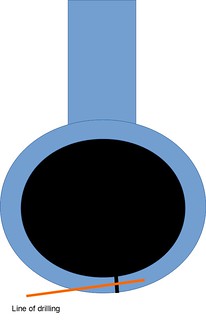
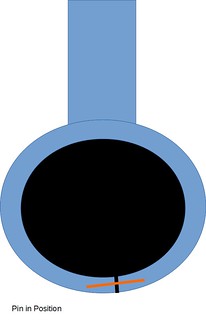
This close-up pic shows the flat angle at which I drilled, and the brass rod in position. I marked the rod length and then cut it a bit short so that when fully seated in the shaft, the outer end of the rod would be below the outer surface of the briar. I roughed up the brass pin with 220-grit sandpaper to give the glue more gripping surface, then ran a drop of CA glue into the shaft before pushing the pin home.
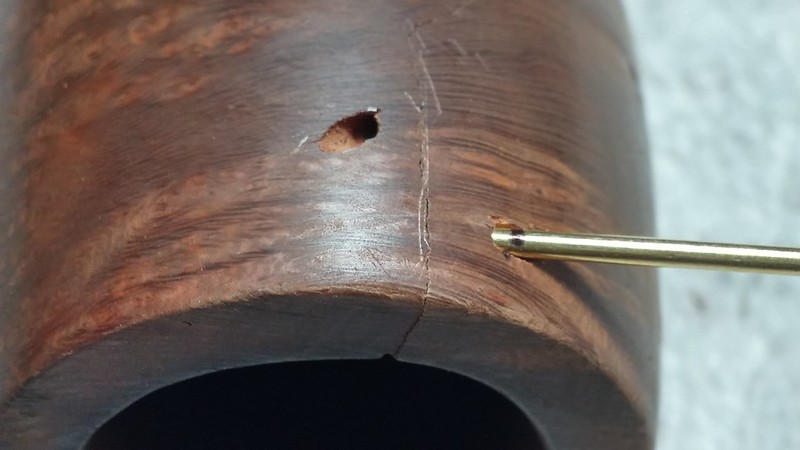
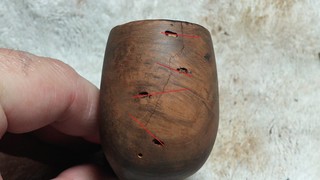
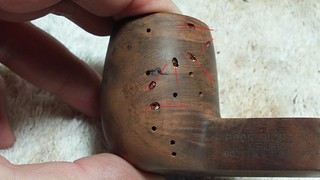
Sharp-eyed readers will also have noticed that the second shaft had been drilled when I took the pic above. Note the angle of this shaft relative to the first one – it’s not even close to parallel. This is deliberate. Each pin should be drilled at an opposing angle to its neighbours. This way any movement of the briar as it heats and cools will be blocked by one or more pins. If the pins were parallel, pressure in the wrong direction could push the crack open again. Here are pics of the front and rear cracks after pinning. The red lines show the direction of the pin shafts. You can see how the pins work to stitch the crack shut. The front repair doesn’t look too bad, but the rear of the bowl looks like it was attacked by termites!
After letting the glue cure, I am happy to report that I can no longer make the cracks move no matter how hard I squeeze the bowl. That’s a very good sign, as it shows that the bowl is acting as a single piece of briar instead of several bits of loosely connected wood.
With the bowl structurally sound again, it was time to sort out the damage inflicted on the stummel by some maniac with a drill. I patched over all 17 (!!) holes with CA and briar dust and let the CA cure before filing and sanding the fills flush with the surface of the briar.
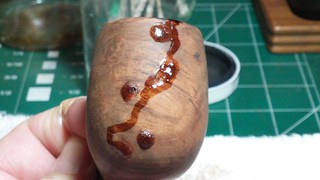

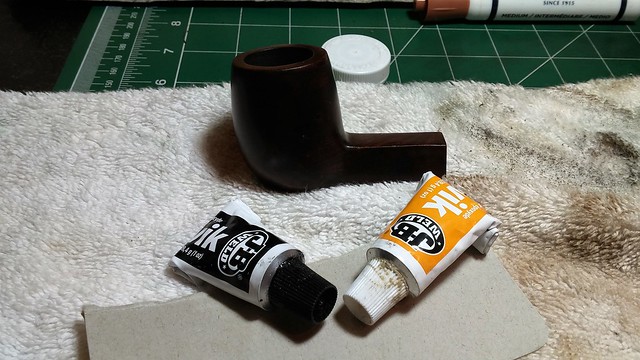
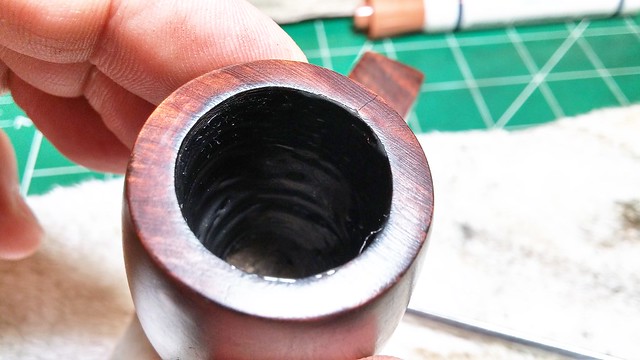
At this point, you can sit back and congratulate yourself – the hard work is done! But before refinishing the stummel, take the time to fill the cracks on the interior of the bowl. Many pipe repairmen use traditional pipe mud (cigar ash and water) for interior chamber repairs, but in this case I elected to fill and reinforce the interior repairs by pressing JB Weld into the cracks. There was also a spot on the front chamber wall that looked suspiciously like the beginnings of a burnout that I filled in the same way. I let the JB cure and then sanded out the excess epoxy. This produced nice smooth chamber walls with JB Weld left only in the repaired areas. JB doesn’t “breathe” like wood as it heats and cools, so I think it’s worth the effort to remove any epoxy that you don’t need.
I finished off the repair with a bowl coating of activated charcoal powder and maple syrup. This coating is largely cosmetic in this case, used to hide the JB, but it will provide an extra layer of protection for the repairs as well as a consistent surface upon which to build a new (and hopefully well-trimmed) layer of cake. You can read my post on this useful bowl coating method here.
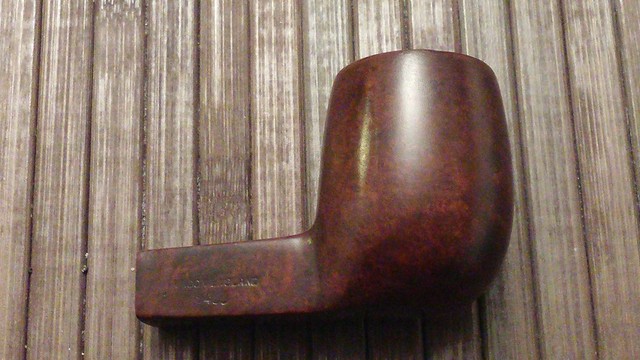
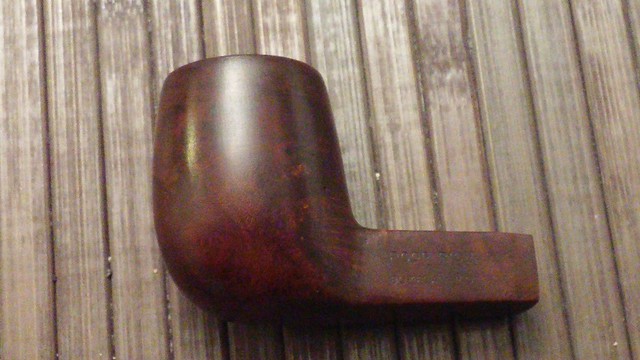
All that remains at this point is to refinish the stummel as you like. If your repair required a large number of fills, I recommend a dark stain as it hides the repairs better than a lighter finish. In this case, I went with a dark brown finish that masks the repairs well enough but still allows the grain of the briar to shine through. If you’d like to see how the completed pipe turned out, you can check out the full restoration here on Reborn Pipes.
I hope this tutorial has demystified the pinning process and provided you with another useful repair technique and the inspiration to try it out the next time you come across a cracked bowl. I would put crack pinning up near the top of the Pipe Repair Food Chain, so try to start this repair when you’re rested and have an uninterrupted span of time in which to work. And, as with all repairs, remember to plan your work, have all the necessary tools and supplies at hand, and proceed carefully and patiently.
Thanks for joining me. Happy Piping!

Charles, thanks for making this tutorial. One of the most unique and durable fixes I could imagine. Many of us (including myself) had never heard of this method before. Please let us know in a follow up how it smokes and holds up.
LikeLiked by 1 person
I figured this would be new territory for a lot of folks, which is why I wanted to break it out into its own post. It’s not nearly as daunting as it sounds. The worst you could do is over-drill a hole and give yourself another fill to fix. 😉
Steve and I will both be following up on the stability of the repair after he’s had a chance to fire up the pipe a few times.
LikeLike
Thanks Greg. I searched but found no existing writeup of the process so thought we needed one. I based a lot of this tutorial on a post I found on woodwind instrument repair. Same principles – close the crack & keep it closed.
LikeLiked by 1 person
In hand it is a great looking repair. I hope to fire it up later this week to see what happens. The mechanics certainly sound promising. Charles did an amazing job on the bowl.
LikeLiked by 1 person
Reblogged this on rebornpipes and commented:
Charles put together this tutorial on the pinning and repair of the pipe we worked on together. Since it would be new territory for a lot of folks, he broke it out into its own post. It’s not nearly as daunting as it sounds. The worst you could do is over-drill a hole and give yourself another fill to fix. 😉
Charles and I will be following up on the stability of the repair after I have had a chance to fire up the pipe a few times.
LikeLiked by 1 person
Excellent article, Charles! I had no knowledge of this before your article- never even heard of it. I’m excited to hear the results you get long term and to try it myself. Kudos for the diligent research and for sharing the technique!
LikeLiked by 1 person
Thanks Greg. This has been quite an adventure but if the repair stays on its current trajectory long term it’s a winner.
LikeLiked by 1 person
It’s certainly innovative IMHO and a great option to have in the arsenal.
LikeLiked by 1 person
Amazing tutoring Charles, takes quite some skill and talent. Thank you so much.
What “tool” was in order to work the JB in the bowl and there is a quick setting one too, not ?
LikeLike
Hi Roland. Thanks for commenting. Anything that fits down the bowl will work for applying the JB – I typically default to a gloved finger or a doubled up pipe cleaner. I like the quick-setting version of JB too – “JB-Kwik”. It’s not rated as highly for temperature resistance as the regular JB but it sets in 15 minutes versus 12 hours. That makes it a heck of a lot more convenient!
LikeLike
Great tutorial. Thanks for clarifying something I’ve only seen on price lists for repairs and had no idea what that was! Looks easy now!!
LikeLiked by 1 person
Hope it works for you! I’m sure there are ways to improve the process. If you find one please post it here!
LikeLike
Thank you Charles for the tutorial. Very informative.
LikeLiked by 1 person
Thanks for all the comments, everyone. I found several videos on woodwind instrument repairs helpful when trying to nail down a pipe pinning process (bad pun!). You’ll see a lot of familiar tools, supplies and techniques used in this clarinet crack repair:
LikeLike
Thank you Charles for this fantastic tutorial. I have a pipe (or two) in need of this repair, and have wondered if this might work. I will look forward to the follow up report answering the question of durability. .
LikeLiked by 1 person
Thanks Dave. I am reasonably confident the repair will hold up, though empirical evidence to that effect will be most welcome 😉
LikeLike
Charles, thanks for the excellent tutorial.
One of my ‘other’ hobbies involves restoration of M1 Garands and I have seen pin repairs on some of the stocks but mostly I have seen crossgrain wood spline repairs. I think the pinning looks a lot cleaner and will definitely be easier.
Thanks for adding another arrow to my quiver.
Don
LikeLike
You’re very welcome, Don!
LikeLike