
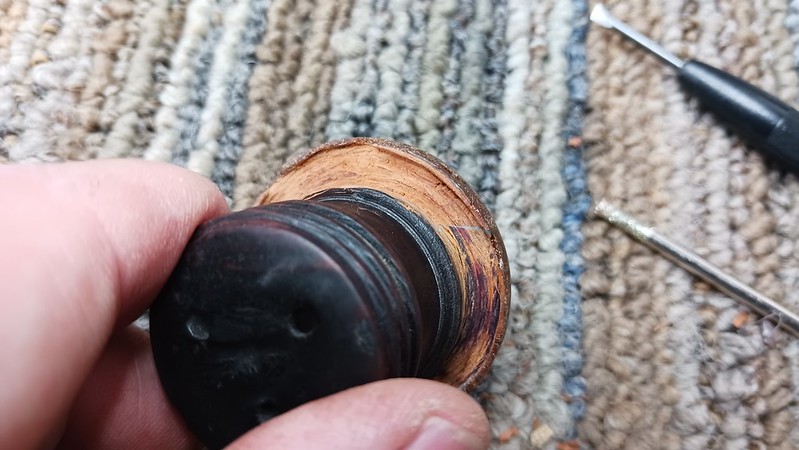
A little while ago I was contacted by a pipe smoker in California inquiring about repairs to a vintage Dunhill Captain Warren style pipe. For those unfamiliar, a “Captain Warren: is essentially a calabash with a removable bowl insert that sits above a condensing chamber at the bottom of the stummel. In the case of this Dunhill, the bowl insert screws into the stummel and the smoke is drawn through holes in the bottom, down into the condensing chamber where it cools slightly and moisture is collected before the smoke flows up the sides of the insert to a draft hole about three quarters of the way up the stummel.
This image shows the component parts of the Dunhill Capt Warren design.

Apart from the somewhat unusual design of the pipe, this Dunhill would catch the attention of any pipe collector due to its age and markings. Stamped “DUNHILL” over “LONDON” on the left shank, and “MADE IN ENGLAND” over “INNERTUBE” over “PAT No 116989/17” followed by “12” and a shape number, “28”.


The patent number corresponds to Dunhill’s patent for the Innertube with flange, in use between 1918 and 1934. The underlined, superscript “12” after the patent number is the date code for 1932.
I somehow only have a partial set of pictures showing the pipe as it looked on arrival here at the shop. Overall it was in rather good estate condition. The stummel was in need of a cleaning but was otherwise sound; similarly, the stem was oxidized and had a bit of tooth chatter near the button, but would clean up easily enough. The real challenge on this 90-year-old Dunhill was the chipped and ragged rim of the bowl insert, damage caused, I am told, when the insert rolled off a table and hit a hard floor. Ouch.

I gave the stummel and stem a good cleaning with 99% isopropyl alcohol, cotton swabs and pipe cleaners. As you can see below, these parts of the pipe were in good shape. When they were clean, I set them aside to focus on the repairs to the bowl insert.


As always, I started by reaming the old cake from the chamber. I worked carefully as the floor of the chamber was not very thick and had darkened with age and use.

With the initial cleanup out of the way, I was free to dig into the meat of the repair. These shots show that more of the rim was damaged than showed in the image the pipe’s steward had sent. The rim was chipped around about 1/3rd of the circumference of the cap.


As I have done on previous rescue missions, I decided to glue in some fresh briar to replace the damaged section. The trick would be carving the underside of the new briar to match the old – the area prone to chipping was only about 1mm thick, carved out underneath to allow the rim to cover the seam between insert and stummel.


Using a series of files, I cut out the damaged briar, shaping the edges of the cut to match the slice of new briar. When I was happy with the fit, I used a small amount of JB Weld epoxy to bond the new briar permanently to the cap.


I let the insert sit in the clamp overnight to give the epoxy time to cure completely before sanding and filing the new patch of briar roughly to shape. As you can see, it was a bit lopsided to start with.

A few dabs of CA glue mixed with briar dust helped fill in a few small gaps.

The work was slow going but was proceeding to plan. I decided to mount the work in the lathe to round out of the cap, but in hindsight I should have stuck to hand work. In a true example of Murphy’s Law, the mostly-repaired bowl insert came loose from the lathe chuck and the opposite side of the rim was chewed up. Ouch! Who knew 90-year-old, 1mm thick briar was so delicate? <sigh>

I admit I had to set this project aside for a day or so to regroup and consider the path forward. I debated cutting another piece of fresh briar to fill in the damaged area, but in the end decided to try filling in the missing rim with a patch mixture of thick CA glue and briar dust.
As these pics show, I applied several layers of patch material, carefully building up both the thickness and the depth of the patches. This stage of any repair looks awful but is necessary to create sufficient material from which to carve the final profile of the work.


If cutting in the briar patch had been time consuming, the next phase of restoration was much more finnicky and slow. The space between the barrel of the bowl insert and the inner edge of the rim is less than 3/16 of an inch, so no off-the-shelf tool was going to fit in there. In the end, what I found most effective for shaping the inside of the rerpaired area was a small precision screwdriver sharpened into a micro-file and a 1/8th inch round diamond burr. The screwdriver-turned-file cut away small portions of the patch material cleanly, while the diamond burr acrted as sandpaper to smooth and refine the final shape.

This close-up shot of the finished rim edge shows just how thin the rim is. I’d guess that this area has always been the Achilles Heel of this pipe design, more prone to breakage than even the stem tenon.
After a LOT of sanding, filing and a few reapplications of patch mix, the rim of the insert was starting to look complete. There was very little clearance between the inner edge of the rim and the body of the stummel. It took quite a bit of fiddly work to get the insert to sit properly in position without stressing the delicate rim.


The patch material cures in a sort of speckled finish, with the lighter briar dust highlighted against the darker CA glue holding it all together. To get a uniform appearance, I used a dark stain pen to colour the patches to match the surrounding briar, then applied a top coat of thin CA glue to fill any micro-bubbles and encapsulate the colour within the repair.

After sanding the bowl insert once again, the briar was finally ready for final finishing. To match the finish on the stummel, I first applied as coat of Black leather dye to the entire exterior of the bowl insert. I let the dye dry, then carefully wiped away the excess stain with a damp Magic Eraser. This left the black dye only in the grain of the briar.

A second dye coat, this time of Black Cherry stain, went on next. This dye looks very purple on the applicator pad, but dries to a nice red/brown.

When the dye wad dry, I hand buffed the excess off the briar with a terry towel then wiped on a thin layer of mineral oil to help set the stain and inject some much needed moisture into the old wood. I let the oil sit on the briar for a minute or two before again hand buffing the excess away.
After a few hours of rest to allow the briar to find its new equilibrium, I took the pipe to the buffer for a run of Red Tripoli and White Diamond compounds followed by several light coats of Carnauba wax to shine and protect the restored pipe.
This 1932 Dunhill Patent Innertube Capt Warren pipe was a real challenge but I’m rather pleased with the end results. Not only is the pipe clean and ready to enjoy, but the chipped rim is whole again and the repair blends in quite well. The pipe’s new steward will have to treat the pipe gently to avoid damaging the thin, delicate rim, but otherwise, this 90 year old pipe is ready for another 90 years of service.
Thanks for following along on this rather involved restoration. It was not an easy repair but I’m glad I could return the pipe to active service. I hope you enjoyed watching it happen.
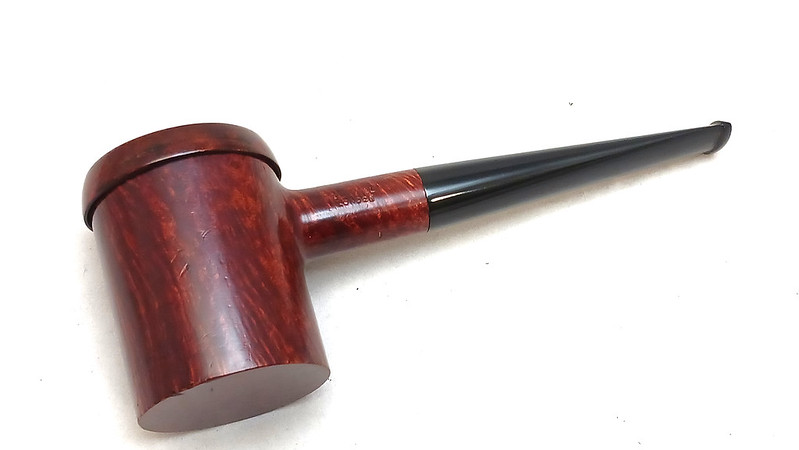
Until next time, Happy Piping! Here’s the finished pipe.


UPDATE: I received an email from Ben Rapaport, noted pipe historian and author, suggesting that the design of this interesting Dunhill may in fact be a General Dawes/Lyon rather than a Captain Warren. The primary difference seems to be that the Dawes/Lyon design features a flat bottom to the bowl, while the Warren sports a rounded bottom. Thanks to Ben for the info!

Wow Charles. Splendid work!
LikeLiked by 1 person
Thank you! This was definitely a challenging repair.
LikeLike
An amazing restoration on a very interesting and fine looking Dunhill. Job excellently done, Charles!
LikeLiked by 1 person
Hi Charles,
That was an amazing restoration. The repairs are very well masked and difficult to make out. The stain is also perfectly matched and blends in perfectly with the rest of the bowl.
Paresh
LikeLiked by 1 person
Thanks very much, Paresh. There were more than a few touch & go moments during this project, but it came together nicely in the end. 👍
LikeLike
I’m betting cutting that close to the chamber edge was no fun, either. An excellent repair!
LikeLiked by 1 person
Not the most relaxing cut I’ve made, Mark! 😄
LikeLike
A LOT of handwork on this one Charles. Excellent result on an older pipe.
LikeLiked by 1 person
Hand work is often the only viable option when dealing with older and unique pipes like this Captain Warren. In some respects, turning a completely new bowl insert may have been a “better” option, but bothtbeh client and I felt that preserving the original bowl was important. Repairing the damage was fiddly work but ultimately I think it was the right call. 👍
LikeLike