
Working with translucent or transparent pipe stems can be a real test of patience and skill. As everything is (almost painfully) visible, there is no margin for error when drilling, shaping or slotting Perspex (aka clear acrylic). To complicate matters further, cleaning clear acrylic with alcohol can lead to the formation of cracks inside the stem. On the whole, I’d much rather fit a black or dark coloured stem any day.
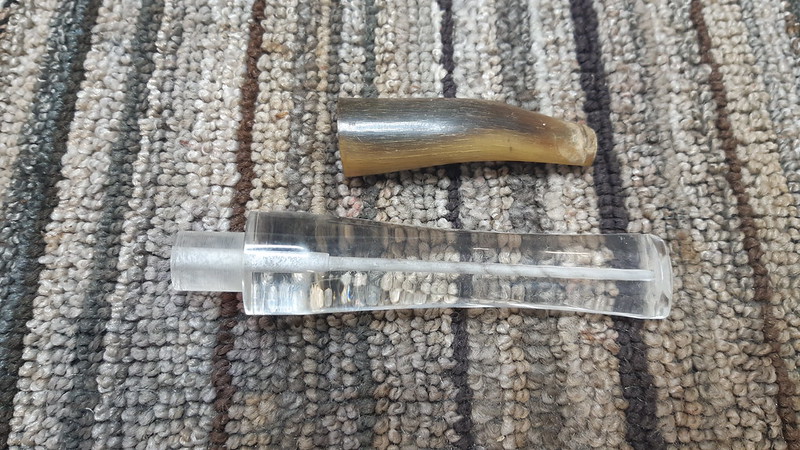
That, however, was not an option when this smaller CGT Elite pipe arrived on the workbench. The original horn stem had seen better days, so the pipe’s steward wanted it replaced with a new stem made from acrylic. Not a big problem normally, but the COVID pandemic has a long reach, affecting the supply chain for just about everything, including replacement parts for tobacco pipes. When I went looking for stem options, the only acrylic stem I could get my hands on was a large clear acrylic round taper blank. Given the choice between this clear stem and a standard black Vulcanite stem, the pipe’s steward elected to run with the clear Perspex stem.
As this first series of images shows, the pipe was in decent but not great estate condition. It was looking a bit drab, with a tired finish. The horn stem was chewed up and dry with age to the point that fine cracks had formed, running along the grain from end to end.


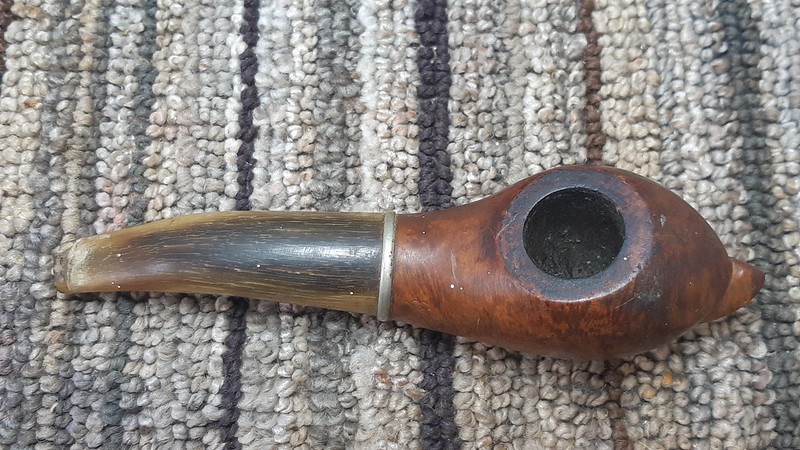


The stummel is stamped “C.G.T.” over “Veille Bruyere” on the left shank, and “Elite” in script on the left shank. There is no shape number or Country of Origin stamp, though the use of French words on the stamps certainly suggests that this pipe is a product of France.
I was unable to find any definitive information on the CGT brand. If anyone knows more about the maker, please let us know in the comments section below!


When I removed the stem for the first time, the metal shank cap fell off. I wasn’t too upset – a drop of glue would put it back where it belongs after the stummel was cleaned.

Wherever possible, I prefer to salvage and reuse aluminum tenons. Unless they are heavily corroded or otherwise damaged, reusing the original part automatically ensures a good fit, and in this case there was no need to reinvent the wheel. To extract the tenon from the old horn stem, I first used a pair of pliers to remove the (non-original) stinger, then applied a bit of heat to the tenon to soften the glue holding it in place.


I dropped both stinger and tenon into a shot glass of 99% isopropyl alcohol to dissolve the built-up tars and other gunk clinging to it. After cleaning the parts, the stinger proved to be in rough shape. Knowing that it would not be a great loss to the pipe’s steward anyway, I binned it and moved on with the job at hand.

The briar stummel was reamed and the shank and airway cleaned with cotton swabs and pipe cleaners dipped in alcohol. A scrub-down with 0000 steel wool removed a spattering of paint spots from the briar’s surface, along with a light carbon crust from the rim of the bowl.

The steel wool also made quick work of shining up the shank cap. It’s looking much better in this shot.

With the stummel clean, I used a few drops of CA glue to reinstall the shank cap.

Then it was time to get into the meat of this restoration – fitting the new Perspex stem. This pic shows the acrylic stem blank under the original horn stem. I needed to shorten the new stem to maintain the pipe’s proportions, then drill a mortise in the stem face to accept the aluminum tenon.
I’m afraid I forgot to take pictures during this process, but the end result is shown below. Here the pipe is clamped upright in the bench vise while the clear epoxy used to secure the tenon in the stem cured overnight. (Yes, the tenon was threaded, but worn. A bit of epoxy guaranteed a strong bond.)


After leaving the pipe to cure overnight, I could safely remove the stem and open the airway, which is inevitably blocked with excess epoxy. It’s important to work carefully here as the acrylic that forms the walls of the airway will turn cloudy if the drill goes off-line.
I refined the shape of the new stem using files and sandpaper, eventually wet-sanding the acrylic to 2000-grit.

Just before final buffing, I added the required bend to the new stem. The pipe cleaner shown below helps to hold the airway open as the acrylic softens over the heat gun.

Finally, I took the completed pipe to the buffer for a run of Red Tripoli and White Diamond polishing compounds followed by a light application of Carnauba wax to shine and protect the refurbished pipe.
Destined to be used as a utility pipe by its steward while doing yard work or other such activities, the finished pipe is not perfect – there remain several blemishes on and around the rim, for example, but I think you’ll agree that it has come a long way since it arrived on the work table. This CGT Elite is clean, fresh, and ready to be put back into active service, and the Perspex stem looks pretty good on it, in my opinion. It will need regular cleaning to maintain its crystalline clarity, but properly cared for the stem will last for many years.
Thanks for joining me for this estate pipe restoration project. I hope you learned a thing or two about working with clear acrylic, a material I consider one of the trickiest to handle.
Until next time, Happy Piping! Here’s the finished pipe.


Great job on the stem! Suggestion on the blog – make the font darker, it washes out against the white background, make it a challenge to read.
LikeLiked by 1 person
Thanks for letting me know. 👍
LikeLike
Mr.Lemon. so very much enjoy your posts. Thank you. R.Compton
LikeLiked by 1 person
Thank you, both for the feedback and for your patronage!
LikeLiked by 1 person
Reblogged this on rebornpipes and commented:
Nicely done Charles. Working with the clear acrylic stem is a challenge as you note but one you rose to. Well done my friend. Looks great.
LikeLiked by 2 people
Thanks, Steve. The clear stems work really well with some pipes but they don’t seem to be very popular as replacement options. I think I understand why! 😄
LikeLiked by 1 person
Excellent job as usual. I made a perspex stem once from a rod blank, to be able to see every bit of my progress on stem making, specifically slot funneling. It’s definitely a different beast of a material, but undeniably beautiful if done right.
LikeLiked by 2 people
Thanks Mark. Why does the idea of cutting a perspex stem from rod give me the sweats?? 😄 I’m sure it would be most informative but not sure I want the answers! 🙃
LikeLiked by 1 person