
The pipe on the bench today was sent to me by a gentleman who has become a regular client of mine over the last year or so. We have been restoring the pipes in his extensive collection batch by batch and just when he thought he was finished, a few loose stummels were discovered at the back of a drawer. Among those was this older meerschaum Canted Billiard, which my client had forgotten and hadn’t seen in decades. The stummel arrived with its bone screw tenon intact. The original stem, however, was long gone.
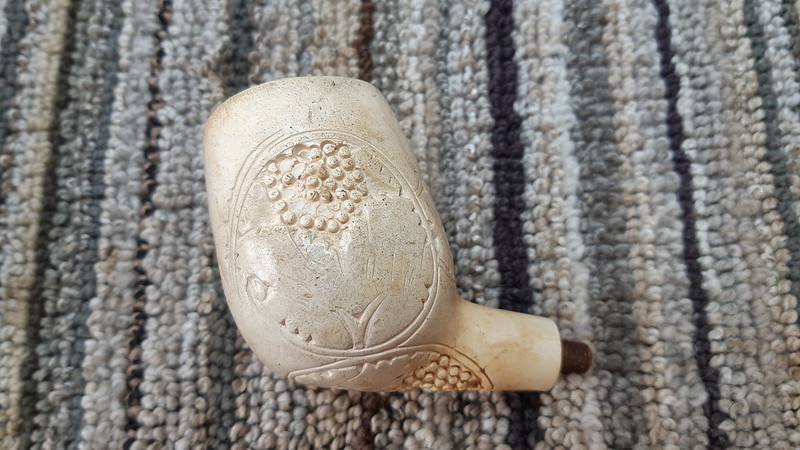


As the above pics show, the stummel had sustained a few knocks and had its fair share of handling marks and other signs of wear. The design on the exterior of the meerschaum was missing some of the carved grapes and the stummel had a generally tired appearance.
To get this restoration underway, I carefully unscrewed the bone tenon from the shank and set it aside. Then I used a toothbrush dipped in a small amount of clean water to gently agitate and remove the dirt and dust from the exterior of the stummel. It’s important to keep the water to a minimum here as meerschaum will absorb it quickly and can become too soft to handle.


You may have noticed a slight colouring of the meer in the pic above. This is an indicator of things to come when the stummel is finally waxed – I think we’re all in for a surprise with this one!
To clean the interior of the stummel, I used sandpaper wrapped around a dowel to remove a small amount of old cake from the chamber. Meerschaum pipes, unlike their wooden cousins, do not require a protective layer of cake so I sanded the chamber walls back to the meerschaum, removing as much carbon as I could without altering the bowl geometry.
A few cotton swabs dipped in 99% alcohol cleared some dust and dirt from the shank. Here again one needs to be cautious with the amount of alcohol introduced into the meerschaum. Solid block meerschaum can handle a reasonable amount fo alcohol during cleaning, but pressed meer will literally disintegrate in your hand as alcohol will dissolve the glue holding the meerchaum dust in place.

With the stummel clean, I moved on to the next phase of the project – fitting a new acrylic stem. Fortunately, the original bone screw tenon was in very good condition and could be reused. To get it ready for the new stem I scrubbed it clean of old glue and tars with a brass bristle brush. It looked almost new afterwards.

We landed on a green swirl acrylic stem for this canted billiard. This pic shows the stem face after I cut off the molded-in tenon and sanded things flat and true.

The airway diameter needed to be expanded to fit the bone tenon, and threads had to be cut to accept the threaded end of the tenon. To widen the airway I used a half dozen drill bits to incrementally remove material. This made it relatively easy to drill by hand, using the airway itself as a guide to keep the drill square to the stem face. When I had opened the airway sufficiently, I used a tap to cut the threads.

Sometimes, despite my best efforts, either the drill bit or the tap goes slightly off-line and corrections must be made to square things back up. This time, however, the pipe repair gods were smiling on me and the bone tenon screwed in straight and true.

The threads inside the shank were in less ideal condition and I was a bit worried about the amount of stress the thin meerschaum in this area would be under as the stem was removed and replaced during use and cleaning. To shore things up and add a bit of bling to the pipe, I installed a thin brass shank band.

With the brass band i place, the new stem seated nicely on the shank face. Looking good!

inevitably with any stem replacement, there are some adjustments to make to the fit and finish. I sanded the stem to create an even reveal at the shank face and tweak the contours slightly. After polishing to 2000-grit, I slid a pipe cleaner through the stem and after warming the acrylic over the heat gun, added a gentle bend.

Happy with the new stem, I removed it from the stummel and moved on to the final part of this restoration, waxing the meerschaum. I really enjoy this step in the process. The colouration revealed by the beeswax is always a surprise.
To prep the stummel for waxing, I corked the chamber and used a foam earplug as a stopper for the shank.

I found this small crock pot at a thrift shop for a whopping $5 and absolutely love it for waxing meerschaum stummels. I keep about a half pound of beeswax in the pot, which takes about half an hour to melt completely whe I turn the pot on. When the wax was ready, I popped the corked stummel in and let it soak on one side for a few minutes before turning it over to soak the other side.

After five minutes or so in the pot, the meerschaum had soaked up as much beeswax as it could so I fished it out of the crock pot and set it on a towel to cool slightly before removing the corks. I have learned not to leave the uncorking too late as the excess beeswax on the exterior can really hold the corks in place.
These pics show just how much colouration was hiding under the surface of the meerschaum. The stummel has turned from a dull white to a deep, rich caramel in just a few minutes. Lovely!


I allowed the stummel to cool until just slightly warm to the touch, then buffed away the excess wax by hand with an old towel. After a quick run on the Red Tripoli and White Diamond wheels, the acrylic stem took on its characteristic deep glassy shine, revealing all the interesting swirled highlights within.
And with that, this project was finished. I reunited stem and stummel and gave the completed pipe another hand buffing with a microfibre cloth to bring up the shine before taking this final series of pictures.
I am really pleased with the results achieved here. I was able to not only add a new stem to an old pipe but also return a quite literally forgotten piece of a client’s personal pipe journey to his rack and rotation where I trust it will perform faithfully for decades to come. And those dents, dings and handling marks I pointed out at the start of this post? All still there and all well earned, they now stand as testaments to the pipe’s long history of service.
Thanks for joining me for this estate pipe rescue project. I hope you enjoyed it as much as I did. Until next time, Happy Piping!
Here’s the finished pipe.


Wow – I didn’t know waxing a meerschaum stummel would reveal such coloring, or that it could be hidden. Beautiful pipe.
LikeLiked by 1 person
Reblogged this on rebornpipes and commented:
Charles did a great job on this old timer. As he predicted the finished pipe is a real surprise. Give the blog a read. Thanks Charles.
LikeLiked by 1 person
Thanks, Steve. I had a lot of fun bringing this one back to life! 😁
LikeLike
Very Impressive restoration Charles.
LikeLiked by 1 person
Thanks, Bob! It’s always nice when I can return an old friend to a client.
LikeLike
this restoration is lovely.
i have a bad habit of picking up basket case meers.
i don’t suppose you have an instructable in repairing a thru body crack in a meerschaum stummel ?
LikeLiked by 1 person
Hmm. Crack repair really depends on location, size and severity of the damage. If the stummel’s structural integrity is compromised, you may need to line, splint or pin the damage before making cosmetic repairs. Egg white and chalk is an old recipe for patching meerschaum.
LikeLike
Another great job. Waxing an old meer is my favorite part as well. It’s a great payoff to a fun project.
LikeLiked by 1 person
It really is, Mark. I love watching the beeswax pull the colour to the surface. 😁
LikeLike