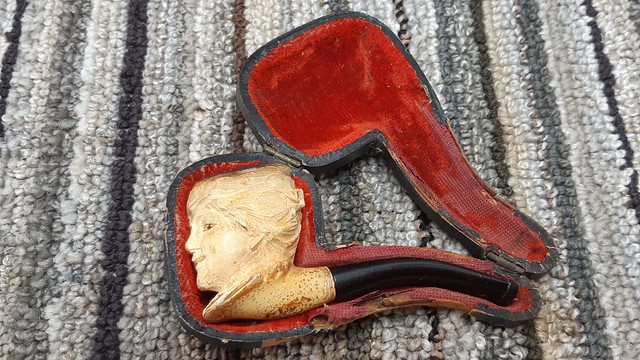
Today’s estate pipe restoration is a bit more esoteric than some of my recent posts. I’m working on a rather petite figural meerschaum pipe carved into the likeness of a lady’s head.
I would tentatively date this pipe to the latter half of the 19th Century, though there are no markings on the pipe or case to confirm this. The overall poor condition of the case and the presence of a new-looking vulcanite stem both tell me the pipe is old, though. This little lady was likely originally fitted with an amber stem, a material that generally went out of fashion in the early 1900s.
As you can see from this series of pics, the pipe was in decent shape for its age, but had quite a lot of carbon buildup on the rim. The finish was speckled and dull, indicating that it had been some time since the meerschaum was last waxed properly. More pressing, however was the broken bone screw tenon glued into the shank – a full-length slice of bone was missing from the top side of the tenon, resulting in a wobbly stem.


Normally, I would replace the old bone tenon with a nylon push-pull set of threaded mortise and tenon fittings, but this pipe is simply too small to accept one. The entire pipe is a whopping 3-1/4″ long with a shank diameter of just a hair over 1/4″. Did I mention she was a petite lady?
My only alternative for this repair was to find a suitable replacement tenon of the same (or very similar) diameter. To get a better sense of what I needed, I very gently twisted the old tenon out of the delicate meerschaum shank. I got lucky on this one. The glue holding the tenon in place had aged and deteriorated to the point where the tenon twisted out easily.

Now to find a replacement tenon. This is where the restorer’s collection of random old parts come in. I keep everything from a restoration that could possibly prove useful in another repair. This tactic saved my bacon on this project, as I found a threaded bone tenon that fit the stem threads perfectly.


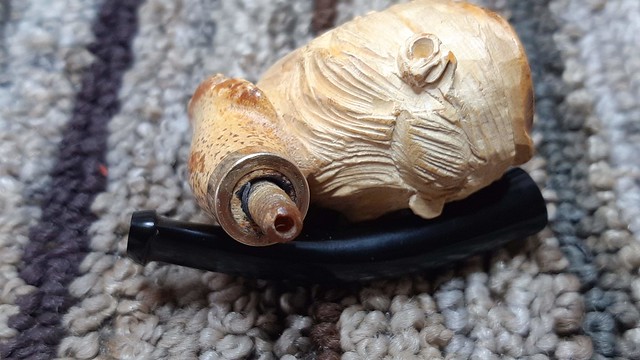
As you can see in the first pic above, the replacement tenon was a bit narrower on the shank end than the original, but before I started messing about with glue, I needed to remove the mess of carbon cake from the pipe and clean it up in general.
I started by using a brass brush to gently and carefully remove the worst of the carbon from the rim of the pipe. This was delicate work, not frenzied scrubbing, as the rim was carved to look like a Victorian lady’s hairdo. I used a dental pick to coax the carbon out of the details, then scrubbed the entire stummel with clean water and a toothbrush to remove as much surface grime as possible.


The sharp-eyed among you will have also noticed the addition of a thin brass shank cap/band to the stummel. While cleaning the shank, the old glue came away and revealed a somewhat less than pristine shank face. I installed the band to shore things up and make sure the delicate shank took no more damage. Sadly I took no pictures during this process; I was so focused on the repair that the camera went ignored in the corner of my bench.
With the stummel now clean, it was time to install the replacement tenon. This is usually done using white glue, but here I needed something that would both hold the tenon securely in the shank and fill the gaps between the mortise walls and the thinner replacement tenon. I elected to mix up a small amount of JB Weld two-part epoxy, which I applied to both the exterior of the tenon and interior walls of the shank mortise before assembling the pipe. I held the parts in alignment until I felt the epoxy take hold, then propped the pipe upright on the table to let gravity keep the stem in position while the epoxy cured completely.

The trickiest part of this process was making sure I didn’t inadvertently glue the stem to the shank permanently. A bit of petroleum jelly on the stem face helped keep the epoxy where I needed it. When the glue had cured, I gently unscrewed the stem and breathed a sigh of relief when it came off cleanly. Success!
The last thing to do to get this petite Victorian lady back to form was to give the meerschaum a good waxing. This serves two purposes – it adds a nice soft shine to the meer, but the wax also penetrates deep into the porous meerschaum and pulls the coloration to the surface.
Meerschaum colours from regular use, absorbing the moisture and some of the tars from burning tobacco. This brownish liquid then permeates the meerschaum, giving it its distinct colour. I use pure beeswax for this job, and the process couldn’t be simpler. While warming the meerschaum over the heat gun, I mop on melted beeswax with a cotton swab. The warm meerschaum quickly absorbs the wax. The trick is to keep applying wax until the meerschaum can’t absorb any more, at which point, the stummel is set aside to cool. Excess wax can then be easily removed by gently buffing the pipe with a soft cloth.


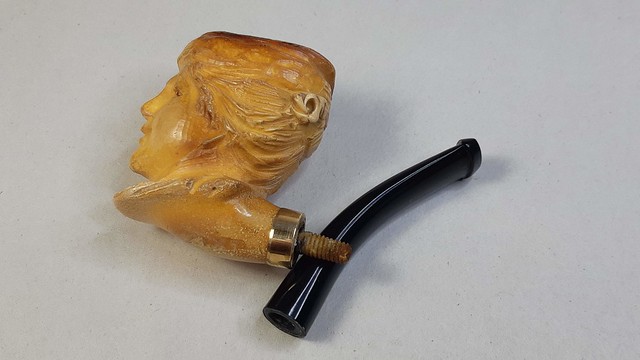
With the pipe repaired, cleaned and waxed, I took the tiny meer to the buffer where I applied some Carnauba wax to the vulcanite stem and buffed the entire pipe on a clean wheel to bring up the shine.
The finished pipe is once again ready to join a new steward for a (small) bowl of good pipe tobacco, though I suspect that, for most pipe fans, this piece is more suited to a collection than an active rotation. If you’d like to bring this little Victorian Lady home, she is available on the Pipe Inventory page now.
I hope you enjoyed following along with this estate pipe repair. Thanks for joining me.
Until next time, Happy Piping! Here’s the finished pipe.