
Estate pipes have become increasingly popular over the last five or six years, and with that rise in popularity among pipe smokers and collectors has also come an increased interest in estate pipe restoration. Sometimes DIY restorations go very well indeed, but other times even experienced restorers can have things go wrong. When that happens, handing off the repairs to someone else may be the best route forward (anyone who has tried to make progress on a particularly frustrating project can vouch for this!).
Such was the case with the pipe on the workbench in today’s restoration post. I must open with an apology here. The initial series of “before” pictures somehow disappeared from my camera roll, so you’ll have to take my word for the state of the pipe when it arrived at DadsPipes.
The patient is an early 19th Century silver-mounted Bent Bulldog that came in with several issues. The sterling shank band had been removed to glue up a pair of cracks underneath, and while the crack repair had been successful, the shank band had been damaged during reinstallation when the glue dried before the band was fully in position on the shank. This left the end of the band standing proud of the shank face and blocking the screw-in stem from fully seating. The stem also needed some rehab as the threaded tenon had been installed at an angle, making it impossible for the stem to sit flat against the shank face. Thankfully, both stem and stummel were clean and ready to work on when they arrived.
With my marching orders laid out, I got to work. Task #1 was to see if the damaged shank band could be removed from the pipe without inflicting further injury. To this end, I used an eye dropper to inject 99% isopropyl alcohol under both ends of the band to hopefully dissolve the glue holding the silver in place. After a few minutes I started wiggling the band gently and was rewarded when it slid off the end of the shank.
The sterling silver used here was clearly meant to be decorative and not structural. It was VERY thin, resembling a heavy silver foil more than anything else. It would need some very gentle treatment during the course of this restoration. This pic shows the stummel with the band removed. Note the glue residue and the hint of the old cracks underneath it.

A close shot of the shank band illustrates the problem – the thin band had been bent, dented, and re-bent over the years and the metal had become weakened at the corners. The worst damage was a long split along the top corner of the diamond shaped band that stretched from the shank end to slightly over halfway along the length of the band. The other three edges were similarly damaged but to lesser extents.


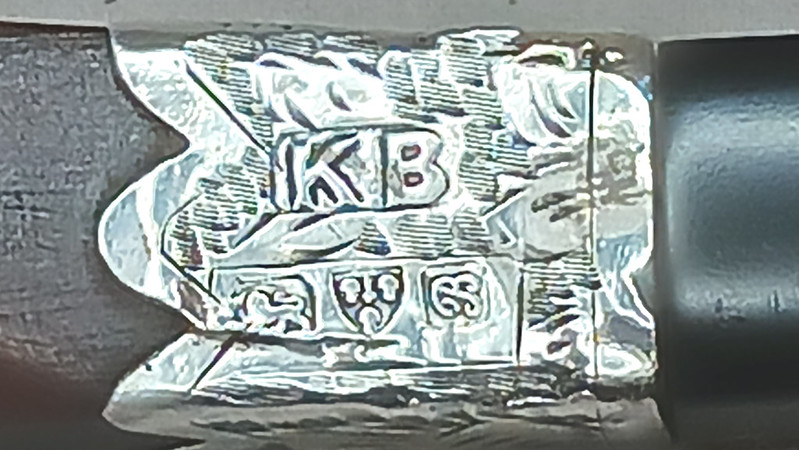
The only marking on the pipe itself was, presumably, a shape number, “1”, stamped on the left shank near the bowl/shank junction. The sterling band held all the real information – one of the reasons I was so keen to save it. The stamps on the band, shown above, read “K.B” in a rectangular cartouche (which may represent the silversmithing firm of Kemp Brothers) over a trio of hallmarks consisting of a Lion Passant indicating Sterling Silver, Three Sheaves and Sword representing the City of Chester, England, and a date letter, “B”, which was, curiously, stamped sideways. If I’m reading the charts correctly, the date letter corresponds to 1902, so this pipe is currently 120 years old. Wow!
After consulting with the pipe’s steward, the shank band was sent out to a local jeweler’s shop to have the damaged corners re-soldered. This would ensure that there was as much structural stability in the shank as possible when the pipe was reassembled. Care would still be needed when handling the pipe, especially when mounting and unmounting the stem as over-tightening of the threaded stem could potentially re-open the glued cracks.
While the shank band was at the jewelers, I worked on the stem rehab, first cutting off the misaligned tenon and drilling out a mortise for the new tenon. I made up a tenon from Delrin rod, turning it to size on the lathe before tapping the correct threads along its length.

A test fit of the freshly threaded tenon showed all was well so far.

After what felt like a very long wait, the shank band was ready to pick up from the jewelers. I got it back to the shop and snapped a few pics. Much better!


I used a bit of wood glue to install the revived shank band on the pipe. I could have used CA glue for this but I wanted a longer work time before the glue cured to make sure the band was properly positioned. I did not want to have to remove it again and risk damaging the thin silver.


With the shank cracks glued up and the sterling band back in place, I could finally move on to fitting the stem. This pic shows all three parts ready to go – the stummel, the shop-made threaded tenon and the Vulcanite stem.

After screwing the threaded end of the tenon into the shank mortise, I test fit the stem and got a nice light-tight fit at the shank face so I mixed up a small amount of two-part epoxy and glued the stem in place on the tenon. A dab of petroleum jelly on the shank face helped keep any excess glue from bonding the stem permanently to the shank.
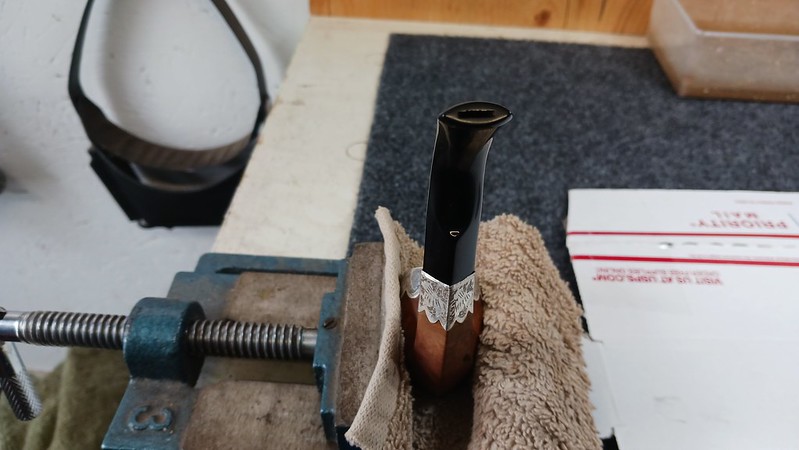
I positioned the stem by hand and held the parts in place by hand until I felt the epoxy began to “grab”. The pipe was then clamped gently upright in the padded jaws of my vise to let gravity hold the stem in position while the glue cured overnight.
The following day I unscrewed the pipe stem and drilled out the excess epoxy that inevitably blocked the airway. I also wiped away the remains of the petroleum jelly before remounting the stem and taking the complete pipe to the buffer.
I polished the pipe gently with both Red Tripoli and White Diamond compounds to bring up the shine and finished the restoration with a few light coats of Carnauba wax to add a layer of protection.
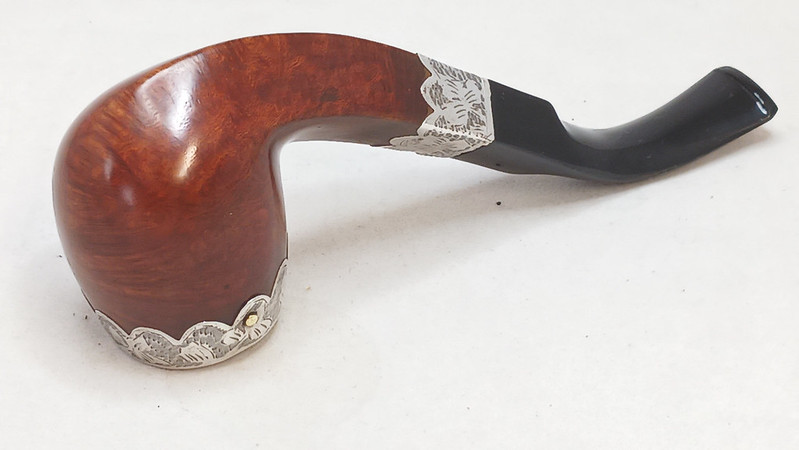
This 120 year old K.B Bent Bulldog is looking great after its time on the bench. The pipe is clean and polished, and more importantly, it is structurally sound and ready to join its steward’s collection or active rotation. I am very pleased to have been involved in its restoration.
Thanks for joining me. I hope you enjoyed following along as this pipe came back to life. Until next time, Happy Piping!
Here’s the finished pipe.


A beauty of a pipe and a great restoration!
LikeLiked by 1 person
Thank you!
LikeLike