
A fellow pipe lover here in Ontario sent me a couple of old friends for a bit of TLC. One of those pipes is this 1980’s vintage Brigham 384 Squire. This round-bottomed bent brandy shape was introduced to the Brigham lineup in the 1970s and quickly became a fan favourite. This particular example was certainly a favourite of its current steward. It had been well-smoked but was definitely overdue for some maintenance.
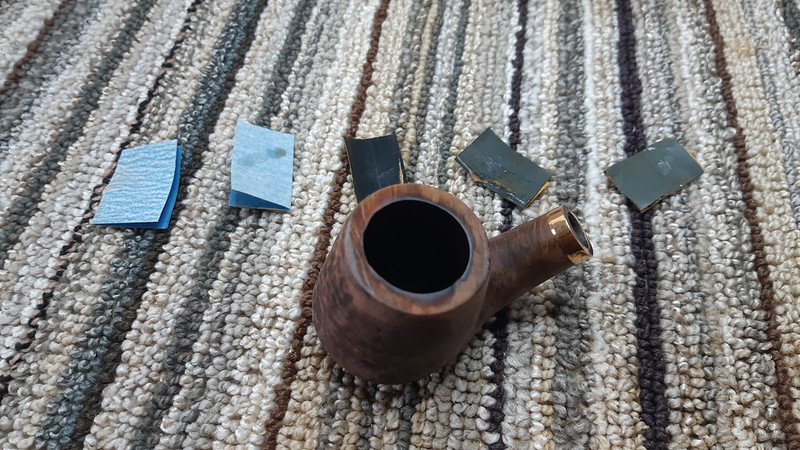
As this series of pictures illustrate, besides needing a good overall cleaning, the pipe had some significant issues that would need to be dealt with as part of the restoration effort. First and foremost, the original stem had been bitten off at the button and would need to be replaced. The chamber carried a fair amount of old cake, as did the stem/shank junction. The buildup here prevented the stem from seating properly at the shank. Adding to the list, the rim of the pipe had been eroded at both front and rear edges through decades of dottle knocking.


The stamps on the pipe were heavily worn but it is still possible to recognize the “Brigham ” over “Canada” logo on the left shank, which identifies the pipe as a roughly 1980’s production. Try as I might, I could not find a shape number stamp, though the Squire shape is readily recognizable. Taken with the three brass Dots on the stem, the shape number code becomes “384”, to indicate a Shape 84 pipe in a 3-Dot quality level.

Though the damaged button end of the stem made the vulcanite a write-off, the original aluminum tenon/filter holder was in very good condition. I planned to salvage that part of the Brigham System and transplant the tenon into the new stem.

Before I could do any of that, however, the stummel needed to be cleaned. I reamed the bowl back to briar and discovered a pit in the center of the chamber floor. This is fairly common in older, well-used pipes, caused by a combination of the use of a pointed blade to remove cake and the sharp wire end of pipe cleaners scratching across the chamber floor over decades.

There was a healthy accumulation of old tars, bits of tobacco and old gunk lurking in the pipe’s shank and airway. I used a pair of appropriately-sized drill bits, turned by hand, to auger out the worst of the blockage before finishing up with a handful of cotton swabs dipped in 99% isopropyl alcohol.

With the insides clean, I turned to the stummel’s exterior. A light topping removed a layer of carbon lava from the rim and highlighted the areas of missing briar at front and rear. After a scrub with Murphy’s Oil Soap to remove the dirt, wax and oils from the surface of the briar, I drop-filled the worn areas with a mixture of thick CA glue and briar dust and set the stummel aside for the night to allow the patches to cure.

When I returned to the pipe the next day, I decided to work on fitting the new Vulcanite stem. Heating the original stem over the heat gun softened the Vulcanite and allowed me to remove the original aluminum tenon for reuse. This pic shows the tenon, along with a Brigham Rock Maple filter, being test-fit into the shank. The replacement Vulcanite stem blank sits next to the stummel.

To recreate the Brigham System stem, I drilled a long shaft down the stem’s airway to accommodate the length of the filter that sticks out beyond the aluminum tenon. A larger pocket is then drilled into the stem face to accept the knurled end of the tenon. Assuming the drilling is done properly, the pipe goes together easily.

So far, so good!

Originally, the aluminum tenon on a Brigham System stem was held in place by a combination of friction and a single brass pin, with any additional Dots mounted in the Vulcanite only. I hedge my bets by drilling the mortise slightly oversized and using a dab of epoxy to secure the aluminum into the stem.
Here you can see the tenon and filter mounted into the shank. A light coat of petroleum jelly on the shank face helps me avoid gluing the whole thing together permanently.

After adding epoxy to both the end of the tenon and the inside walls fo the mortise, I slid the stem into place, aligned it correctly and held the assembly together for a few minutes until the epoxy tookl hold. With a bit of masking tape in place to avoid accidental movement, I clamped the pipe, stem upright, in the vise and left it to sit overnight again to give the epoxy sufficient time to cure completely.

The following morning, I twisted the new stem out of the shank and wiped away the petroleum jelly. Happy with the results, it was time to add the Brigham Dots. Traditionally drilled freehand by the Brigham craftsmen, no two pinning patterns are ever exactly the same, This gives me a bit of leeway with pin placement, but I do clamp the stem into a vise on the drill press during the process.
For the classic 3-Dot pattern, I drilled three 1/16″ diameter holes in a triangular shape, then added short lengths of brass rod, securing the pins in place with a little bit of regular CA glue. After the glue cured fully, I filed and sanded the pins flush to the surface of the Vulcanite.

While waiting to finish off the stem work, I sanded the rim patches smooth. One shortcoming of the CA and briar dust patch is the micro-bubbles that often form in the CA glue during the curing process. These present as small, light-coloured pits in the repaired areas when sanded.


The remedy for the rather unsightly pits is two-fold. First, I added a coat of dark brown stain using a furniture repair pen, followed by a skim coat of thin CA glue. The thin glue flowed into and over the pits, sealing in the colour and producing a smooth finish after sanding.

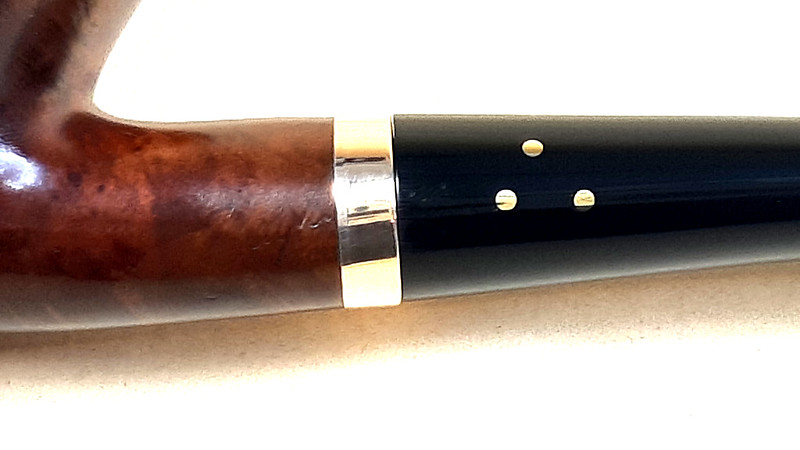
When I cleaned away the carbon buildup from the stummel, I discovered fine pitting of the shank face. Rather than attempt to re-face the shank (and risk changing the geometry of the stem/shank junction, I installed a thin brass shank cap over the damage. This both provides a nice flat surface to mate with the stem face and adds a not unwelcome bit of bling to complement the brass Dots on the stem.

Then it was time for final sanding and polishing of the new stem and reconditioned stummel. I worked my way through several grits of sandpaper, from 220 to 2000, while finalizing the shape of the rim repairs and removing the coarser sanding scratches.
A fresh coat of black leather dye refreshed the finish. When the dye was dry, I scrubbed the black away from the high points of the mixed smooth and rusticated briar, leaving it only in the deeper depressions and restoring the original two-tone brown over black colour scheme.

With the exterior of the pipe ready for final buffing, I had one last job to do to the pipe’s internals. I filled the dimple in the chamber floor with pipe mud to restore the original bowl geometry and help prevent an accidental burnout.

When the pipe mud was dry, I added a quick bowl coating of maple syrup and activated charcoal powder to cover the mud and give the chamber a fresh look. The bowl coating also provides a nice “grippy” surface to jump start the development of a new protective layer of carbon cake.

Making sure that a Rock Maple filter was in place, I slid a pipe cleaner through the stem and warmed the Vulcanite over the heat gun until pliable. I gave the stem the proper bend, then ran the stem under cold water to set the new shape permanently.

Finally, I took the completed pipe to the buffer for a run of both Rede Tripoli and White Diamond polishing compounds followed by a few light coats of Carnauba wax to shine and protect the refinished pipe.
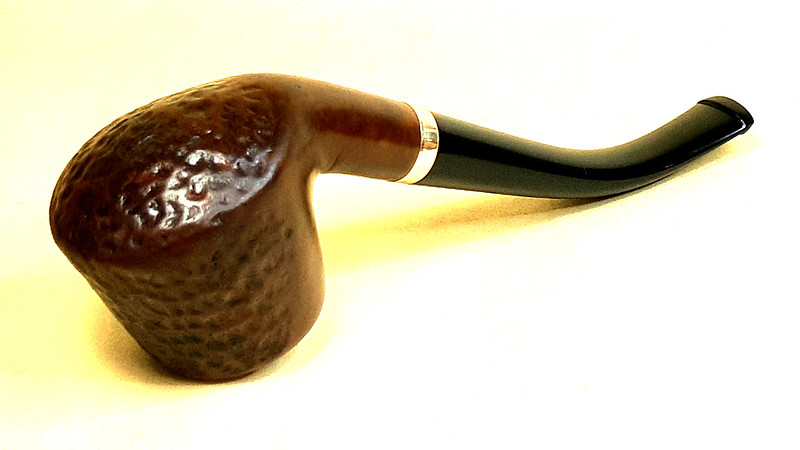
This 40-something year old Brigham 384 Squire has a new lease on life after its time on the bench. The new stem looks great and as the tenon was salvaged from the original stem, it fits the shank mortise perfectly. The briar is fresh and clean, and the brass band accentuates the trio of Dots on the stem very nicely.
I’m happy to have been able to return this old friend to its steward, who has already put it back into active service.
Thanks for following along on this fairly detailed restoration project with me. Until next time, Happy Piping!
Here’s the finished pipe.


Hello. Truly like your blog here. What is CA glue ? Thank you. R.Compton
LikeLiked by 1 person
Glad you are enjoying the posts! CA glue is short for CyanoAcrylate glue – aka Krazy Glue. 👍
LikeLike
Kind of hard to believe the final pictures are actually of the first group. Are you sure you didn’t pull one out of your collection? ( eflorescente i get flamed, the previous was sarcastic). That being said, this job was borderline unbelievable. Nice work, Charles.
LikeLiked by 1 person
Thanks David! A lot of the difference is simply a good cleaning, to be honest. Of course, a new stem always looks better! 😁
LikeLiked by 1 person
I really need to proof read before posting. (*before I get flamed, know I was being sarcastic)
LikeLiked by 1 person
Reblogged this on rebornpipes and commented:
Charles is one of few who actually make new stems and know how to insert the Brigham system in place and set the dots. Well done Charles.
LikeLiked by 2 people
Thanks, Steve! I’m glad I can offer re-stemming services to owners of older Brigham pipes. These old friends don’t need to be retired when the stem gives out!
LikeLiked by 1 person
Amen brother!! Have you had a chance to work on that one I sent your way with the crack?
LikeLiked by 1 person