
This pipe arrived at the workshop recently, sent in from a pipe smoker in the Prairies for a bit of TLC. The subject is a figural meerschaum in the shape of a Sultan’s head. The obvious issue was the broken Bakelite stem, which had snapped off near the shank. Less obvious before a closer examination were several details related to the presumably DIY replacement of the mortise and tenon setup with a Kaywoodie-style threaded aluminum fitment.


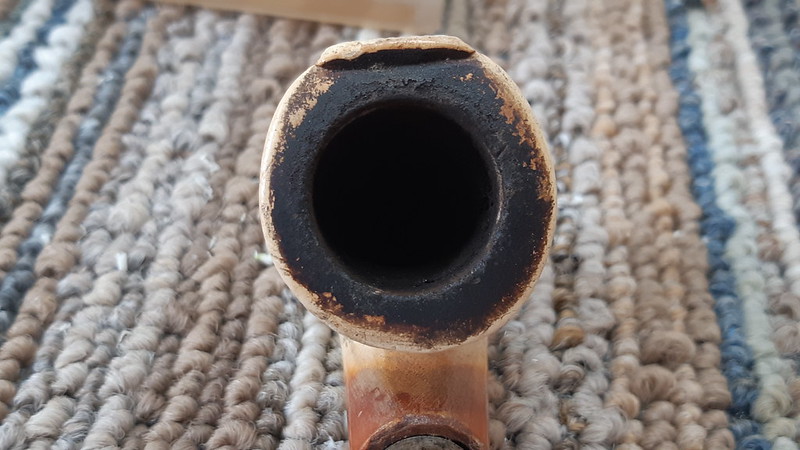
As the above series of pics also shows, the pipe needed a good overall cleaning. The dips and ridges of the carved meerschaum were packed with dirt and the rim was hidden under a layer of tarry carbon “lava”.
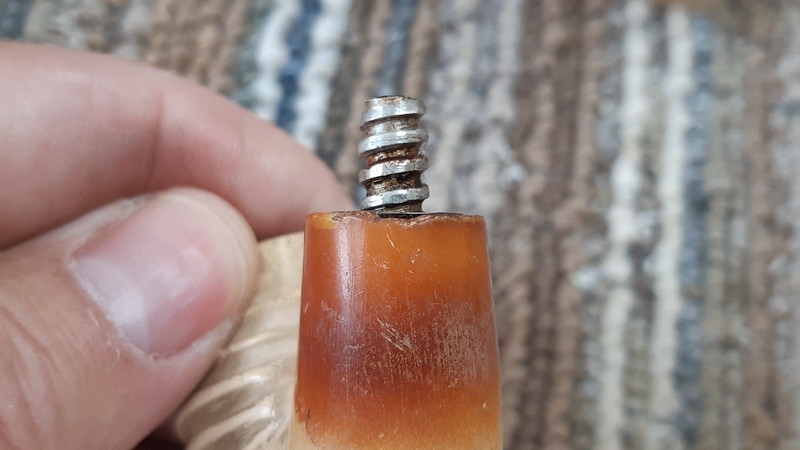
The surface of the meer carried a handful of small dents, dings and other handling marks, but those would be left as-is. My brief here was to add a replacement stem and sort out a few issues with the shank face. These next pics show the problem – at some point in this pipe’s history, the original mortise and tenon setup had been replaced by a threaded Kaywoodie style mortise insert and matching tenon. While not a bad idea as DIY repairs go, the mortise insert was glued (epoxied?) firmly into the shank at a slight angle which made achieving a light-tight stem-to-shank fit impossible.

Rotating the stummel 90 degrees, a second complicating factor came into focus. The shank face had suffered some damage, leaving the shank face rough and uneven.
I started the cleanup by removing the tenon from the shank and scrubbing the tenon with a tire brush to remove the buildup of tars, dirt and general grime. Underneath, the aluminum was in excellent condition.

A single pipe cleaner dipped in 99% isopropyl alcohol removed a light amount of deposits from the tenon’s airway. When I was happy with the state of the tenon, I set it aside while I worked on cleaning up the stummel.

I used both my reamer set and some sandpaper wrapped around a dowel to remove a light amount of cake from the tobacco chamber.

I mention this in every meerschaum pipe post, but it is an important principle for meerschaum pipe smokers to keep front of mind. Cake is an important protective element in briar pipe maintenance but is completely unnecessary in a meerschaum pipe. As a mined mineral – essentially a very light, porous rock – meerschaum does not burn. Further, leaving excess carbon cake in a meerschaum pipe can actually lead to cracking of the bowl as the two materials expand and contract at different rates, so it is important to keep your treasured meers clean.
The tire brush came out again to remove the worst of the lava from the rim of the pipe. The meerschaum underneath was lightly pitted in a few areas.

A small handful of pipe cleaners and cotton swabs dipped in 99% isopropyl alcohol removed the tars, dust and dirt from the shank and airway. High-proof (90% or higher) isopropyl is, in my opinion, the safest way to clean and sterilize a block meerschaum stummel. The very low water content is key here – the 99% isopropyl alcohol that I use evaporates almost instantly, leaves no residue and unless used excessively, will not soften block meerschaum.
Another warning for meerschaum pipe owners – make sure the pipe in question is BLOCK meerschaum and not PRESSED meerschaum. The former is carved form a single block of meerschaum and can endure the judicious use of liquids during the cleaning process. The latter is meerschaum dust held together with glue. Alcohol will quickly dissolve pressed meerschaum.

With the internals clean, it was time to work on the exterior of the stummel. To remove the dust, dirt and general grime from the carved Sultan’s head, I scrubbed the stummel with a toothbrush dipped lightly in fresh, clean water, wiping the stummel dry afterwards. Here, as with the use of alcohol, prudence is required. Too much water will soak into and soften the meerschaum, potentially damaging the intricate carving. Used judiciously, however, plain water and a light scrubbing action with the toothbrush can have dramatic results.


Now that the stummel was clean, I could easily see the repair challenge ahead of me. After some consideration, I decided that the best option for smoothing and squaring up the shank face (and guarantee a light-tight fit on the new stem) was the addition of a slim brass shank cap. After digging through my supplies I came up with a shank cap that fit the diameter of the shank without interfering with the aluminum shank insert.


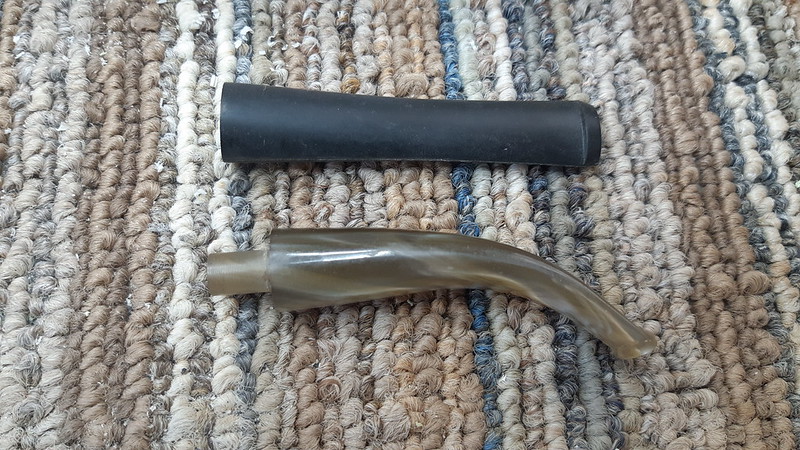
Now a decision needed to be taken regarding the type of replacement stem to be used. The pipe’s current steward had identified this pipe to me as a utility smoker in his rotation. His priority was to simply get it back to work, so there would be no special order placed for replacement parts.
A quick search through the parts bins turned up two possible stem options – a basic black Vulcanite stem blank, and a pre-cast acrylic stem in a smoke grey swirl. After a brief discussion, the client decided to go with the acrylic stem.
To prepare the acrylic stem blank for the aluminum tenon, I drilled out a mortise in the stem face slightly larger than the tenon’s diameter and test fit the stem to the shank. So far, so good!

And now the tricky part – gluing the tenon into the stem face while ensuring both a tight fit at the shank and proper registration of the threaded tenon. The tenon was somewhat worn, which made it slightly loose in the mortise insert. I temporarily tightened the threads by adding a small piece of masking tape, which held the tenon firmly in place while I glued the stem up. It’s hard to see in the second shot below, but I left the stem slightly under-clocked so that when the masking tape came off the tenon the stem would sit straight on the shank.


I secured the pipe upright in the vise overnight to allow the epoxy to cure completely before I removed the stem to complete the restoration work. When I came back to the pipe, I set the new stem aside so I could wax the stummel.
After plugging the openings at shank and chamber to keep the wax out of the pipe’s internals, I popped the meerschaum into a bath of hot beeswax. A few minutes on each side dramatically changed the colour of the pipe as the hot wax penetrated the porous meerschaum and pulled the colouration to the surface. I let the stummel cool slightly after its soak, removing the plugs as soon as I could comfortably handle the meerschaum.
A quick hand buffing with a well-used terry towel removed the excess wax from the surface of the meerschaum and brought up the shine. Then the stummel was left on a clean towel to cool completely.


When the stummel was cool, I reinstalled the new stem and made a few small adjustments to the acrylic blank before sanding and polishing the new stem with sandpapers in 220 through 2000 grits. A quick run on the buffing wheel with Red Tripoli and White Diamond compounds removed the sanding scratches and brought up the shine. A light buffing with Carnauba wax added even more lustre to the stem.
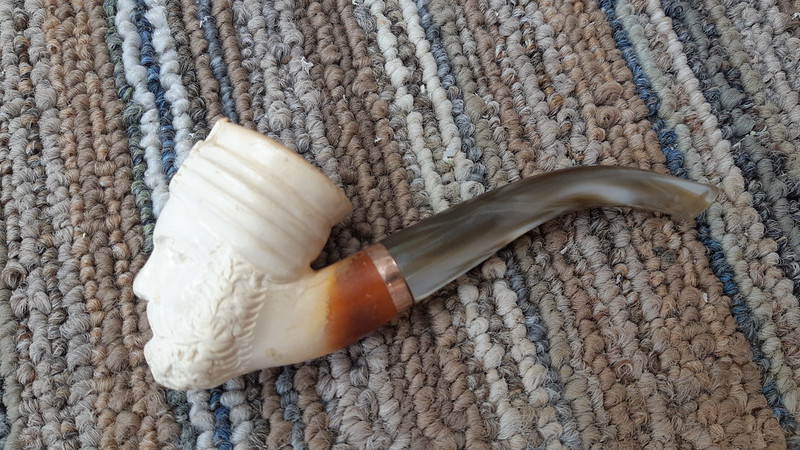
This unbranded Sultan meerschaum has come a long way since it first arrived on the worktable. The new acrylic stem fits well and looks much better, in my opinion, than the somewhat bland yellow Bakelite stem it came in with, but the real transformation for me is the meerschaum itself. Gone is the dirt, oil and dust that was obscuring the details of the delicate carving. Likewise, the ugly carbon lava is gone from the rim. Signs of age and use remain, including the previously mentioned pitting around the inner rim, but even these small flaws look better against the backdrop of an attractive and much more evenly distributed caramel colouring. Undetectable in the final pics below is an added bonus – instead of smelling like old tars, the cleaned and freshly waxed meerschaum now carries the light aroma of warm beeswax.
I’m happy to report that this pipe has been returned to active service as part of its current steward’s rack and rotation.
Thanks for joining me for this estate pipe restoration. I hope you enjoyed following along on its transformation. Meerschaum pipes are a different breed from their more common briar brothers, and while there are certainly many commonalities, it’s good to remember the key differences before undertaking any meerschaum repair.
Until next time, Happy Piping! Here’s the finished pipe.


