
As touted on the Peterson website, “XXL or Oversized shapes can be found represented in our catalogue as far back as 1896. Our House Pipe range pays homage to that tradition through a number of extra-large designs imbued with our iconic House Style — such as muscular proportions, capacious fire holes, and generous accents of sterling silver — and offered in a variety of finishes and aspirational tiers.”
The original Peterson House Pipes featured long stems that made the House Pipe a type of Churchwarden or “Reading Pipe”, as shown in this image taken from a discussion from 2013 on the pipe forums on PipesMagazine.com.

Modern House Pipes have lost the long and somewhat cumbersome stems, and instead feature a scaled-up version of Peterson’s classic P-Lip stem. As I’ve mentioned in a few previous posts, the P-Lip is something that pipe smokers either love or dislike, and unfortunately for the owner of the House Pipe featured this week, he fell squarely into the second camp. His dislike for the P-Lip prompted him to contact me to see about having a Fishtail version of the stem hand made for the pipe.
Purchased new, the pipe arrived in almost pristine condition, showing evidence of only one or two firings. Even without a scale reference, it is easy to see that this is a big pipe, in which Peterson’s typically beefy design is magnified. The stummel is a real fistful of briar at more than 2.5 inches tall and a chamber bore of .87 inches or 22mm. The Deluxe System stem features an aluminum condenser screwed into the stem face, and a long, wide saddle stem measuring 130mm or 5-1/8 inches from the button to the end of the Vulcanite tenon.


The underside of the shank is stamped “Peterson’s” over “Hand-Made”, then a football-shaped “Made in Ireland”.

The Sterling Silver shank cap is marked “Peterson” over a trio of hallmarks: Hybernia, for Dublin, Ireland; “925, indicating Sterling Silver; and finally a date letter, “M”, which tells us that this House Pipe was made in 2022.

On top of the shank cap, the silver is stamped “Peterson” over “Dublin”.

As the pipe was essentially unsmoked, I gave the internals a quick cleaning and set the stummel aside to have a closer look at the stem. This pic shows the complete stem, with aluminum condenser or chimney attached.

The pipe’s steward wanted the new Fishtail stem to include a condenser, so I unscrewed the aluminum part from the original stem and matched the threads to one of the taps in my set of tools. These condensers can be purchased individually from SmokingPipes.com. I ordered a half dozen of them so I’d have some in stock for future projects.

As I’ve done before when tasked with reproducing a stem, I took many measurements to build up a sketch of the stem’s profile. Getting the taper right on an Army mount stem is critical to achieving a solid fit, so I checked and double-checked my sketch against the original stem to make sure I had my numbers right.

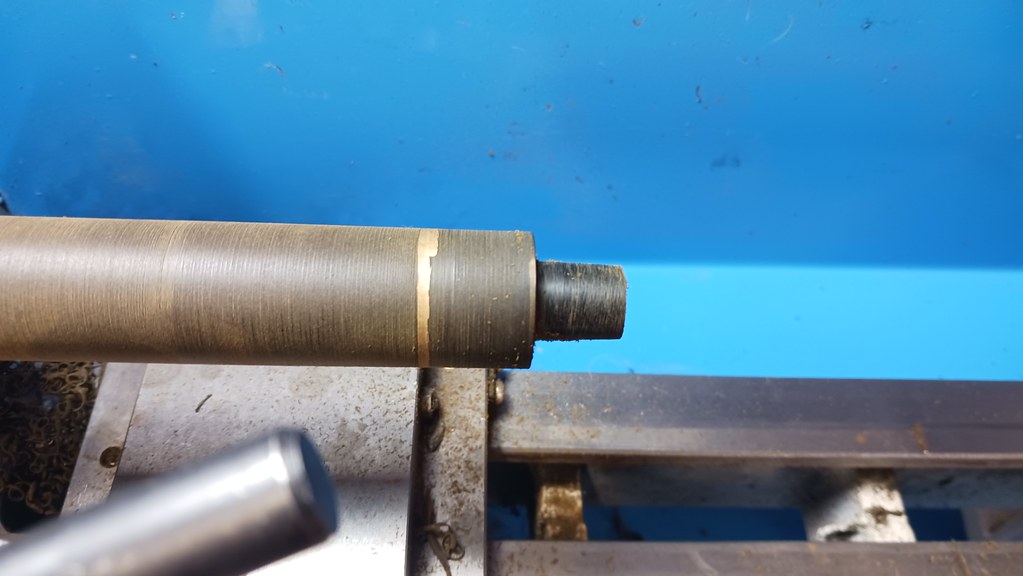
The shoulder of this saddle stem measured 24mm in diameter, so I cut a length of 25mm Ebonite rod and used my lathe to drill the tapered airway required of a Peterson System stem, which is 5/32″ at the end of the tenon, tapering to about 3/32″ at the button. As you might imagine, this required several different drill bits and just about maxed out the capacity of my 7×12 lathe bed.
With the airway drilling complete, I tapped the tenon end of the rod with threads and test-fit one of the new aluminum condensers.

It sure doesn’t look like a System stem at this point, but the internal geometry and tenon extension are present and correct.

Removing the condenser to keep it safe during the stem shaping, I put the rod back into the lathe to cut the Army tenon. The taper on this tenon is very subtle, decreasing less than 1mm from stem face to the end of the tenon, so I had to work carefully to avoid removing too much material and having to start again.
A quick test fit in situ on the lathe showed that I had achieved a good fit, with no lateral movement of the stummel when mounted to the tenon. Yay!

I could now turn my attention away from the tenon toward shaping the rest of the new stem. I used masking tape to mark off the position of the airway along the length of the Ebonite rod as well as the rear edge of the shoulder portion of the stem. These guides help prevent removing too much material and cutting through to the airway, which would turn this length of Ebonite into expensive scrap.


I used my 1×30 belt sander to hog off the bulk of the excess Ebonite. You can also see in this pic that I adjusted the position of the masking tape at the button end after rechecking my measurements against both my sketch and the original stem. Measure twice, cut once!

With the bulk removal complete, I turned to hand work with a selection of files to begin refining the shape of the new stem. A drill press vise is handy to hold the piece while I work.


Here is a quick shot of the slot in the button end after roughing it in. There is more work to be done here.

Again using the original stem as a reference, I tapered the width of the new stem to make it more comfortable to clench.

I continued to refine the shape of the stem, thinning it out to just over 5mm thick behind the button. In these pics, I have begun to create the oval cross-section of a traditional slotted button.


I continued with the files until I had the stem looking as I wanted, then switched to sandpaper for the final detail work.

This pic shows the stem sanded to 320-grit, while the next image shows the stem sanded to 2000-grit, ready for final buffing.


I took this quick comparative pic to show the new stem next to the original. It was looking good but needed quite a deep bend to make it useful.

I warmed the stem over the heat gun until the Ebonite became pliable, then introduced the required bend.

Then it was off to the buffer where the stem was polished on both the Tripoli and White Diamond wheels to erase the last of the sanding marks and bring up the shine. A few light coats of Carnauba wax added more lustre and a bit of UV protection to prevent oxidation.
And with that, the new Fishtail stem was ready to be put into active service on this lovely House Pipe. I’m sure it will be a relief for the pipe’s steward, and he will have the original P-Lip stem on hand should he decide to give it another try.
Thanks for following along on this XXL stem project. I enjoyed working on this one, not only because it solved a problem for the pipe’s steward but also because it clarified for me the functional limits of my mini-lathe, which will help when discussing future projects with clients.
I hope you enjoyed watching the new stem take shape as much as I did. Until next time, Happy Piping! Here’s the finished pipe.


