
I was contacted recently by a gent who had acquired a Brigham Valhalla stummel some time ago and was looking to have a new stem fitted to it to make the pipe useable again. After a bit of discussion, the pipe was sent in to DadsPipes for the work, where I took the following initial series of pictures. As you will see, the stummel was in very good estate condition, but varied slightly from other Valhalla pipes I have seen. Can you spot the differences?


The only stamp on the briar is on the underside of the shank and consists of the Brigham logo over a linear, block letter “Made in Canada” stamp.

For reference, here is a page from a 1970s era Brigham brochure showing the Valhalla and related Norseman series of pipes. The stummel on the bench is a W6 shape, though the shape code is not stamped on it.
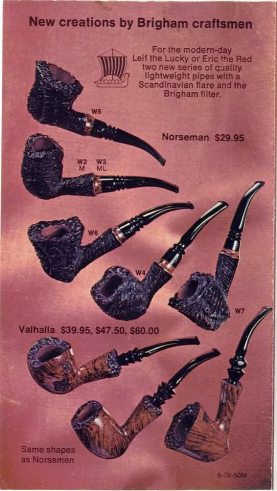
Here is where the pipe collector side of my brain kicked in. As you can see in the above image, the Norseman line of rusticated pipes were all fitted with flush-fit stems – those that sit tight to the end of the shank – while the smooth Valhalla pipes featured Fancy stems similar to Danish freehand pipes of the same era.
The Brigham stummel on the bench, however, is a bit of an oddity, with a smooth Valhalla finish but the flush-fit shank of the Norseman pipes. The key to understanding this peculiarity is the Country of Manufacture stamp on the shank. The linear “Made in Canada” stamp was used by Brigham after 1955, when the patent expired on the Brigham System, until roughly 1969 when the markings were updated to a single combined Brigham logo over an upward sloping “Made in Canada” as shown here:

That leaves us with a late 1960s stummel, made at or soon after the launch of the Norseman/Valhalla series when Brigham was still working out the details. The two distinct product lines had not yet solidified into the classic pipes we recognize from the 1970s. At this early stage, both smooth and rusticated pipes were pinned with the linear, horizontal VIP 3-Dot pattern retained by the rusticated Norseman series for the duration of its run. Valhalla series pipes were later pinned with four, five or six Dots, depending on grade. If you’d like to learn more about Brigham’s stamps and production eras, you might like my book, Brigham Pipes – A Century of Canadian Briar.
With that little history lesson concluded, let’s move on to the restoration! For this early Valhalla pipe, I would need to recreate a flush-fit stem with a few design details borrowed from the Norseman series and pinned with the VIP 3-Dot pattern.
As Brigham fans know, the classic aluminum Brigham System tenon was discontinued in 2001 when the modern composite tenon was introduced. Luckily, a dig through my supplies turned up a pre-2001 Brigham stem with an aluminum tenon that fit the Valhalla shank nicely. The Vulcanite stem attached to it was in rough shape, so I’d need to transplant the aluminum tenon into a new stem. This pic shows the parts lined up – the stummel, a new round taper Vulcanite stem, the vintage Brigham stem with the donor tenon, and a Brigham Rock Maple filter I would use to make sure the new stem worked to spec.

Before I could work on the new System stem, though, the stummel needed to be cleaned. There was only a light amount of carbon buildup in the chamber, so I skipped the reamer and used sandpaper wrapped around a dowel to remove the cake. Underneath it, the briar of the chamber walls was in excellent condition.

Next up was to carefully pick the carbon deposits out of the faux-plateaux rim. I spent a few minutes with a dental pick and a tire brush, but eventually found the rim surface underneath the accumulated grime.

The internals were already surprisingly clean. A few cotton swabs and pipe cleaners dipped in 99% isopropyl alcohol removed the remaining dirt and detritus from the shank and airway.

While cleaning the pipe, I spotted a small flaw in the briar – a tiny chip on the outer edge of the rim. A bit of careful sanding followed by a touch-up stain pen smoothed things out nicely.


With the stummel ready, I moved on to creating the new Brigham System stem. I used heat to remove the vintage tenon from the donor stem and carefully cleaned up the aluminum. Then it was time to take the new Vulcanite stem blank to the lathe for some customizing. I cut a series of trim rings into the stem in a nod to the style of stem shown in the 1970s brochure above, leaving enough room at the shoulder to inset the brass Dots.

With the stem profile done, I laid out the drill bits required for the System stem – a 3/16″ drill bit to cut the filter pocket into which the end of the Rock Maple filter would sit, and a larger drill bit to create a mortise into which the aluminum tenon would be secured. The depth of these drillings was determined by mounting the salvaged aluminum tenon and a Brigham filter into the shank and measuring the protruding length.

A quick dry fit showed me that everything lined up and fit together properly.

Originally, Brigham press-fit the aluminum tenons into the stems and used the first brass Dot to pin it in place. I take a slightly different tack, gluing the aluminum tenon into the stem face with a bit of JB Weld high-heat epoxy. The Dots I install do not penetrate the tenon wall, so are purely cosmetic.
This pic shows the new stem gluing up. After applying the epoxy, the stem is slipped into place and the pipe clamped upright in a padded vise where gravity helps to keep the stem face flush against the end of the shank. A bit of masking tape holds everything in place while the epoxy cures.

I left the pipe in the vise overnight to give the epoxy full time to cure, then twisted the stem out of the shank and tidied up the airway, clearing the filter pocket of any excess epoxy with a drill bit turned by hand.
Things were looking good at this point, but the new stem needed its Dots. The VIP pinning pattern consists of three Dots, with the centre Dot larger than the other two. After carefully laying out and drilling the holes, I used CA glue to secure short sections of brass rod into the stem.

After the CA glue had cured, I used files and sandpaper to level out the new Dots and touch up the shank-to-stem junction. I could then sand the new stem to 2000-grit in preparation for final buffing. I used the touch-up marker again to blend the new work into the original finish.


A little heat softened the Vulcanite stem enough to allow me to apply the correct bend to the new stem. As when drilling the Vulcanite blank earlier, bending the stem is done with a filter in place to ensure the proper fit.

All that was left to do now was to take the finished pipe to the buffer for a run on the Red Tripoli and White Diamond wheels to remove the last stray sanding marks and bring up the shine. A few light coats of carnauba wax added more lustre and a layer of UV protection.
The refreshed pipe is now looking great and, more importantly, is whole again and ready to be put into its steward’s rack and rotation. The new stem, complete with vintage-correct aluminum tenon, looks like it has always been part of the pipe. I can’t ask for more than that! May this early Brigham Valhalla serve well for many years to come.
Thanks for joining me on another estate pipe restoration journey. I love working on these early versions of production pipes as I find the small variations fascinating. I hope you enjoyed following along!
Until next time, Happy Piping! Here’s the finished pipe.


Excellent restoration as usual Charles. Thank you for sharing.
LikeLike