
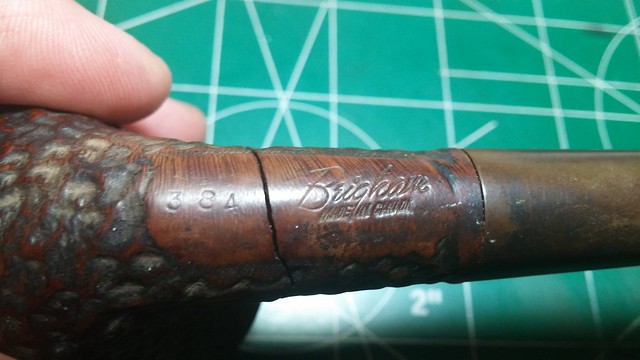
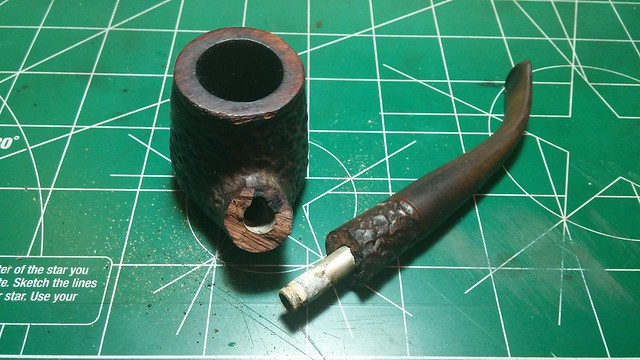
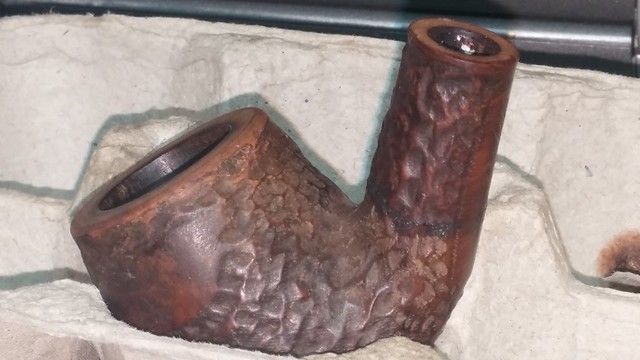
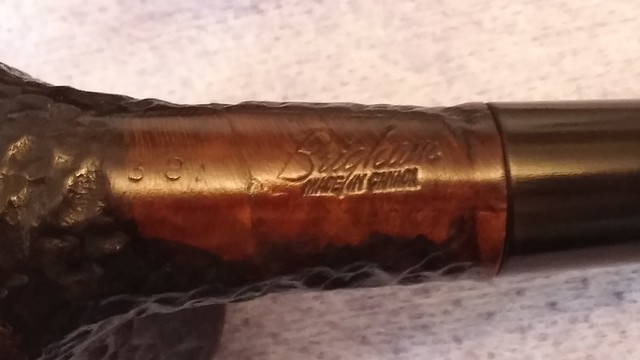
Just about the worst thing that can happen to a pipe smoker is damage to a favourite pipe. We wince at the smallest handling marks, dread rim dents and try our darnedest to keep our Vulcanite stems from oxidizing. So I can understand a panic reaction when something really dreadful happens to a favourite pipe. Take this 1960’s-era Brigham 384 Bent Brandy, for example, which had evidently been repaired in a hurry, probably by the same piper that witnessed the beheading of this pipe when the shank snapped off the bowl. Unfortunately, the piper’s initial, and likely quite panicked, response led to further complications.
The pipe was sent to me by a DadsPipes reader from New York State in the hopes that it could be made usable again. He had purchased as an estate pipe, but could not separate stem from stummel to give the pipe a proper cleaning. I agreed to said I’d have a look, and soon afterwards the pipe arrived on my workbench in Kitchener, Ontario.
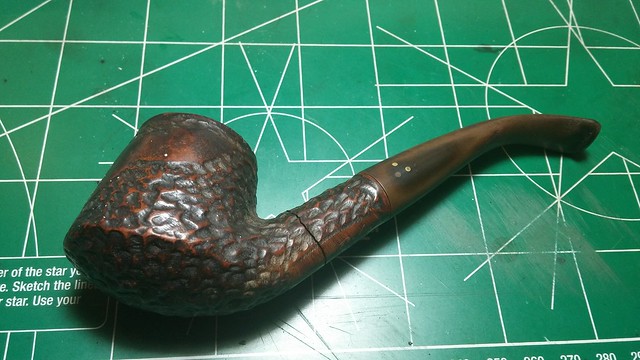
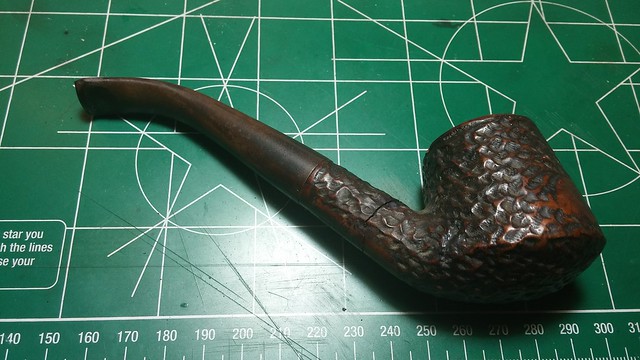
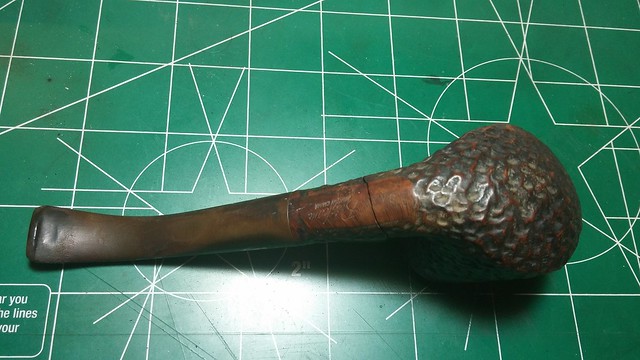
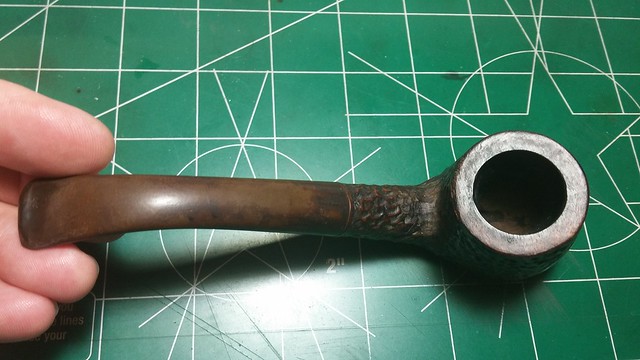
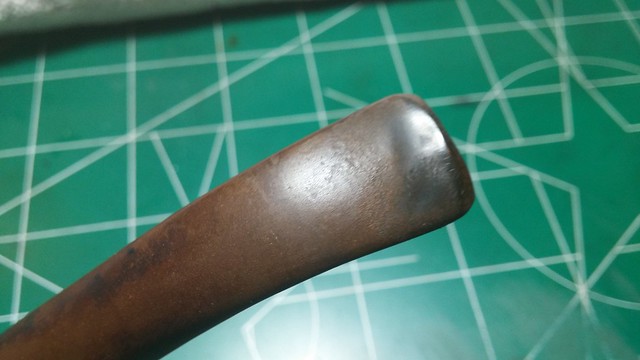
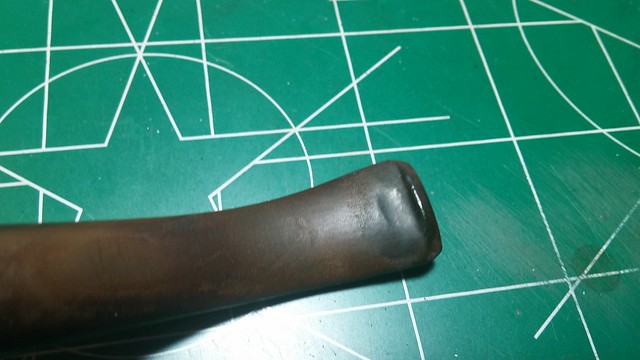
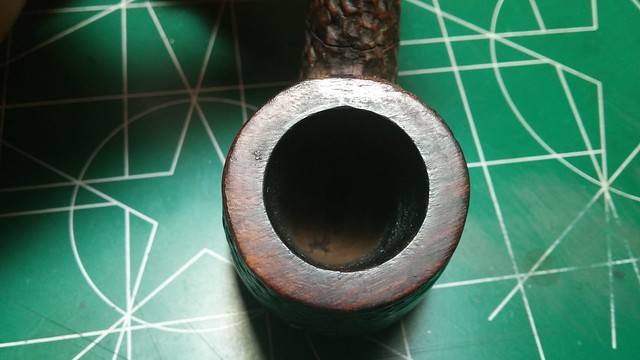
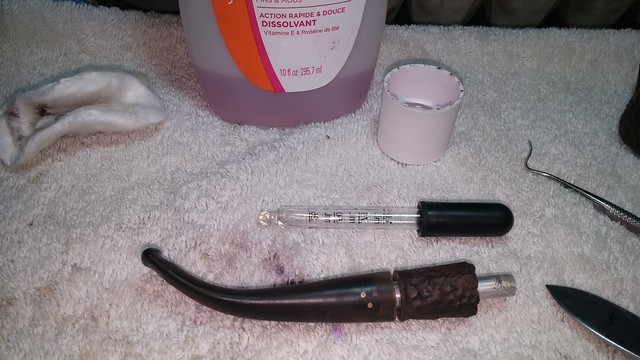
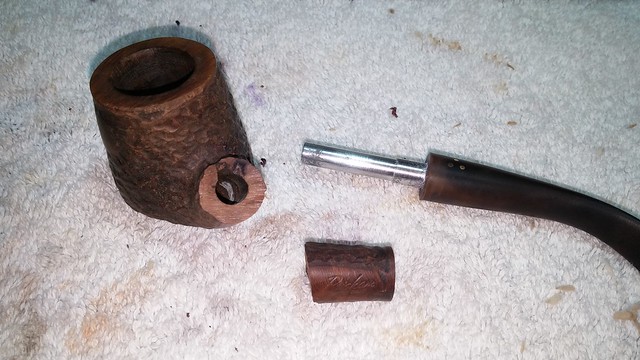
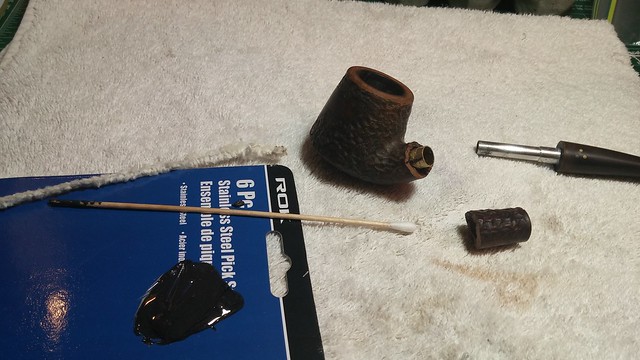
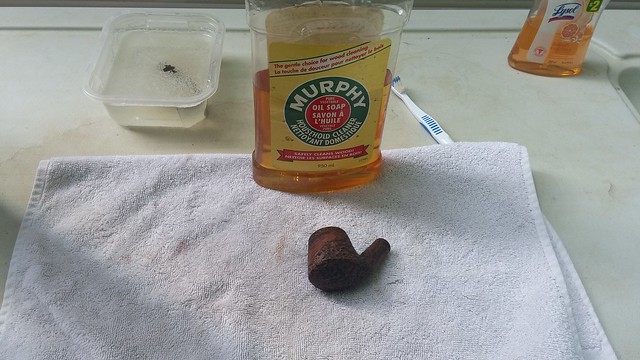
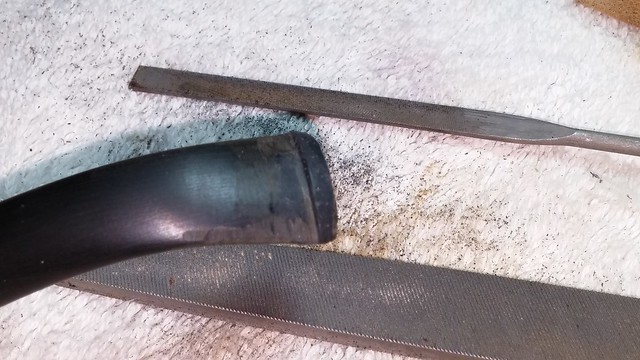
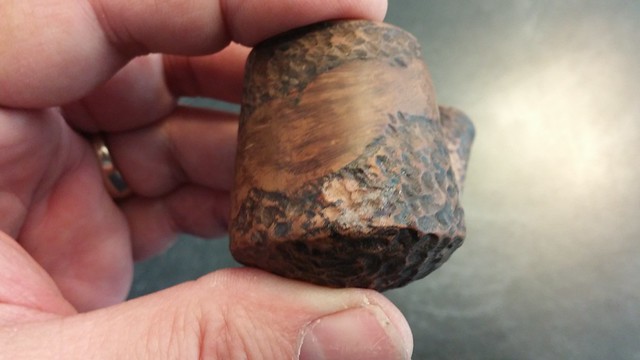
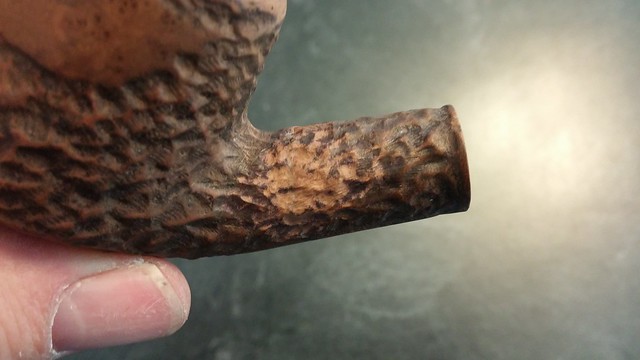
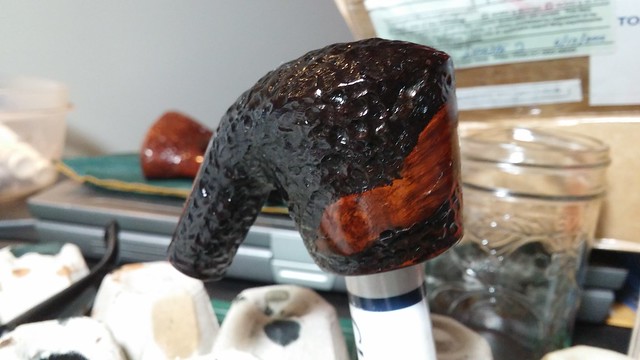
I took this series of pictures to show the condition of the pipe when it arrived. Barring the obvious shank damage, the pipe was in decent estate condition. There was a good layer of dirt and grime ground into the rustication, and the stem was heavily oxidized, though not enough to hide the mangled remains of the button. Our original owner was quite a clencher – there were deep tooth dents in the bit both top and bottom, and the button had been worn down to a nubbin. The chamber, however, was round and nicely reamed, and the rim was free of both lava and dents. If I could repair the shank, the rest of the pipe would clean up pretty easily.
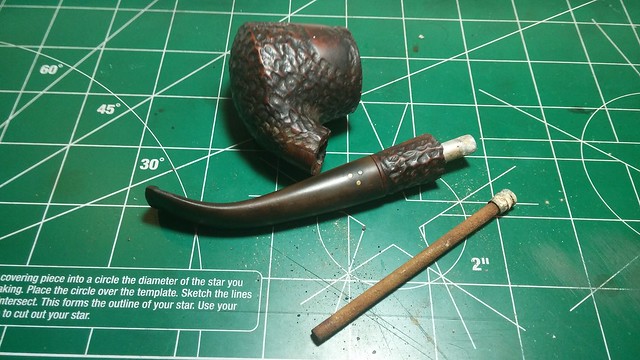
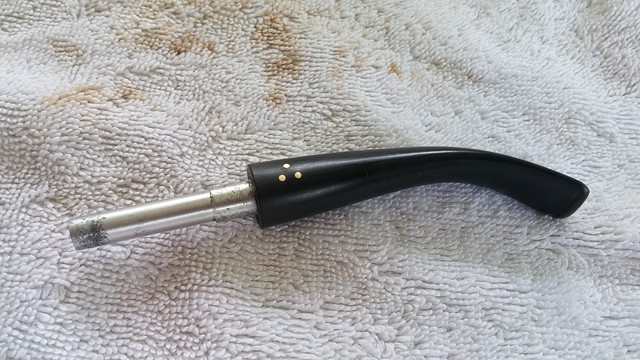
True to the owner’s description, the stem was FIRMLY stuck in the mortise. None of the usual remedies did the trick, so I dropped the entire pipe into an alcohol bath to soak overnight. The following day I fished the pipe out of the alcohol, dried it off and began working to get the stem moving. After a short bit of careful manipulation, the stem and broken end of the shank began to move. A bit more work had the stem out of the stummel, but the broken shank end was still stuck firmly to the stem’s tenon.
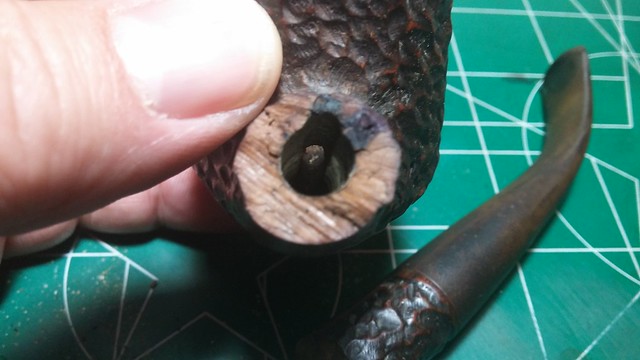
A quick look with a bright light confirmed my suspicions; the remains of white glue in the stummel’s airway told me that the aluminum Brigham tenon/filter holder had been used as an ersatz splint to hold the parts of the shank together. Why a rock maple filter was left in place inside the aluminum tenon is still a mystery to me – these filters, like all their brethren, are intended to be replaced when they get dirty, so why seal it up inside a jury-rigged pipe repair?
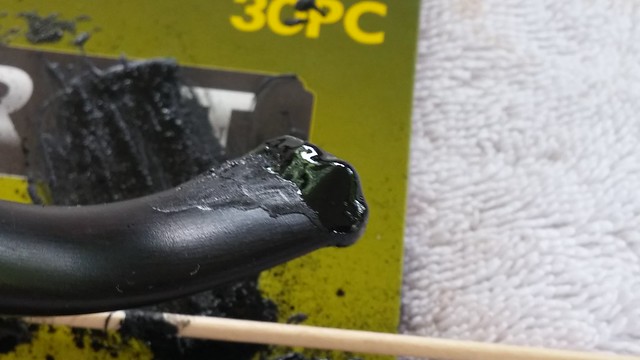
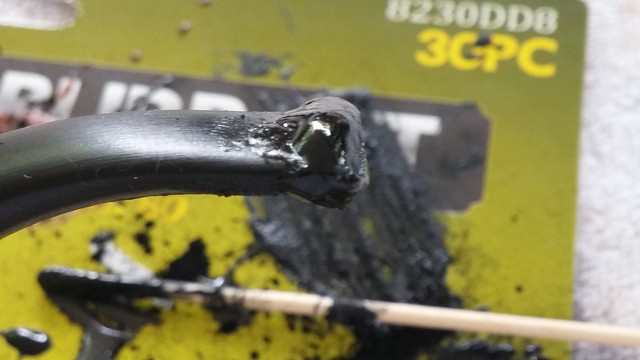
Now that I knew I was dealing with white glue, I set about working the broken shank end off the stem tenon. I dripped a bit of nail polish remover into the crack between the stem face and the shank and let it sit of a minute to work on the glue. Then I slid the blade of a pen knife into the seam and began slowly working around the tenon with a gentle prying motion to push the briar shank away from the stem. It took about 10 minutes of patient effort and a few more dribbles of nail polish remover to work the shank end completely free.
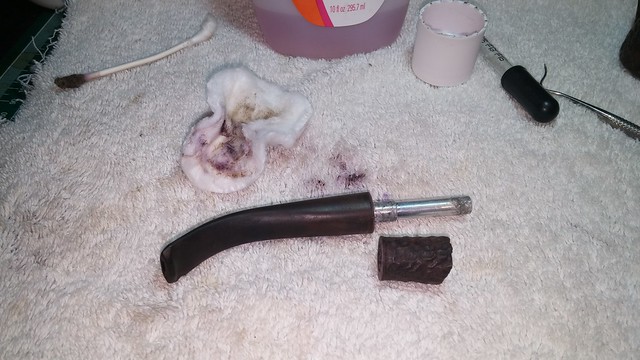
I used steel wool to clean up the aluminum tenon and a few cotton swabs and more nail polish remover to scrub the glue reside out of both the shank end and the stummel.
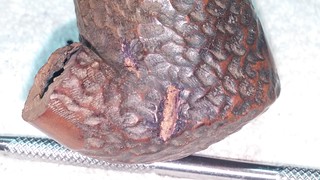
The long alcohol soak had softened a few fills in the briar, so I scraped out the old putty with a dental pick and refilled the cavities with a mixture of briar dust and CA glue. I would eventually blend in the fills later when I finished up the shank repair.
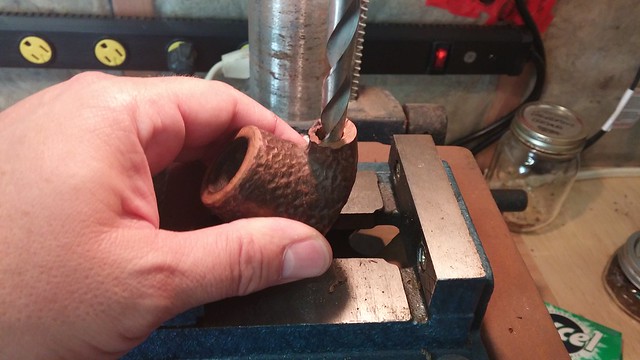
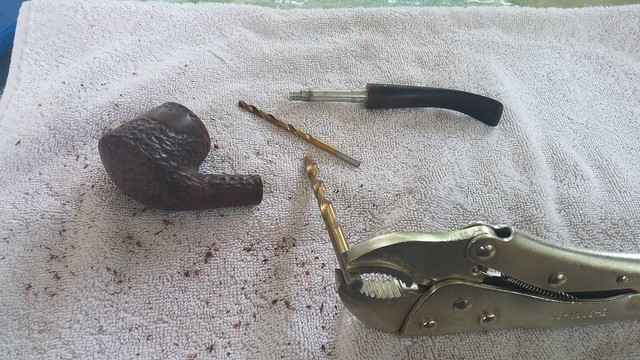
Moving on to the meat of this repair, I hit up my local hobby shop for a length of brass tubing with an interior diameter of 7.5mm to match the Brigham airway drilling. I would use a short section of the tubing as a splint or interior band to repair the break. I used my drill press to enlarge the airway on both sides of the break and make a socket for the brass splint. Rather than risk cracking the damaged walls of the briar shank, I used a series of drill bits and turned the drill chuck by hand, gently expanding the airway in easy stages until I hit the desired diameter.
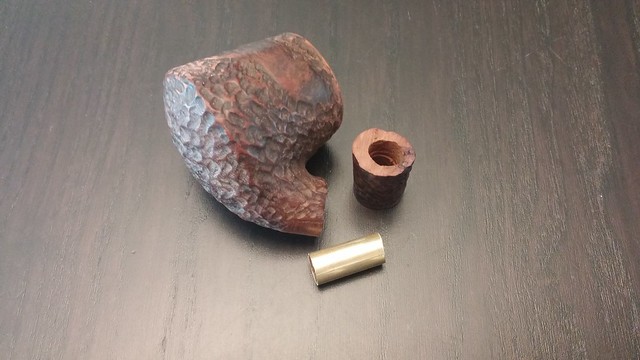
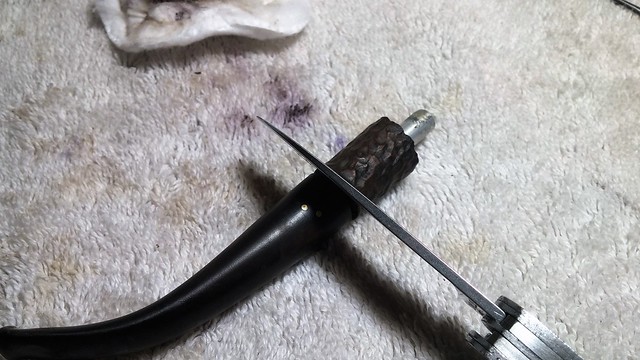
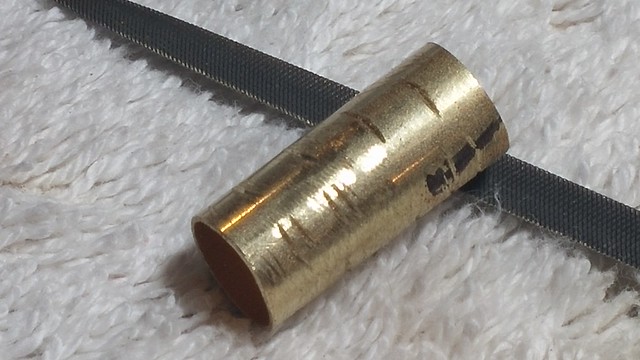
I cut the tubing to length and scored parallel lines around the exterior of the tube with a needle file. This would provide additional grip for the epoxy when I glued the repair together.
To set the repair permanently, I mixed a small amount of JB Weld epoxy, applied it to one end of the prepared tubing and pressed it home in the stummel end of the airway. A bit more JB Weld on the exposed end of the tubing secured the broken shank end in place. I clamped the pieces together, pressing out any excess epoxy. The repair then sat overnight to cure.
When the epoxy was fully cured, I reamed out the excess epoxy from the airway with a few drill bits turned by hand. There were a few blobs in there that had to come out before I could seat the stem fully with a filter in place.
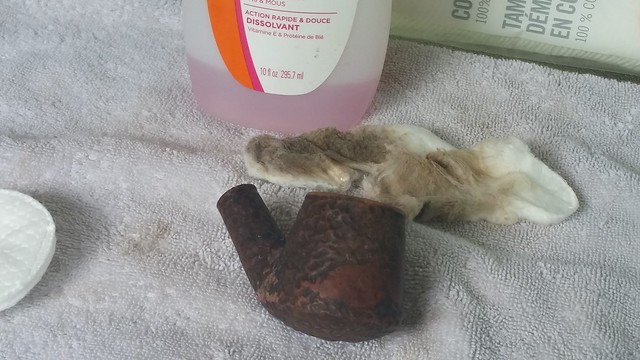
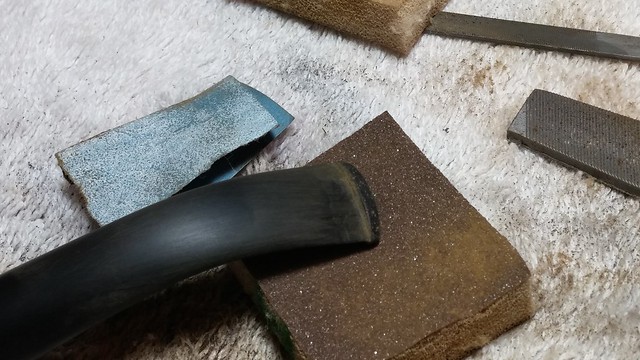
Now that the stummel was in one piece, I carried on with a general cleanup of the briar. I wiped away a lot of the dirt, grime and old wax with nail polish remover on cotton pads, and finished up with a good scrub with Murphy’s Oil Soap and an old toothbrush. The stem went into an Oxyclean bath to soften the oxidation.
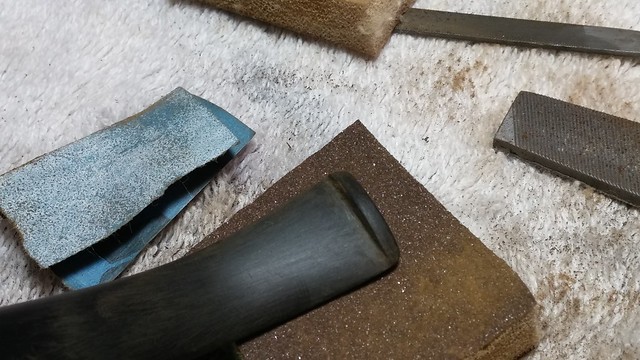
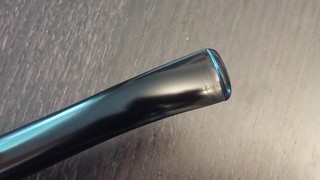
After a few hours, I scrubbed the stem with a sanding sponge to remove the worst of the oxidation. Any remaining discoloration would come off when I rebuilt the button.
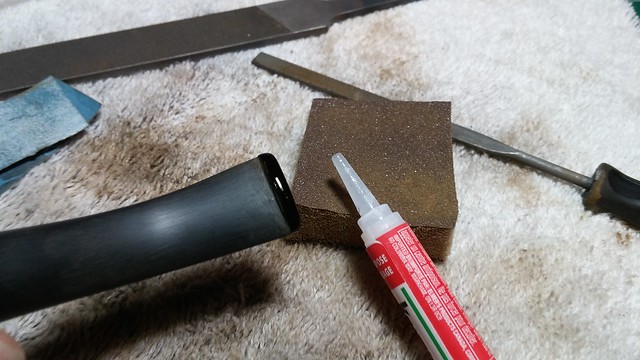
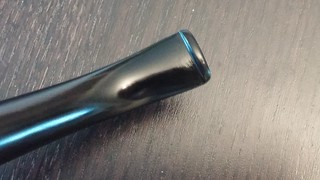
The button was almost nonexistent. I built up layers of think CA glue mixed with charcoal powder until I had both filled the tooth dents and had sufficient material in place from which to carve the new button. I let the CA glue cure fully before cutting and shaping the button with needle files and sandpaper.
I often find it necessary to apply a few coats of clean CA glue after rough shaping of the button is complete. This fills in the tiny air bubble that can get trapped in the CA/charcoal mixture, ensuring a smooth finish to the new button.
When I had the button looking the way I wanted, I sanded the stem with progressively finer sandpapers and sanding sponges to erase the scratches left by all the repair work and prep the stem for buffing.
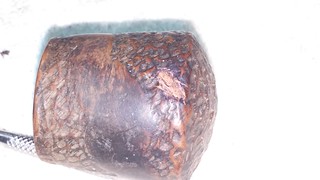
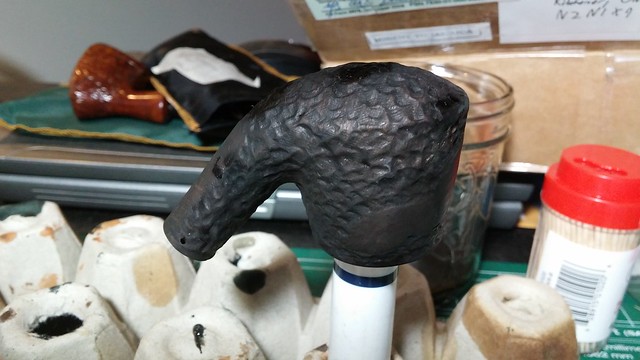
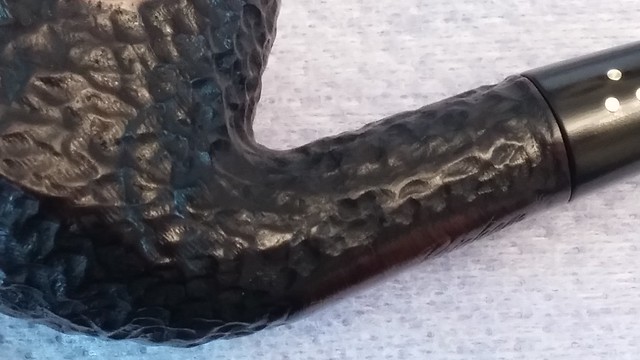
I set the stem aside and moved back to the stummel. It was functional again after the shank splice, but it was looking a little rough around the edges. I used my rotary tool and a tiny round carving burr to level out the fills and blend them and the shank repair into the original rustication.
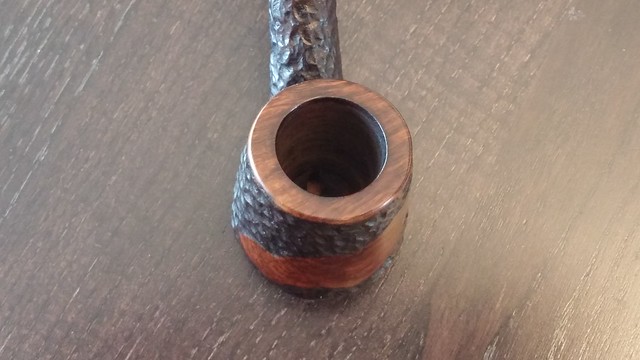
Then it was time to stain the briar and bring it all together. I applied a 2-colour finish of black rustication and red/brown smooth areas to replicate the factory Brigham finish. If you’ve read some of my previous Brigham restoration posts, you may find this process familiar. A base layer of black Fiebing’s leather dye was applied to the entire stummel, then scrubbed off the smooth areas, leaving the rustication dark and highlighting the grain in the smooth areas. Then a top coat of a blend of Saddle Tan and Dark Brown dyes was washed over the briar to give a warm reddish glow to the smooth rim and decoratively carved areas.
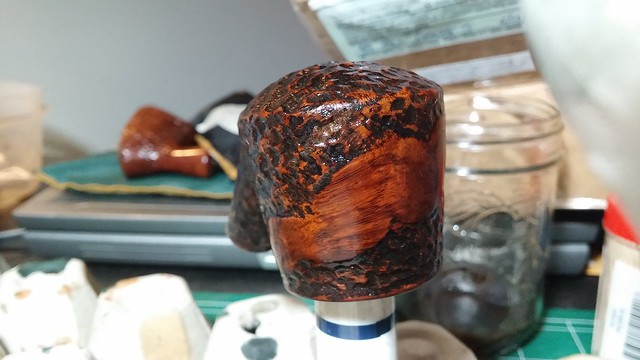
To push the shank repair further into the background of the rustication, I reapplied the black dye to only the rusticated areas. This did the trick and had the nice side effect of making the red/brown smooth areas really pop. A final wipe of mineral oil helped to set the final colours and add a bit of moisture back into the wood.
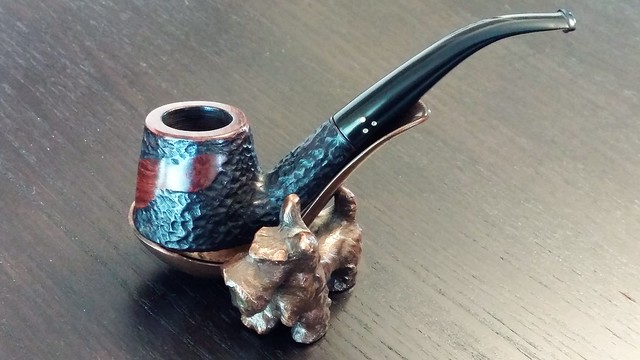
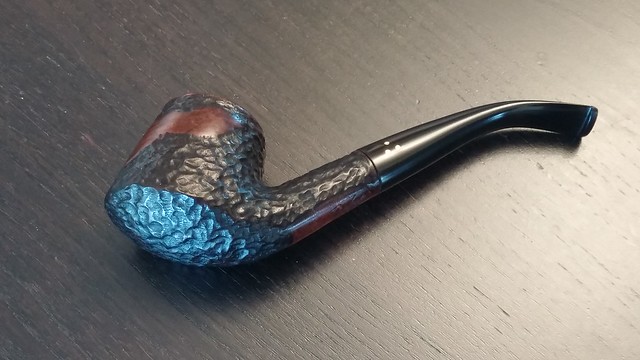
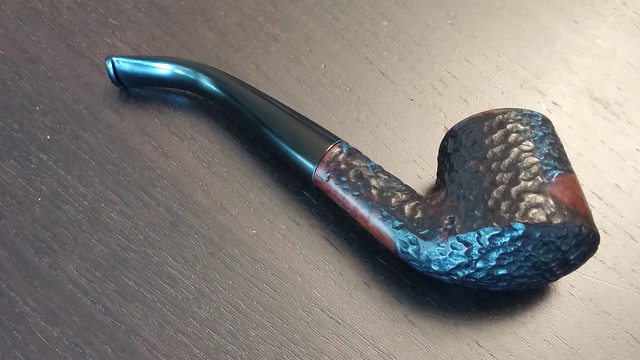
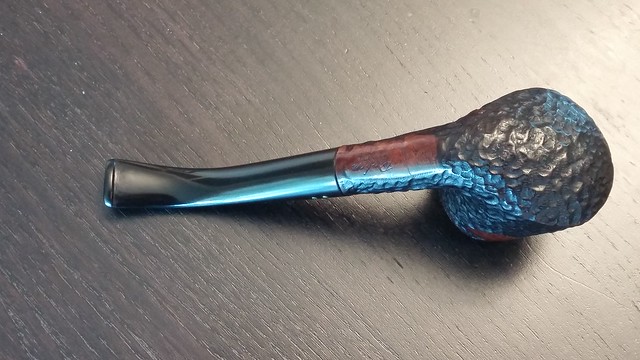
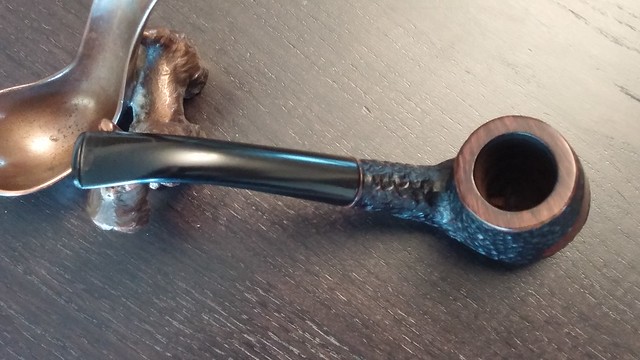
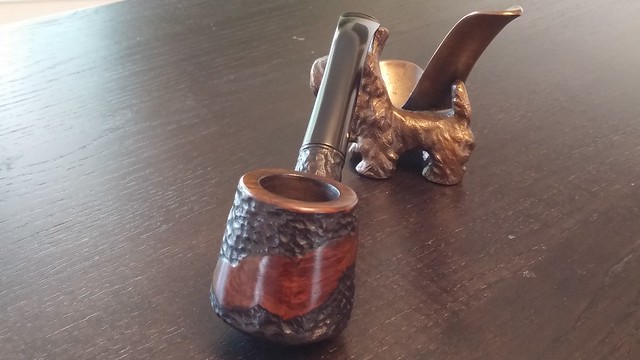
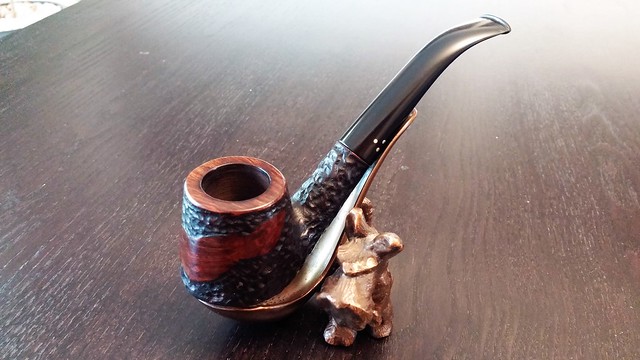
Then it was time to take the pipe to the buffer where both stem and stummel were treated to White Diamond compound and several coats of Carnauba wax to protect the new finish. I’m quite pleased with the end result – the smooth areas of the stummel shine like amber against the dark rustication, and the shank repair is practically invisible except where it bisects the smooth patch on the underside of the shank. The new button is also a very welcome improvement over the old chewed-up stem. This Brigham 384 is ready to rejoin its new owner for years of companionable use.
Here’s the finished pipe. Thanks for looking, and until next time, Happy Piping!

That is simply amazing work. Been a pipe man for more than 30 years and I really enjoy seeing your handiwork. Great repair. Thanks for sharing.
LikeLiked by 1 person
Thanks much, Jeff. High praise indeed!
LikeLike
Wow, Charles! A lot of work went into that one. It’s a beautiful pipe…now. A side note: if you haven’t tried Whiteknight yet, give it a go. I think you’ll like it. Had my first taste this week and like it.
LikeLiked by 1 person
Thanks Dave. I’ll look up Whiteknight!
LikeLike
A beautiful pipe, beautifully restored. Great work once again.
LikeLiked by 1 person
Charles, that is an amazing job on a pipe that needed extensive repairs. It now looks fantastic!
LikeLiked by 1 person
What a clever repair. “It looks like it growed that way”, as my old shop teacher used to say.
LikeLiked by 1 person
Charles, nice save! The internal band idea was great. You almost cannot see the crack where it was broken. I’ll need to file that one for future reference.
LikeLiked by 1 person
Thanks. Rustication is s great way to hide repairs.
LikeLike
Reblogged this on Papaw's Pipes and commented:
Charles is a friend and fellow pipe restorer. He does some great and pretty unique repairs in my opinion. Here’s one I thought you might enjoy.
LikeLiked by 1 person
Great job, Charles! I reblogged this on my new site papawspipes.wordpress.com
LikeLiked by 1 person
Thanks Greg#
LikeLiked by 1 person
Charles, this post was definitely a clinic in different techniques! I appreciate the details which help the newcomers a bunch. This one is going into my resource file. Thanks!
LikeLiked by 1 person
Thanks Dal! Hope it comes in handy for you.
LikeLike