
My affection for vintage Brigham pipes is evident to anyone browsing this blog. Many of my restored Brighams have been showcased on the site, and I own more Brigham pipes than any other brand (currently 15 of the 55 or so pipes in my man-cave), ranging from run-of-the-mill 1-Dot Standards through to top-of-the-line Presidential Freehands. There is, however, a gap in my collection at the top end, specifically the 5 through 7-Dot range of what Brigham Pipes now calls the Classic pipes. My aim with this blog post is to narrow the gap slightly with the restoration of this Brigham 565, my first 5-Dot (500 Series) pipe.
I spotted this example of Brigham’s Special Grain line on eBay a few weeks ago, and was lucky enough to snag it just two days before my birthday, and three days before I took off with the family for a bit of vacation. The pipe was delivered while I was away, so I had to wait until after Christmas to open the box. I can tell you I was both excited and relieved when I finally held this old pipe in my hand! The auction listing pictures were fairly accurate (not always the case), and the pipe was in fairly decent used condition when I got it.
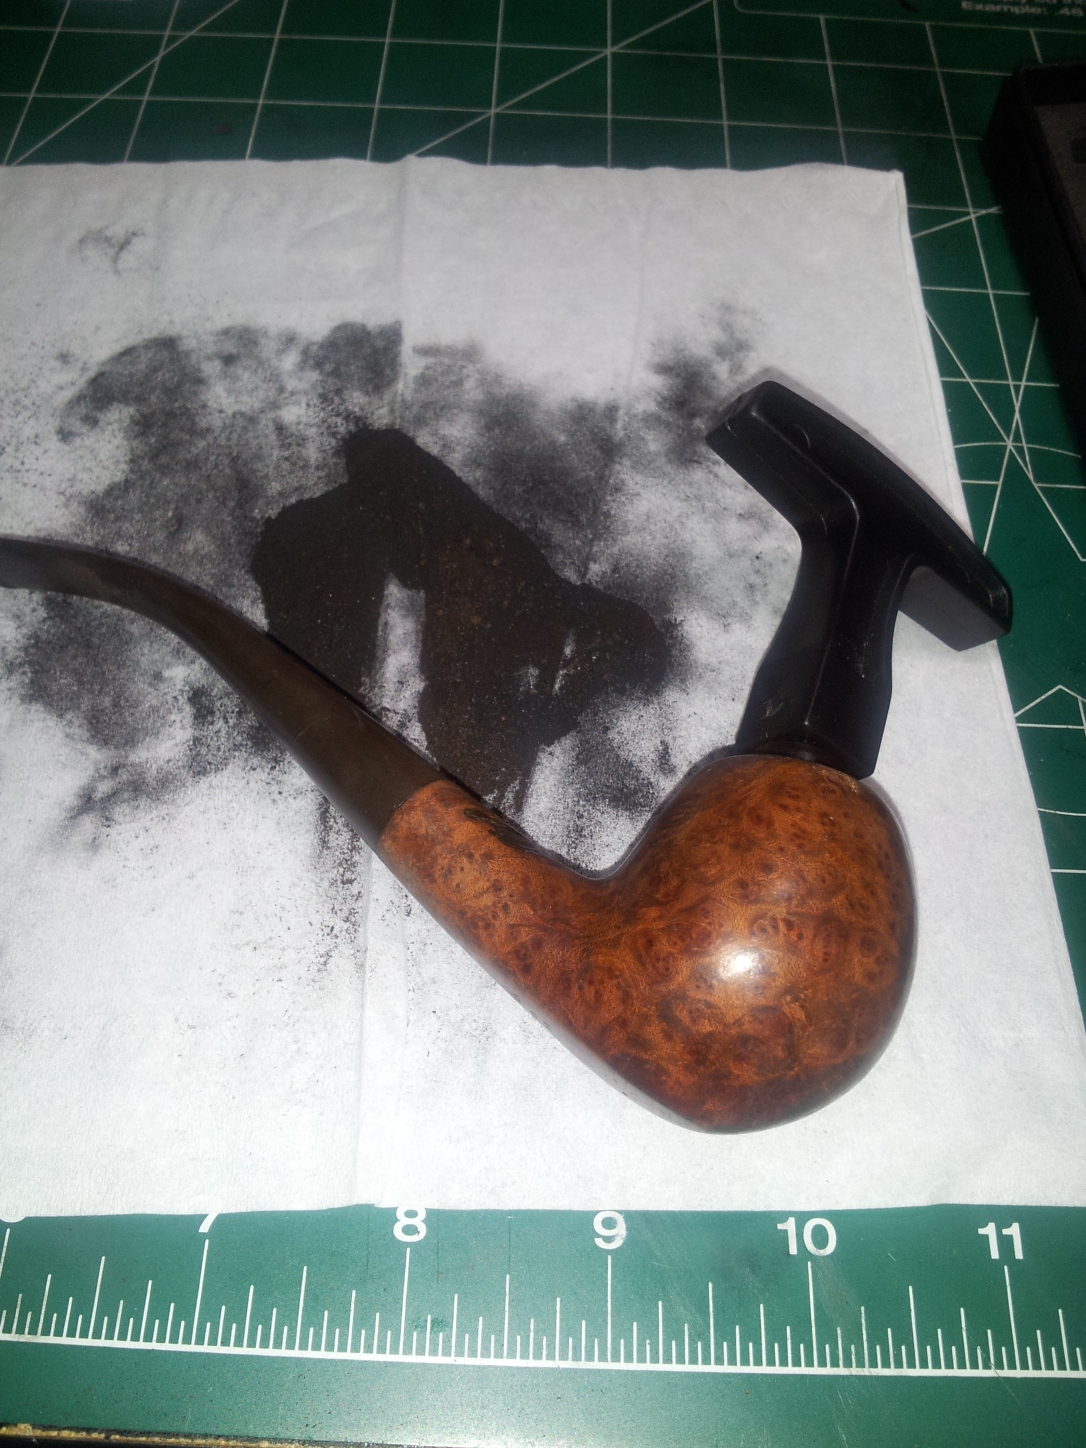
The 565 is a unique Brigham shape – kind of a cross between an Acorn, a Bent Billiard and an Apple. The piping community must have taken to it though, as Brigham is still making pipes in this shape, though now from Italy instead of Toronto, Canada. This example is stamped with only the Brigham script logo and the shape number. Apart from a layer of grime on the exterior surfaces and a middling buildup of cake in the bowl, the biggest issue with the pipe was a patch of “road rash” around the rim caused by knocking the pipe out on whatever surface was handy. There were also small handling marks elsewhere on the stummel, but no major dents or damage. Tantalizing bits of flame grain and birdseye poked out through the dirt here and there, which gave me high hopes for the post-restoration pipe!
The pipe’s stem was lightly oxidized and had some tooth chatter top and bottom of the bite area, but nothing that wouldn’t come out with a bit of work. The internals of the stem would prove to be in need of the most work, as the pipe had obviously been well used without the benefit of the Brigham rock maple filter. The inside of the aluminium tenon was caked with a smelly, clay-like amalgam of tars, moisture and bits of old tobacco. Ick.


I started the cleanup by reaming the bowl back to briar using my Castleford reamer. I started with the smallest cutting head and worked up to the head that best fit the internal diameter of the chamber. The reamer left a small patch of cake on one side of the chamber, which I sanded out with a scrap of 220-grit paper.
I dropped the bowl into an isopropyl alcohol bath to soak off the grime and the remnants of the old finish. I knew I’d be sanding the bowl later to remove the pipe knocker road rash, so any old stain that came off in the bath would save me the sanding work later.
While the bowl soaked, I started work on the stem. I used a drill bit, turned by hand, to auger out the worst of the tarry crud built up in the tenon/filter holder. A dental pick came in handy for cleaning out the slot at the end of the bit – the tars had filled in the Y-shaped slot until only a small bit of the airway was still open. The original owner was apparently fond of the sour flavour of old tars, but this stem was not going into my mouth until it was sparkling again!

The stem went into an Oxyclean bath to raise the oxidation and loosen up any remaining muck in the airway. I switched my attention back to the stummel, pulling it out of its alcohol bath and cleaning the shank and airway with a combination of bristle and fluffy pipe cleaners and more isopropyl.

I finished up the basic cleaning a bit later when the Oxyclean had done its magic on the stem. I scrubbed away the oxidation and dirt with Magic Eraser and 0000 steel wool, then smoothed and polished the stem with 600 – 2000 grit wet sandpapers. A handful of pipe cleaners dipped in isopropyl removed the last of the muck from the airway.

I reassembled the pipe and shot this series of pics to judge progress to this point. It’s going to be a good-looking pipe!


I covered the stampings with bits of electrical tape before starting to sand out the road rash around the rim of the bowl. Experience has taught me that I can get a bit too enthusiastic sometimes, and I didn’t want to accidentally destroy the stamps. With the tape in place, I worked with 220-grit sandpaper and medium and fine sanding sponges to gently smooth out both the rash around the rim and the handling marks on the stummel. When I had worked out all the flaws, I went over the briar with 0000 steel wool to remove any remaining sanding scuffs and bring out a bit of shine in the wood.


With the stummel ready for stain, I took 220-grit paper to the stem to remove the tooth chatter on the top and bottom of the bite. It didn’t take long to smooth the stem. I followed up the sandpaper with medium and fine grit sanding sponges and finally steel wool to remove the sanding scratches.
I reassembled the pipe at this point to do a final sanding before staining and finishing. A light going-over with 1000 and 2000 grit wet paper polished up the briar and the stem. I then applied a constrast stain to enhance the grain, starting with a coat of Fiebing’s Black leather dye. I applied the stain, let it dry and then scrubbed off most of the stain. This left the stain in only the softer grain. A top coat of a lighter stain allows the grain to pop through and show itself off to full advantage. In this case I used a blend of Dark Brown and Saddle Tan leather dyes that I’ve started thinking of as “Brigham stain”, as it very closely approximates the reddish-brown Brigham “Royal” finish. I finished off the staining by rubbing the stummel with a bit of mineral oil on a cotton pad. This really helps to bring out the red colours and gives the finish depth.


Then it was off to the buffer where stem and stummel received a run of White Diamond compound and several coats of Carnauba wax. The pipe took the wax like a duck to water, resulting in a deep, glassy shine that really makes the grain stand out. I’m looking forward to a first bowl with this pipe very soon. I also hope to fill in the rest of the gap in my Brigham collection over the next year – those 6 and 7-Dot pipes are out there somewhere!
Here’s the finished pipe.


Great job. Love these old Brighams. That is a great shape.
LikeLiked by 2 people
Thanks Steve. I’ll have 2 of this shape if I ever get time to work on the 365 in my box waiting for a new stem 🙂
LikeLiked by 1 person
Great job on that Brig. At least now I know where that other one went I was bidding on…lol
LikeLiked by 1 person
Nice work Charles. I saw this pipe on ebay recently and almost put a bid in on it myself. It looks awesome.
Paul
LikeLiked by 1 person
Thanks Paul! Keep an eye out for a Brigham 613 coming soon ;-D
LikeLiked by 1 person
Great looking job on that Brig. At least now I know where the other one went I was bidding on….lol
LikeLiked by 1 person
LOL! Whoops! I think we both got one that day though 😉
LikeLiked by 1 person
Is that a Brigham Valhalla in your profile pic? Sweet!
LikeLiked by 1 person
Yes we did. I just picked up another one from him. Psst…a little secret, I’ve been buying from him for about 2 years and he is an awesome seller.
LikeLiked by 1 person
No I think it is just a VIP pipe. The stem doesn’t match my pamphlets.
LikeLike
Looks like it has the same pinning pattern as my President Freehand. Wrote that one up on the blog here too. Kind of an oddity as it has the Valhalla pinning pattern but it clearly stamped as a President series freehand. Early crossover, I think.
LikeLiked by 1 person
If you ever want to talk Brighams let me know. I am building a Brigham empire…lol
LikeLike
Always happy to talk Brigs with another enthusiast! 🙂
I keep hoping to find a definitive history of the company & the pipes, but so far no luck. The recent website update is a bit more coherent, but still patchy on detail. We may have to team up and write one!
LikeLiked by 1 person
Give me a week or two. I have a little background I am building about Roy Brigham. His grandson Michael has emailed me with a little history and is sending me some stuff.
LikeLiked by 1 person
Now there’s a teaser! Looking forward to seeing what you put together.
LikeLiked by 1 person
A super job, Charles. I love the Birdseye on that briar. I see why you like Brighams.
LikeLiked by 2 people
Reblogged this on rebornpipes and commented:
Love this unusual Brigham shape and the pins on the stem. Well done Charles.
LikeLiked by 2 people
A happy belated Birthday, and well done adding this beauty to you collection. The stain is outstanding.
LikeLiked by 1 person
Thanks Dave! I’m very happy with the way this refurb turned out. If I’m lucky I’ll be able to add a 6-Dot before another birthday rolls around 😉
LikeLike
Love The Birdseye Grain In That Pipe,And The Shape Is Outstanding.Kudos
LikeLiked by 1 person
I agree, Terry. The 65 shape is still in production today, which says something about its appeal. It’s a unique Brigham shape that’s been around since at least the late 1950’s or early 1960’s.
LikeLike